


How Long Does It Take To Install A Garage Door Opener?
Garage door openers typically don’t get much thought until they quit working. When the garage door won’t go up or come down, things can get frustrating. The frustration grows when you discover the garage door opener is history.
Your next thought is usually, “How long does it take to install a new one?” Or “ how long should your garage door opener last?”
It can take 4-6 hours to install a garage door opener for the average homeowner. Installation can take longer than 6 hours if there are no existing ports or connections and you run into delays. You can save 30 minutes if you use existing brackets when you replace a garage door opener.
Most new garage door openers make homeowner installation easy. There are differences in the installation processes for each manufacturer. However, there are a few installation steps that all garage door openers have in common.
Do You Need Garage Door Opener Installation or Replacement?
Get free, zero-commitment quotes from pro contractors near you.

How Long Does It Take To Install A Garage Door Opener?
When you install your garage door opener it can take anywhere between 4 to 6 hours to complete the process. However, if there are no existing connections, this can cause delay and the project will take longer.
Steps For Installing A Garage Door Opener
- Make sure you have all the parts.
- Put the rail sections together.
- Attach the rail to the motor unit
- Install the chain to the rail and motor pulley
- Attach the brackets and supports to the ceiling and walls
- Hang the opener from the brackets
- Place the controls in a convenient spot near the door to the garage
- Install the safety devices
- Program the opener and the remotes
- Test the opener
Step 1: Find and Identify all the Parts
The installation guide should have a diagram identifying the parts included in your garage door opener. Make sure you have all the parts before going any further. If parts are missing, take the entire opener back for a replacement.
Organize the parts and sort them according to size. Sorting the parts by size will make the installation process go much quicker. This process should take about 15 minutes.
Step 2: Assemble the Rail Sections
Follow the manufacturer’s directions and assemble the rail sections. Some rails are tubular, and others are T-shaped. Pay attention to which end attaches to the motor unit. Lay the complete rail on the floor, running in the right direction.
The instructions may also require you to install the trolley that rides on the rail now. The trolley usually has a front and back. Pay attention and make sure the trolley is running the right way on the rail. This step could take as much as 30 minutes to complete.
Step 3: Attach the Rail to the Motor Unit
The rail unit attaches to the motor unit, usually on the top. Using the right bolts and washers is crucial to keep the garage door opener operating correctly. Put a piece of the cardboard box under the motor unit to prevent scuffing or damaging the cover.
The motor unit is the heart of the garage door opener. It is also the heaviest part and contains the electronics that control the door. Putting the rails in place is easily accomplished in 15 minutes.
Step 4: Install the Drive Chain and Idler Pulley
Follow the directions in the installation manual carefully in this step. The chain that connects the garage door to the opener is not a continuous loop. The ends connect to the trolley on the rail and loop around the drive sprocket and the idler pulley.
It is essential to install the chain precisely as the manufacturer recommends. Several factors affect how well the garage door opener works.
- The tension on the chain
- The attachments to the trolley
- The way the chain feeds through the idler pulley
Tensioning the chain can be the trickiest part. If the chain is too loose, it may jump off the drive sprocket. If the tension is too much, the extra pressure on the drive sprocket can damage the sprocket or the motor. Take your time. This step may take 45 minutes.
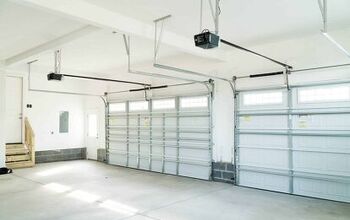
Step 5: Install the Brackets and Supports to the Ceiling and Wall
Two sets of supports must be installed on the ceiling and above the garage door. These hold the motor unit and the end of the chain rail. Each garage door opener design has different requirements for where and how to mount the support brackets.
Refer to the installation manual for specific instructions. Carefully installing the support brackets will put the garage door opener in the proper alignment for smooth, trouble-free operation.
Saving Some TimeIf you are replacing a garage door opener, you may be able to use parts of the existing brackets for the new garage door opener. Using the existing brackets can save you some time on this step.
If this is a new installation, allow at least one hour to install the brackets. If you are replacing a garage door opener, you may be able to accomplish this step in 30 minutes.
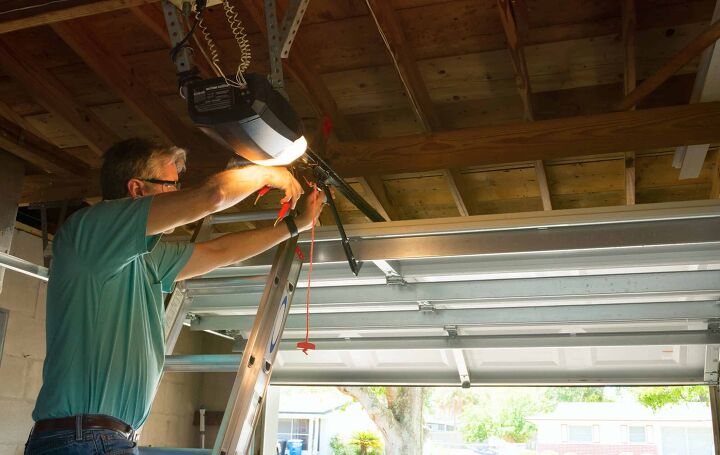
Step 6: Installing the Opener in the Brackets
Typically, two lengths of angle iron or perforated metal attach the motor unit to the brackets on the ceiling. The rail attaches to the bracket installed above the garage door on the wall.
Take care during this step. The motor unit is cumbersome and unwieldy. A second set of hands is often useful at this point. An A-frame ladder is also helpful.
Follow the installation guide when mounting the motor unit and rail to the brackets. Most installations suggest that you attach the rail to the bracket above the door. Once the rail bracket is secure, pivot the motor up to the brackets on the ceiling.
You should allow about 30 minutes for this step.
Step 7: Place the controls for Your Convenience
It may come as a surprise, but this step is usually the most time-consuming. There are several components to the control systems that require installation and fine-tuning. The opener controls may include
- A master door controller that should be mounted near the door from the house into the garage
- A remote keypad that controls the door from outside the garage
- The safety devices mounted near the floor on each side of the garage door opening
Wireless vs. Wired Technology
Many new garage door openers employ wireless technology. Wireless control is a huge timesaver. Otherwise, this step requires you to run a wire from each control to the opener motor box. Unfortunately, safety devices usually require wire and don’t operate wirelessly.
Installing safety devices at the bottom of the door needs careful attention. These safety devices operate with a beam of light. If anything interrupts the light beam, the opener will stop operating. The precise alignment of the two sensors is critical to smooth operation. For more information about aligning the sensors on your new or existing garage door, see this article.
If your opener requires running wire, this part of the installation can take as much as an hour to accomplish.
Step 8: Adjust the Door Travel
With the opener installed and all the control in place, the next step is to adjust the up and down travel of the garage door. You do this from the opener motor unit. Follow the instructions for adjusting the up and down travel of your garage door in the installation guide.
At this time, it is also a good idea to program any remote controls included with the garage door opener. The remotes may also include programming the remote external keypad and the master control panel.
You should accomplish this part of the installation in 30 minutes or less.
Step 9: Test the Door and the Safeties
With the installation complete and the programming done, test the garage door opener. Operate the door up and down while checking for:
- Smooth operation up and down with no binding or catching as the door moves
- Easy motor operation without any struggle to lift the door
- Check the travel. The garage door should stop with the bottom seal, just barely touching the ground and stop before the trolly hits the motor unit.
- The operation of the safeties. Break the beam between the safety sensors and see if the door stops
- Test each remote, the keypad on the exterior, and the master controller near the house door
Performing these tests should not take you more than 30 minutes. Allowing time to make any minor adjustments is wise.
Do You Need Garage Door Opener Installation or Replacement?
Get free, zero-commitment quotes from pro contractors near you.
Final Thoughts
That’s all there is to it! A garage door opener installation complete in less than six hours. With only a few basic tools, the installation of a new garage door opener is within the capabilities of any DIY’er. Now you can enjoy the safety and security of a well-functioning garage door opener for many years to come.
Related Questions
How much does Home Depot charge to install a garage door opener?
If you prefer to have an expert tackle the install of your garage door opener, Home Depot is a great place to find professional installers. Garage door opener installation through Home Depot starts at $127. This price includes the removal and tow away of old openers and other materials.
Can a garage door opener unit be replaced without changing the rails?
In most cases, no, you cannot repurpose the rail since they won’t be the exact same dimensions. Unfortunately, there isn’t one standard sizing and even if you go with the same manufacturer, sizing can change over the years.

We are a team of passionate homeowners, home improvement pros, and DIY enthusiasts who enjoy sharing home improvement, housekeeping, decorating, and more with other homeowners! Whether you're looking for a step-by-step guide on fixing an appliance or the cost of installing a fence, we've here to help.
More by Upgraded Home Team


![How To Reset A Whirlpool Cabrio Washer [In 5 Easy Steps!]](https://cdn-fastly.upgradedhome.com/media/2023/07/31/9076531/how-to-reset-a-whirlpool-cabrio-washer-in-5-easy-steps.jpg?size=350x220)