How Do I Turn Off My Descale Light On My Keurig?
Keurig’s are great to have, especially if you like to enjoy a quick cup of coffee without wasting an entire pot of coffee. While the smart coffee machines are simple to use, they can be annoying, especially when the descale light comes on. This usually causes a mess and keeps you from being able to use your machine. So, how do you turn it off?
To turn off your Keurig descale light, take the pod out of the system and check the needle to make sure it’s not jammed. If this doesn’t solve the issue, check the tubes for clogging. If everything checks out, your machine may need to be descaled. Descaling the machine will turn your descale indicator light off.
Below we will take you through the necessary steps to turn off your descale light and get your Keurig functioning like usual again!
Why Is My Keurig Descale Light On?
The descale light is a normal part of most coffee machines across the board. When the light is illuminated, this is to let you know that your coffee machine needs to be cleaned.
When calcium or dirt particles build up on the interior components of the machine, blocking it up, the light turns on. This can cause the device to stop functioning occasionally.
Sometimes, if you pack your K-cup too full, this can cause the water flow to back up, trigging the descale light. In this instance, you can take the cup out, repack it, and this should turn your light off.
Why Should I Turn Off My Keurig Descale Light?
When your Keurig light is on, this can cause your machine to stop working until the light is off. It’s a simple fix and will not take you longer than an hour or so to fix.
While it is annoying, it is best to turn off your light so that your unit can operate correctly in the way that it is meant to.
When Should You Descale Your Keurig?
Descaling a Keurig coffee machine per three to six months is highly advised by Keurig. This should aid in preventing the formation of calcifications or scale. That way, you are not stuck trying to fix the light again when you want a quick cup of coffee.
If you live in an area with hard water, you might want to descale more often, such as once a month. You do not have to wait for the light to turn on to descale your Keurig; you can do it anytime your coffee tastes a bit weird. This usually means that it has built up a good amount of calcium deposits again.
The procedure of descaling involves clearing the coffee maker of accumulated calcium and other minerals. As a result, your coffee will taste better, and your machine will last longer.
How Do You Turn Off The Keurig Descale Light?
The easiest way to turn off your descale light is by a process of elimination. If your Kcup is packed too tightly, it might just be as simple as you removing the pod from the system.
Or, maybe your unit really needs descaling. Below are a few steps you can take to get your descale light to turn off:
- Unplug your Keurig. Pull the plug on your Keurig and make sure there is absolutely no power running to it.
- Empty the water. Remove any remaining water from the reservoir.
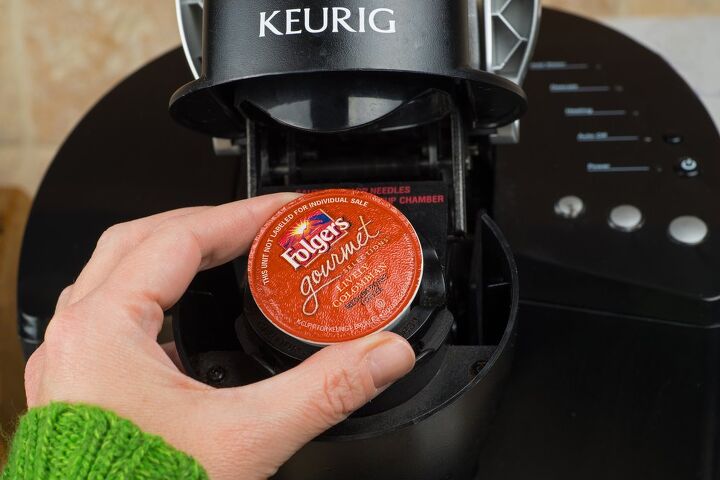
- Remove your pods and the filter. Remove the coffee pods and water filter from the unit.
- Insert your water catch. Place your coffee cup where it typically goes on the tray. It will collect used descaling solution or water.
- Plug the unit back in. Reconnect the power to your device, but hold off on turning it on.
- Activate your descale mode. Holding down the 8-ounce and 12-ounce buttons on your machine simultaneously for three seconds will activate the Descale Mode. When the device turns on, the brew button ought to start blinking. Your descale light will become solid if it was previously flashing.
- Follow your instructions on your solution. Your machine is currently in descale mode and anticipates being descaled. Use your container of descaling solution and follow our instructions on how to descale a Keurig if you haven’t done it in a few months.
- Add some water. Even if you recently descaled it, the light won’t go out until you’ve brewed over two full reservoirs of water. Water should be added to your reservoir before pressing the blinking brew button.
- Empty your water catch. When the coffee mug is completely filled with water, empty it. Reposition the mug and push the brew button once more.
- Repeat steps. Run the brewing until the light instructs you to add water by blinking on. Repeat the same procedure until the “ADD WATER” light illuminates a second time, then refill the reservoir once more.
- Go ahead and use your machine! Your Keurig will exit Descale Mode, and the light should finally go off after running through two full reservoirs.
How Do I Reset My Keurig Duo?
It will be a little bit harder to get the light to go out if you own a Keurig Duo. The Duo has a decanter and a single-serving coffee maker. Both should be descaled before manually resetting the light.
To reset your Keurig Duo, simply press the 8-ounce and 10-ounce buttons at the same time. After three seconds, let the buttons go, and this will turn off your indicator light.
What If My Light Stays On After I Descale My Keurig?
There is a problem if the Keurig descale does not function and your light remains on. Repeat the descaling with extra solution if there is an accumulation of extra scale.
Even better, use a stronger descaler like vinegar and let your machine sit for a couple of hours. Citric acid will work to cut through a tough buildup in your machine if it is genuinely bothersome and persistent.
If the Keurig descale light stays on, it signifies that there is something obstructing the river flow through the unit. This could be a leaky piping or a cup that is too large for your machine.
If your Keurig is old, you might want to think about getting a new Keurig, as sometimes it is cheaper to buy a new one rather than fix an older unit.
Do You Need To Clean The Keurig Exit Needle?
The Keurig exit needle may need to be cleaned sometimes. A small protrusion that protrudes from the K-cup may be seen if you look closely. A tiny needle pierces the lump at the base of your cup.
That needle may occasionally become clogged. You might not be able to brew any coffee if this occurs because of a build-up of coffee grounds or just plain muck.
To clean this, all you need to do is simply insert a paper clip or sewing needle to loosen the needle so you can clean it. Then, take it out, clean the holding cell of the needle, and wipe the needle-free of any buildup or debris.
What Should I Do If The Keurig Descale Light Keeps Coming On?
Your descale light can also turn on due to gunk accumulation. Here are a few more frequent issues and solutions to them.
Unclog Your Tubes
If all else fails, it’s possible that your Keurig’s internal components include some obstinate air bubbles or dirt particles. By lightly spanking your machine, you can encourage them to pop out
Disconnect the reservoir, dripping tray, filters, and any coffee pods from it before unplugging it from the wall. Give your Keurig a few hard knocks on its sides and base while holding it over your kitchen sink.
Any potential debris that may have become lodged in the tubes should be moved by this mild Keurig earthquake. To clear out whatever was obstructing your water flow, finish by doing a brew cycle with only pure water.
Check To See If Your Needle Is Clogged
Next, look to see if the needles at the entry and exit are blocked. Under the brewer’s head, directly below the brew handle, is the entrance needle. The exit needle is located on the pod holder’s base.
Make sure that you can actually see the needle. If you cannot see it, then the needle is clogged and you will have to remove anything that it is blocking it.
Repack Your Pod
You’re probably replacing refillable coffee pods too frequently if you use them. The water may struggle to pass through a pod with too much coffee, setting off your descale warning.
We advise refilling your pods sparingly, not to the top, and never compacting the coffee grounds to make room for more.
Try removing the pod to see whether your machine allows you to run a pod-less brewing cycle if you suspect that your issue may have been caused by a densely packed pod.
You can empty an already-packed pod if this is the case. Simply pour the fresh coffee grounds into a bowl. Try replacing about 1/2 to 3/4 of the amount you had in it to see if that makes a difference.
How Do You Prevent The Descale Light From Coming On Your Keurig?
It is typical for limescale and hazardous particles to gradually accumulate inside the tubing and tank of your Keurig if you use tap water.
Utilizing a water filter system on your tap can minimize build-up, but you’ll probably still have to descale frequently. You should descale your equipment at least once every three months. This will help to keep the light from turning on!

Heather is a passionate writer who loves anything DIY. Growing up, she learned everything from home repairs to design, and wants to share her tips with you. When she's not writing, she's usually hiking or searching for her next DIY project.
More by Heather Robbins


![The 10 Best Table Saws - [2022 Reviews & Buyer's Guide]](https://cdn-fastly.upgradedhome.com/media/2023/07/31/9070645/the-10-best-table-saws-2022-reviews-buyer-s-guide.jpg?size=350x220)
![10 Best Electric Pressure Washers – [2022 Reviews & Guide]](https://cdn-fastly.upgradedhome.com/media/2023/07/31/9070600/10-best-electric-pressure-washers-2022-reviews-guide.jpg?size=350x220)