Horseshoe Pit Dimensions (and Rules)
With summer officially upon us, you’re likely wanting to get outside and enjoy your outdoor living areas. What better way to enhance the fun of your backyard then constructing a horseshoe pit? After all, playing horseshoes without a dedicated horseshoe pit is like having a barbecue without the fire.
You can easily create your own backyard horseshoe court using a few easily accessible tools and materials. While there is more than one way to approach this project, believe it or not, the dimensions of a horseshoe pit matter. The National Horseshoe Pitchers Association has specific regulations for court specifications, including everything from safety to lighting to temporary court installations and multi-court facilities.
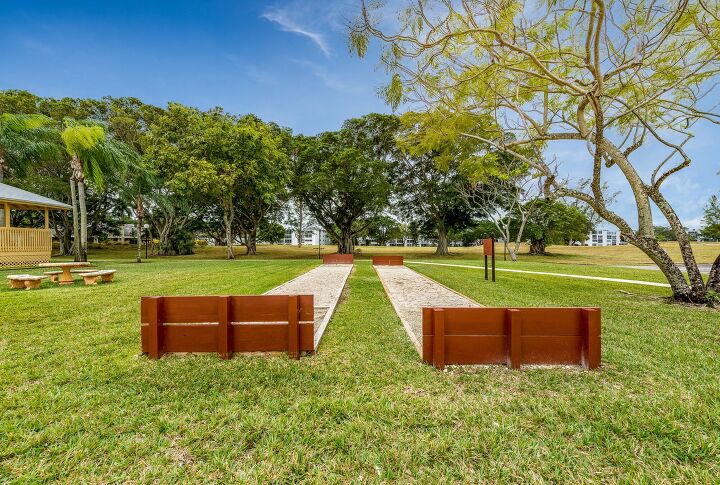
However, according to NHPA regulations, the most basic requirements for horseshoe pit dimensions call for the stakes to be exactly 40 feet apart from each other and the pit must be at least 31 by 43 inches, but no larger than 36 by 72 inches. Since horseshoes involves two boxes – one of the stakes and one for pitching – you’ll want to set aside a rectangular area of play that is 48 by 6 feet.
Continue reading for our comprehensive guide on horseshoe pit sizing, dimensions, and even how to build one for your own backyard space.
What Is Horseshoes?
Horseshoes is a recreational sport that involves players throwing a horseshoe in an attempt to either catch it on or land it close to a stake that is set in the ground. It is commonly played as a lawn game between two people, or two teams of two people. The players use four horseshoes and two stakes – which serve as the throwing targets – that are set in either a sandbox or directly into a lawn.
To play horseshoes, the players alternate turns tossing the horseshoes while aiming at the stakes in the ground. In order to win points, a horseshoe has to land within one horseshoe-width of the stake. The winning horseshoe will be as close to, or “ringing” around the stake. The National Horseshoe Pitchers Association (NHPA) is the sport’s governing body. They maintain a set of rules and specifications for the sport outlined on their website.
The best method for throwing a horseshoe is to have the horseshoe flat in front of you with the shanks pointing left and using a 1 ¼ grip. As the horseshoe is pitched, it will rotate approximately 1 ¼ times in the air before it eventually lands. Because of this, both the grip and the way that you throw the horseshoe matter if you’re trying to get around a stake.
What are Horseshoe Pit Dimensions?
According to horseshoe regulations established by the NHPA, horseshoe pit dimensions measured lengthwise from the back of the pitching area and across the width of the pitcher’s box is 48 by 6 feet. The playing area includes a pitcher’s box that measures 6 by 6 feet, which involves four main elements: The Pit, Pitching, Platform, and Stake.
If you have a small backyard, you might assume that you can alter the horseshoe game dimensions accordingly to suit the size of your lot. While this is possible if you’re just playing innocently in your backyard, if you want to enjoy the real game of horseshoes, you should stick to the regulation dimensions.
To fully understand the true horseshoe pit dimensions, it’s beneficial to take a look at each element individually:
- The Pit: May vary in size, though horseshoe regulations call for a minimum of 31 by 43 inches and a maximum of 36 by 72 inches.
- Pitching: The pitching is a platform that extends across the width of the pit and measures up to 20.5 inches.
- Platform: Typically used by younger players, the platform encompasses the pitching by 10 more feet.
- Stake: Adding height to the pit, stakes extend the playing area upward by 14 to 15 inches. The stakes should also be tilted forward slightly. According to regulations, the stakes must be precisely 40 feet apart.
A foul line must also be marked 3 feet in front of each stake, or 37 feet from the line to the opposite stake. Aside from these four main elements, you may also consider constructing a pit backboard (or backstop). In most cases, the backstop is positioned roughly 12 inches past the pit for stopping rogue horseshoes and clay or sand from exiting the playing area.
How to Build a Backyard Horseshoe Pit
If you want to build your own backyard horseshoe pit that’ll be the envy of your entire neighborhood, we’re here to help! Follow the steps outline below to create the perfect regulation horseshoe pit for your outdoor living space.
1. Horseshoe Pit Materials and Tools
Like any project, gathering all the tools and materials that you need before you begin is the key to successfully building a horseshoe pit. It makes no difference whether you plan to use a professional horseshoe set made from steel, or a more affordable horseshoe game kit made out of rubber. Regardless, the horseshoe pit needs to have the same characteristics if your goal is to play by regulation rules.
To build your own backyard horseshoe pit, you’ll need to collect the following supplies:
- Four horseshoes
- Two stakes
- 2 x 6 or 4 x 4 pressure-treated lumber, or similar framing for pits
- Fasteners for the box frame – spikes or galvanized screws
- Circular saw, or any other saw for trimming lumber
- Pit fill material, like play sand
- Landscaping fabric
- A shovel
- A sledgehammer
Quick Tip: You should avoid using actual horseshoes for the game. Instead, purchase a set from a local sporting goods store that is purpose-made for pitching.
2. Prepping the Space
Once you’ve gathered all the necessary supplies, you want to select a spot for the pit. You’re going to need a rectangular, level area of ground that is ideally oriented north-south. This will help minimize the impact of the sun on your eyes as you play. While the aforementioned horseshoe pit dimensions are established by regulations, there’s nothing stopping you from making a smaller pit fi you are limited on space in your backyard.
Though, if you do have the space, it’s recommended that you allot the standard 40 feet between the stakes. Then, plan for about four feet at each end for the pits – equally a total of 48 feet. If space is very limited, you could get away with only one pit box, which would reduce the length of the horseshoe pit to 24 feet.
It’s also recommended that you do not put spectators at the rear of the pitching area. Tossed horseshoes that miss the stakes could roll and bounce unanticipated distances. Therefore, you should avoid placing people, pets, breakable furnishing, and delicate plants behind either of the stakes. This is why most choose to construct backstops.
Additionally, you should think about overhead clearance, as you don’t want wires, tree limbs, or any other objects less than 12 feet above the playing space.
3. Outline the Pit
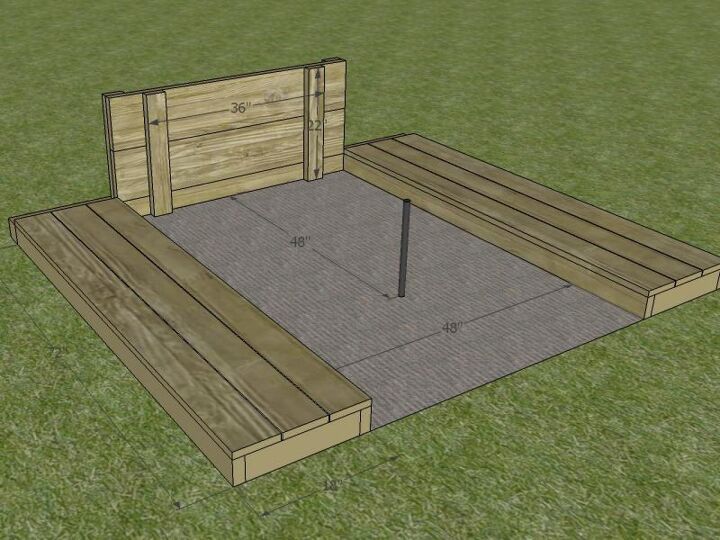
With your materials gathered and your space prepped, you can move onto building the pit boxes. Using your saw, start by cutting the lumber to the appropriate lengths for the pit sides and ends. For instance, if you want to frame two 31 by 43-inch pits (the minimum size), you should cut four 31 inch boards and four 43 inch boards.
Mark the dimensions of the pits on the ground and use a shovel to dig a trench around the perimeter. Ensure that the trenches are deep enough to fit the boards flush in the ground. Before placing the boards in the trenches, nail or screw them together accordingly. Then, secure the boards by filling the outside of the pits with dirt. Finally, excavate the interior side of the pit frames to a depth of 4 by 8 inches.
4. Set the Stakes
At this point, you can set your stakes. If you’ll recall, the stakes should be 40 feet apart and the foul lines should be marked at 37 feet. Measure a minimum of 21 inches from the front of the box and use the sledgehammer to drive the stakes into the ground.
The stakes should be positioned so that about 14 inches stick out above the ground and each one should be slightly slanted toward the other. More specifically, the top of each stake should be precisely 3 inches off the vertical, leaning toward each other at roughly 12 degrees.
Quick Tip: Over time, the stakes may start to loosen. To avoid this problem, you can reinforce the stakes by anchoring each one in concrete.
5. Fill with Sand
While it may be tempting to just grab a bag of sand and start laying it out into the box, you should first place a layer of landscaping fabric in the bottom of each pit. Although this step is optional, it is highly recommended to avoid weeds from growing out from the sand in your horseshoe pit. This liner will help suppress weed growth, while also providing stability to keep the sand from dipping into the ground.
Once you’ve laid out the landscaping fabric, fill the pit with sand. Play sand or horseshoe pit clay can be found at most home and garden centers. You’ll need between five and six bags to appropriately fill each pit setup.
6. Build a Backstop
To maximize safety with your horseshoe pit, you should strongly consider building a backstop for behind each pit. Simply purchase 2 by 6 pieces of lumber and secure them into the ground using stakes. The backboards should be positioned about four feet behind each stake.
Related Questions
How deep should the sand be in a horseshoe pit?
Professional horseshoe pits usually use about 8 inches of depth, but for a backyard pit you’ll need at least four inches of depth.
What’s the best fill material for a horseshoe pit?
Every properly built horseshoe court should have a well-maintained fill material that surrounds the stakes. While any loose or putty-like substance will work, the most recommended material is common blue clay, also called soapstone or blue shale. Another common, and still effective, material to use is playsand.
What is it called when a horseshoe lands around the stake?
When a horseshoe completely surrounds the stake it’s referred to as a “ringer.” This move scores three points unless it is canceled out by a ringer from your opponent.
What is a leaner in horseshoes?
When a horseshoe lands so that it leans on the stake but is not a ringer, it’s called a leaner. In most cases, this position is awarded two points.
Related Articles

Jessica considers herself a home improvement and design enthusiast. She grew up surrounded by constant home improvement projects and owes most of what she knows to helping her dad renovate her childhood home. Being a Los Angeles resident, Jessica spends a lot of her time looking for her next DIY project and sharing her love for home design.
More by Jessica Stone