When To Trim And Shape Boxwoods (And How To Do It!)
Boxwoods have been around in gardens for centuries, going all the way back to the mid-1600s in America. It makes sense that these popular shrubs would withstand the test of time since they have so many good points. They’re versatile, feeling right at home outside, inside, in the ground, or in a container, deer-resistant, and easy to maintain.
One of the primary requirements to keep your boxwoods in tip-top shape is to trim them and remove dead branches. You can trim boxwoods pretty much any time of year, but avoid hard pruning in late summer or early fall. Excessive trimming during these times might result in the new growth unable to harden off before a frost.
Of course, you need to take into account the climate where you live. For example, if it doesn’t get extremely cold until later in winter, trimming in late summer might be fine. Therefore, know your environment, or play it safe and trim your boxwoods toward the end of winter or in spring.
Do You Need Landscaping Services?
Get free, zero-commitment quotes from pro contractors near you.

Why Prune Boxwoods?
One of the most common reasons that people choose to prune boxwoods is to shape them up and create a cleaner, more defined look. However, pruning is essential to plant upkeep and is an excellent form of preventative maintenance regardless of the age of the plant. Most ornamental plants can benefit significantly from annual pruning – boxwood included.
Aside from benefits regarding the overall look of the plant, pruning can also aid the health of boxwood. For this reason, it’s important to understand how and when to prune boxwood, then establish a schedule accordingly.
How and When to Trim Boxwoods
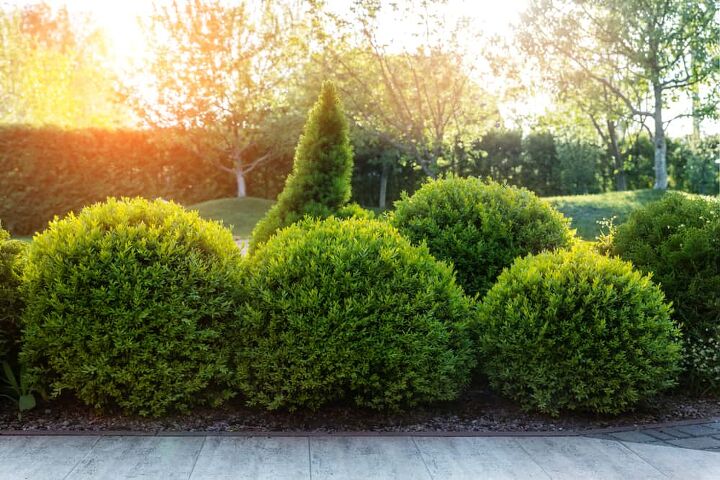
Boxwoods can make quite a statement in a garden, whether trimmed into fanciful shapes, neat rows, or along garden walls. It can grow anywhere from 5 to 8 inches, maybe even more, depending on your location and growing season. Luckily, you can easily handle this rapid growth with some light pruning.
Hard Pruning Boxwoods
Light pruning is cutting back about a third of the stems every season to maintain a healthy plant. However, to establish healthy growth and achieve desired shapes and heights, hard pruning is necessary.
When you hard prune a plant, you cut it back by removing most of the top. In some cases, you might need to cut down your boxwood within one foot of the ground. However, it all depends on how tall you ultimately want it to be.
However, when hard pruning boxwoods, it’s best to not cut more than a third in one season, or year. If you don’t leave enough green leaves on the plant, it won’t get enough energy to continue growing. Typically, you would cut the tallest stems slightly lower than your desired finished height. Aim to cut these stems near a branch fork.
However, since you shouldn’t cut more than a third of the plant in a year, be prepared to be patient. Also, make sure the boxwood’s base is slightly wider than the top so sunlight can reach the leaves.
Don’t Rush Trimming Boxwoods
Keep in mind it could take a few years for your shrubs to reach the desired height. If you try to do all of your cutting and pruning at once, you could kill the shrub. Your boxwood has the best chance of survival if you work toward your desired shape and height over several years.
Plus, when you shear too much of your boxwood at once, it encourages denser growth on the outside. Ultimately, this makes it hard for sunlight to reach the interior of the plant, inhibiting healthy growth.
Tools for Trimming Boxwoods
For best results, use a pair of clean, sharp pruning shears. You can purchase a high-quality set of pruning shears at home improvement stores for about $20 to $25.
If you have larger or taller boxwoods, consider a pair of long-armed or telescoping loppers. These basically look like large shears, but you operate them with two handles instead of holding them in one hand. You can find these for about $35 to $45 depending on the brand.
You can also use electric trimmers on boxwoods, but it’s important to use caution. You don’t want to overcut, and you also don’t want to tear the branches. Therefore, don’t use too much pressure when using electric trimmers and go slowly.
Proper sanitization of these tools is crucial, both before and during your annual pruning. The tools you use should be properly cleaned using Lysol, bleach, alcohol, or some other disinfecting product before and after trimming. This helps prevent the possibility of disease spreading and ravaging the plant.
When Should You Hard Prune Boxwoods?
You can do light trimming throughout the year, but hard pruning should happen in late winter or early spring. In fact, many suggest that early spring is the best time to prune boxwood as it’s the time of year before boxwood begin to flush. This gives you the opportunity to trim away old winter color, or tips that have gotten burned over the winter months. Doing so at this time also helps encourage new growth.
Pruning in late summer or fall risks your boxwoods not having time to harden off against winter frost. If the new growth isn’t allowed adequate time to adjust to the climate, about a month, it will freeze.
If you’re simply doing some touch-up cuts or snipping a few errant twigs, you can do this in early fall. Trimming the tips to maintain the classic box shape is also best done throughout the growing season. However, keep the number of cuts to a minimum the closer you get to fall.
Trimming Newly Planted Boxwoods
With most boxwoods, starting the pruning process early is best. Therefore, if you just planted them, do a light pruning right away. This helps the boxwood adjust and encourages the roots to grow outward.
Additional Considerations for Trimming Boxwoods
As your boxwoods grow, the more you want to control their size and shape, the more often you will need to prune. Otherwise, boxwoods are fairly easy to maintain.
Remove Dead or Damaged Branches
Inspect your boxwoods for diseased or dead branches and snip them off at the base. You don’t want the damage to spread to the rest of the bush or hinder new growth. Ensure you look for bad branches throughout both the exterior and interior of the boxwoods.
Create Access to the Interior
Ensure you keep a few holes in the plant’s canopy so sunlight and air can get through to the inside of the plant. Also, cut back overgrown limbs to the main branch to thin out the bush.
It’s also important to remove any debris or fallen leaves from the interior. These items can obstruct airflow, affecting the plant’s overall health.
Fun with Shapes
If you want to shape your boxwoods into topiaries, follow the guidelines above. However, instead of forming your boxwoods into the classic square hedge, you’ll prune them back to the desired shapes.
When you see boxwoods shaped like elephants, dragons, and other incredible shapes, there’s likely a topiary frame at play. Plants are wrapped, placed inside of the desired frame, then carefully unwrapped while inside of it.
The frame helps train the bush to grow to the desired shape. Then, you can trim the parts that extend past the frame. Young plants are typically easier to train, and creating a topiary can take many months.
Although it’s certainly possible for the average home gardener to trim their boxwoods into amazing shapes, the process patience and precision. Therefore, make sure you’re up for the task before you commit.
Potential Boxwood Problems
While maintaining boxwoods is relatively easy, they’re still susceptible to several problems.
Pests
Many of the same animals that threaten your garden can also damage your boxwoods, like moles and such. Plus, several pests are problematic for the shrub, especially the boxwood leafminer which infests the leaves and feeds on them.
Boxwood mites are another common problem, although they tend to cause more superficial damage. If you believe pests are hurting your boxwoods, snap a picture of the damage. Bring the photo to your local garden store. A professional can help identify the problem and suggest how to fix it or recommend a registered pesticide.
Diseases
If your boxwood has dark spots on the leaves, it could be the beginnings of a disease known as Boxwood Blight. If left unaddressed, the leaves will start to brown and drop.
This is a fungal disease and can spread rapidly. If you fear this is the issue with your boxwoods, take a picture to an expert for verification. Carefully remove and bag the infected plants and any fallen leaves.
Another fungal infection can cause root rot in boxwoods, leading to poor coloring and growth. Avoid planting your boxwoods in overly wet areas, such as near downspouts or where water tends to collect. This can help deter root rot from developing.
Boxwood Growing Tips
When planting boxwoods, choose a spot that gets full sun and partial shade. If boxwoods stay in full sun in the winter, it can lead to leaf burn. Leaf burn is when the foliage turns orange in color.
It’s also essential to provide proper drainage, as too much water can lead to root rot among other issues. The optimal soil pH for boxwoods is 6.5 to 7.2, and they only require light mulching. About one inch or less of mulch over the root area is good but keep mulch away from the stem.
Boxwoods also have a shallow root system, so avoid digging near the boxwoods as it can damage the roots. And of course, follow the proper trimming and pruning regimen.
Do You Need Landscaping Services?
Get free, zero-commitment quotes from pro contractors near you.
Related Questions
How far back can you cut boxwoods without killing them?
The common boxwood can reach between eight to 20 feet tall, but is usually six to eight feet tall when they reach maturity. Severe pruning can yield mixed results; however, you can generally safely cut them back about two to three feet. Though, the actual amount depends on the plant’s size, health, and the time of year you are pruning.
Can you prune boxwoods in the fall?
While you can essentially trim your boxwoods any time of the year, for optimum plant health, it’s best to avoid any pruning in the fall. The new growth that is stimulated will typically not have enough time to harden before the frost sets in and burns it.

Stacy Randall is a wife, mother, and freelance writer from NOLA that has always had a love for DIY projects, home organization, and making spaces beautiful. Together with her husband, she has been spending the last several years lovingly renovating her grandparent's former home, making it their own and learning a lot about life along the way.
More by Stacy Randall


![10 Best Electric Pressure Washers – [2022 Reviews & Guide]](https://cdn-fastly.upgradedhome.com/media/2023/07/31/9070600/10-best-electric-pressure-washers-2022-reviews-guide.jpg?size=350x220)


![12 Washing Machine Brands to Avoid [with Recall Data]](https://cdn-fastly.upgradedhome.com/media/2023/07/31/9075781/12-washing-machine-brands-to-avoid-with-recall-data.jpg?size=350x220)