What Size Trowel For 12×24 Floor Tile? (Find Out Now!)

Ask any professional tile installer which tool is the most important, and you will learn here about the trowel. The importance of applying the right depth and quantity of mastic under the Tile is the key to a solid and secure flooring installation. Different Tile and adhesive require different trowels to ensure that the underlayment bods correctly with the tile. Finding the right size trowel for your materials and situations can be challenging.
In general, a ½ inch by ½ inch notched trowel is the best choice for 12 x 24-inch tile. A three-quarter inch U-shaped trowel may also be used. Overall, you must ensure that 85 percent of the space between the tile and subfloor is covered with adhesive. Of particular importance is adhesive coverage on the edges and at the corners of the tile.
Many tile and adhesive manufacturers make recommendations on their packaging for the size and type of trowel best suited for their product. These recommendations are always great places to start to ensure that your tile application is proper and correct. However, understanding the recommendations and specifications of the ANSI documents can help you ensure that your tile job Is successful.
What Does the American National Standard Specifications for Tile Installation Say?
ANSI sets the standard for a wide range of building and construction codes, including ceramic tile. These standards are promulgated and tested to ensure that ceramic tile installations are performed consistently and safely. You can access the actual ANSI standards for Ceramic Tile Installation at this link. In general, the ANSI specifications for ceramic tile require:
- In dry areas, the tile underlayment needs a minimum of 80% coverage of adhesive
- Wet areas such as showers should have a 95% coverage of adhesive
- All natural stones should have a 95% coverage of mastic.
Specialized tile, shapes and sizes may have different requirements. Always check with the manufacturer of the tile and your adhesive to make sure that the minimum requirements are being met.
What is Meant by 80% Coverage?
The 80% coverage specification can be a little misleading. You may well have 805 coverage of the back of your tile, but it may not be sufficient to meet the requirements. In general, The NASI standard requires that the adhesive coverage on the back of the tile produce maximum coverage with special attention paid to the corners and edges.
The interpretation of this specification is that the edges and corners of the tile must be fully supported by adhesive, and 80% of the back of the tile should have adhesive coverage. In the case of heavier tile or stone, this requirement goes to 95%.
The easiest way to ensure that you meet the coverage requirements is to use the proper size trowel for the tile and adhesive you are applying. In the end, if you are inexperienced with the process of buttering tile and applying adhesive, you should apply and then remove a few tiles to check the coverage of the adhesive.
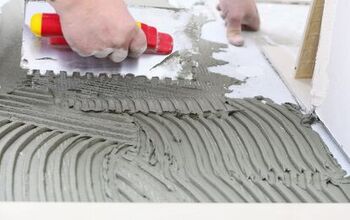
How Does a Notched Trowel Work?
Using a notched trowel is the secret to applying the proper amount of mortar or adhesive to your tile and substrate. Selecting the correct size of the notch on the trowel, the spacing of the notches and the type of adhesive ensures that the proper depth and coverage of adhesive is left on your tile. In general, tile and adhesive manufacturers recommend the proper size notch trowel with their products.
Using a notched trowel properly is not difficult. In general, the trowel is loaded with adhesive and then worked across the surface. The trowel should be held at an angle that allows the adhesive material to flow smoothly through the notches.
The adhesive application should be even and consistent with the rows of adhesive having visibly clear space between the rows. The rows of adhesive should run parallel to each other and not overlap to form a check pattern.
Even rows with a consistent pattern will eliminate air pockets between the tile and the backboard or substrate. Air embedded in the adhesive can create open or hollow spots that eventually fail.
How Do I Choose the Proper Trowel Size?
While tile manufacturers and adhesive producers typically recommend the proper notched trowel size. In some cases, where the tile is not packaged, and a generic thinset is used to apply the tile, some general recommendations are being made.
In general, the size of the tile being installed is a good reference for the type and size of the trowel to be used. The following recommendations come from the Ceramic Tile Foundation and are considered proper guidelines for tile installation.
These standards allow the installer to meet the ANSI A108 requirements for mortar coverage.
- Standard thin-set bed mortars require a minimum of 3/32 inch with a maximum of 1/4 inch
- The recommended notched trowel size for tile sizes of 12 inches by 24 inches is a ¾ inch notch. This sounds excessive, but the mortar lines ensure full coverage and adequate mortar saturation to ensure a proper bed and no air voids.
- Some epoxy-based mortars and thinsets require less thickness to get adequate coverage. Consult the manufacturer for the best recommendations when using non-standard thinset under your tile.
Making the Right Size Decision
Again, the key to the proper size trowel for your project is the size and weight of the tile and the type of adhesive you use. It is always best to follow the manufacturer’s recommendations when selecting a trowel for applying mortar or thinset.
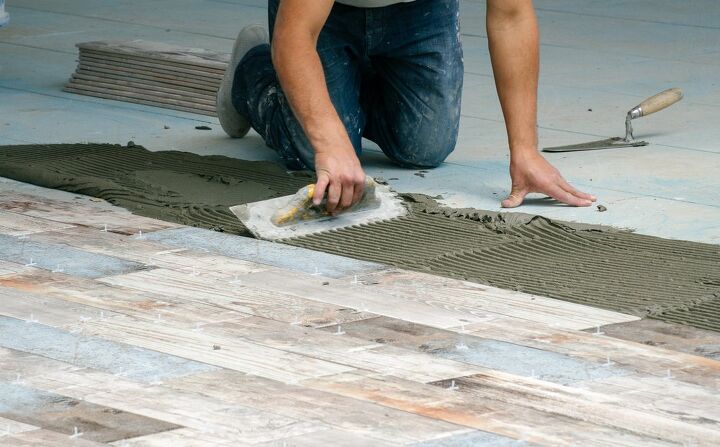
In general, if you are applying a 12 inch by 24-inch ceramic tile using standard thinset mortar, Most experts suggest that a ½ inch by ½ inches square notch trowel offers the best option when using thinset to lay a 12 x 24-inch ceramic tile.
However, some professionals suggest using a three-quarter-inch U-shaped trowel notch for large ceramic tile installations. Many professional tile installers report that a larger U-shaped trowel notch folds the mortar more efficiently between the rile and the substrate. This helps eliminate air gaps in the mortar and provides a better mortar base for the tile.
It’s Not Just About Notch Size
There are many more factors to applying mortar for 12 x 24-inch floor tiles than the size of the notches on your trowel. The wrong mortar application or methods can’t be fixed with the proper size notches on a trowel. To ensure a proper bond between your subfloor and your finish tile, you must have the right mortar and apply it correctly.
Choosing the Right Mortar for your Tile Job
There are many different mortars available on the market. In general, you should use the mortar suggested by the tile manufacturer for your installation. The trick to installing large format tile such as 12 x 24\-inch ceramic tile is the proper thickness and coverage of the mortar bed between the tile and substrate.
In most cases, large format tiles require a “medium-bed” mortar. Unlike thinset mortars, medium-bed mortars have a slightly thick consistency when properly mixed. The thicker consistency prevents the mortar from sagging into the mortar grooves like thinset mortars. Thin-set mortars often tend to spread from the center of the tile to the edges, leaving larger unsupported areas of tile.
A medium-bed mortar helps prevent this mortar movement and creates a consistent thickness under the tile with fewer air gaps and babble.
Have the Right Tools Handy for the Complete Job?
A one-half-inch notched trowel is not the only tool you will need to complete your tile installation. Before you start your tile job, make sure you have the other essential tools handy to prevent frustration and delays in your tile installation job.
A Margin Trowel Will Make Life Easier
A smaller un-notched trowel can save you time and frustration when working with large format tiles. A margin trowel is unnotched and may be rectangular or triangular. The advantage of having a margin trowel on hand is primarily for getting mortar out of your bucket and onto your work area.
Notched trowels used with 12 x 24-inch towels are usually too large to easily remove mortar from the mixing bucket. Using a smaller un-notched trowel allows you to place a controlled amount of mortar where you can easily work it with the larger notched trowel.
If you are “back-buttering” your tiles before setting them in the mortar bed, a margin trowel is a perfect tool for this more delicate and precise mortar application.
Control Your Mortar and Keep It Clean
Inevitably there will be mortar squeeze out at the edge of your tiles. If this squeeze out is not controlled and cleaned as you lay your tiles, the result is grout joints filed with mortar and next to impossible to finish grout properly. This results in more work to remove the hardened mortar from the grout lines.
Your margin trowel is handy for cleaning up any mortar squeeze out as you work your tile into place. If you are working over a sub-floor radiant heating system, a rubber-coated margin trowel can be a handy tool in your box.
Minimize the Work
A bucket of warm water and a tile sponge near at hand can shorten the overall work time as you lay tile. A few quick swipes of the tile you have laid remove most unwanted mortar from the surface. This can shorten the cleanup time considerably.
It may seem like you are adding time to the job, but removing as much of the excess mortar before it dries can be a time-saver in the long run. In the end, it pays to work smart, not harder.
Getting Everything Together – A Short Tool List
Having everything you need before starting your tile installation is an easy way to prevent frustration and delays. There is no way to anticipate every obstacle or problem, but a little forethought can go a long way. We suggest that you have these basic tile-laying tools on hand before starting.
- Medium bed mortar mix in the appropriate color for your decorating scheme.
- A mortar mixing wand and ½ inch power drill
- A garden trowel is handy for moving the dry mortar mix to your mixing bucket.
- A clean 5-gallon plastic bucket.
In addition, you may want to find a larger measuring bowl. This can make measuring the water for your mortar mix easier and more consistent. Professionals get very good at mixing mortar by eye. However, most do-it-yourselfers lack this experience. It is much better to measure than to guess.
Choosing your Trowel
When you go to the home improvement store to pick up your supplies, you will face many different tile trowels. Our advice about this and almost any other tool is you will get what you pay for.
We agree that it doesn’t make sense to buy the most expensive tool available that you may only use one time. On the other hand, a well-designed and engineered tool can make a job easier and produce better results, especially if you are just learning the trade.
Hold and feel each of the different trowel options. How does the handle fit your hand? Can you use this tool for long periods without discomfort or fatigue? Look at the tool. Are the edges sharp and clean? Do the notches fall regularly and consistently? Is the handle tight and well secured?
In any case, purchase the best tool you can afford. In the end, you will find that the better tool produces better work with less effort and fatigue. This usually translates into less frustration and a happier overseer (your wife.)
One Last Bit of Advice
The last bit of advice is to make sure that your substrate is as clean and dry as possible. Clean it twice if there is any question about residual dust or debris on the subfloor. By and large, the mortar will not form a bond with the substrate if there is even the least amount of dust and dirt on the surface.
Sweep, vacuum, and then wipe the surface of the subfloor with a damp towel before you start spreading mortar. A clean surface ensures a good mortar bond and that the mortar will spread evenly as the tile is placed. The bottom line of a tight and uniform mortar bond is a clean work surface and the proper size trowel for the tile you lay.
Bigger Notches for Bigger Tile
Talk to professional tile layers, and they will usually advise you to go bigger with the notches for bigger tile. The consistency and quality of the mortar bed into which your tile is placed is the key to a secure and tight tile installation. All in all, larger notches yield better results when laying large tiles such as 12 x 24-inch.
I am a copywriter and editor based in the Las Vegas area with nearly a decade of experience under my belt writing landing pages, cost guides, blog posts, newsletters, case studies, and social media content. I have a degree in Strategic Communication and experience working in both the account and creative spheres. My goal is to always be discovering new interests and bettering myself as a writer and editor along the way.
More by Kerry Souder