


What Are Plumbing Traps And The Proper P-Trap Configuration?
You likely know P-traps serve an important function and are a necessity when it comes to your home’s plumbing. But have you stopped to think why these traps are so essential? Furthermore, why does there seem to be so many different kinds of plumbing traps?
Many plumbing traps are no longer used or very limited, like bell traps, running traps, and drum traps, among others. Today, P-traps are the most common plumbing trap, typically used in bathrooms, kitchens, and laundry rooms. Plumbing codes place strict restrictions on the use of P-traps, including outlet size, maximum vertical drop, and self-cleaning qualities.
Do You Need to Hire a Plumber?
Get free, zero-commitment quotes from pro contractors near you.

What Exactly Does a Plumbing Trap Do?
A plumbing trap is a critical component of plumbing systems, keeping things flowing (literally) and keeping you safe. They serve many functions, including preventing deep clogs and keeping unpleasant odors, insects, and sewer gases out of your home.
Many of these gases can reach a point where they become dangerous. For example, sewage systems create things like carbon monoxide, methane, hydrogen sulfide, and nitrogen. If these gases back up into your home, it can cause hazardous consequences.
These gases can build up and cause severe health problems like headaches, nausea, memory loss, vomiting, and worse. In extremely serious cases, if left unchecked or unaddressed, they can even be fatal.
How Does a P-Trap Work?
Every time you use a sink, toilet, or other such fixture, a plumbing trap retains a small amount of the produced liquid. This liquid is called a trap seal. Specifically, a trap seal is the maximum vertical depth of liquid that the trap can hold.
P-traps are the most common type of seal. A P-trap forms a barrier between the plumbing fixture, like a toilet or sink, and the sewage waste system. When installed correctly, the trap effectively blocks the gases.
A properly installed P-trap also helps catch debris that goes down the drain. This can be things like hair, dirt, and other items that would generally cause significant problems for your plumbing. Basically, the seal keeps the debris from traveling farther into the system and clogging the pipes.
Additional Qualities of P-Traps
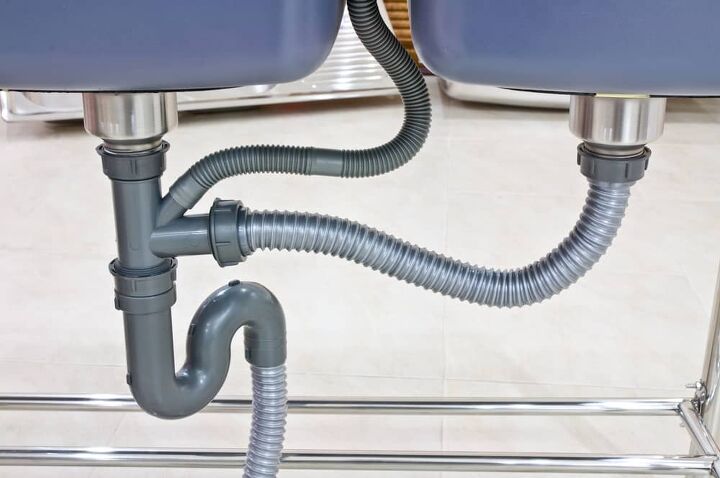
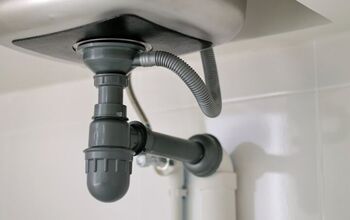
Basically, a P-trap consists of three parts: the inlet, the downward bend, and the outlet. Wastewater enters through the inlet, and water fills the downward bend, forming an airtight seal. Lastly, wastewater exits through the outlet and heads to the public sewer plant.
Typically, residential homes feature P-traps consisting of PVC or steel pipes. However, they can also be copper, cast iron, brass, and some feature recycled materials.
Mostly, you find P-traps in kitchens, laundry rooms, and bathrooms, including appliances like dishwashers and washing machines. However, you need a trap wherever a plumbing fixture connects to the sanitary drainage system.
The Proper Configuration for a P-Trap
For a P-trap to work effectively, you must ensure to configure it appropriately. Plumbing inspectors pay close attention to trap details, especially since they affect health and safety.
There are a few key factors worth noting when it comes to configuring a P-trap. For example, the trap depth should be between two and four inches. Here are a few other primary considerations for proper P-trap configuration.
Number of Fixtures
You can have one P-trap for up to three fixtures, such as a two or three-compartment sink or three lavatories. The drains, or waste outlets, must be in the same room and 30 inches apart or less. Also, flood level rims must be at the same level. The flood level rim is the point where when you fill the sink, the water spills over the edge.
Typically, when using one P-trap for multiple fixtures, pipes would come down from each waste outlet. Then, a pipe would cross to the adjoining unit, meeting together at the single p-trap. If it’s a three-compartment sink, pipes from the outside units will meet under the central unit.
Vertical Drop
The vertical drop is the length of the pipe that comes from the fixture outlet, or drain, to the water seal. The shorter the vertical drop, the more efficient the trap. This is because the longer the drop, the greater the water’s velocity, making it more likely to compromise the seal.
Vertical drops for toilets, sinks, showers, bathtubs, etc., are usually between 18 and 24 inches. Some may be 15 inches or perhaps less; the International Residential Code (IRC) does not stipulate a minimum vertical distance. However, the maximum allowable vertical drop is 24 inches, including all pieces of the pipes, fittings, etc.
Horizontal Trap Arm Slope and Length
The trap arm, which is the horizontal piece of pipe connecting the vent pipe to the p-trap needs to slope. The actual slope depends on the length of the arm. According to the Universal Plumbing Code (UPC), the total length of an arm connected to the P-trap must be 24 inches or less.
It must have a minimum ¼-inch slope per foot, sloping up toward the drain. Conversely, sloping down toward the trap. Additionally, the slope cannot be more than the pipe diameter.
Distance from the P-Trap to the Vent Connection
The vent connection needs to be as close to the P-trap as possible. However, not closer than two times the pipe diameter. For example, if the trap uses a 1½-inch pipe, the vent connection should be more than three inches from the trap.
Ideally, the vent should not be farther than 6 feet from the weir of a standard trap. The weir is where the water either starts or stops going down the drain after the trap.
The Correct Trap Size
Lastly, the P-trap needs to be the correct size for the drain of the fixture. Typically, to find the size pipe you need, measure across the diameter of the pipe that you will attach the trap to.
Of course, you will want to measure your specific fixture and adhere to your local plumbing codes. However, here is a glance at common, universally-accepted drain sizes of common residential fixtures.
| Universally-Accepted Drain Sizes of Common Residential Plumbing Fixtures | |
| Toilet | 3” |
| Shower | 2” |
| Bathtub (and shower/tub combos) | 1½” |
| Bathroom Sink | 1¼” |
| Bathroom Double Sinks (side-by-side) | 1½” |
| Kitchen Sink | 1½” |
| Dishwasher Drain Hose | 1½” |
| Washing Machine | 1½” |
| Laundry Room Tub/Sink | 1½” |
| Bar Sink | 1½” |
Self-Cleaning
P-traps should be self-cleaning, which is pretty much exactly how it sounds. The P-trap essentially cleans itself, so if you were to take it apart, the inside would be nice and clear.
In other words, it is made of a smooth material that makes it difficult for water particles to build up. Additionally, the P-trap is self-scouring, pulling dirt and debris through without clogging the trap.
Self-cleaning traps typically feature pipes made from brass, copper, or cast iron. But, this doesn’t mean you can’t have a P-trap made of other materials, like PVC. However, just know these are usually not self-cleaning. In these situations, you would likely need to clean the P-trap manually every now and then to avoid clogging. Luckily, this is a relatively simple process.
Cleaning Out a P-Trap
Although your first thought might be to use a drain cleaner, it’s better not to. These cleaners often contain corrosive elements that can damage plumbing, causing more problems than they fix.
Tools You Need for the Job:
- Bucket
- Bottlebrush
- Wrench
Step One: Prepare the Area
To clean out the P-trap, clear out the area around it and place a bucket under the trap to catch water and debris.
Step Two: Remove the Trap and Clean It Out
Loosen the coupling nuts that connect the trap to the drain and overflow pipes, and remove the trap. You should be able to do this by hand; if not, use a wrench, but don’t use too much force. Then use a bottle brush to clear out the trap.
Step Three: Reassemble the Trap and Check for Leaks
After reassembling the trap, run the faucet for roughly 30 seconds to check for leaks. If you notice any, ensure the washers are correctly set and tighten the couplings. Finally, rerun the water and recheck for leaks.
Of course, if you’re not comfortable with DIY plumbing tasks, you can always call a pro. A plumber might charge anywhere from $50 to $150 or more, depending on the severity of the issue and the trap’s location. For example, a shower trap will typically cost more than a trap under the bathroom sink.
However, it’s definitely a job worth learning how to do yourself. Especially since the typical recommendation is to clean a P-trap three to four times a year. If you have more than six people in your household, it’s preferable to clean often-used traps monthly.
Plumbing Code Restrictions for P-Traps
Of course, a significant part of knowing the P-trap’s proper configuration is also knowing what not to do. The majority of plumbing codes place restrictions on P-trap manufacturing and use.
These restrictions can vary among different codes, but many regulations include the following:
- A trap cannot depend on moving parts to retain its seal.
- The outlet of the trap cannot be larger than the fixture drain it is connected to.
- Certain applications cannot use a trap that is not self-cleaning.
- The installed trap must be level to the trap seal.
- A P-trap cannot be less than 1-¼ inches in diameter.
- Double trapping is not allowed. In other words, if a fixture has an integral trap (built within the unit), do not install a second trap.
- No more than three fixtures using one trap.
- A trap depth of no less than 2 inches and no more than 4 inches (except in the case of deep-seal traps).
- Factors that go against any of the proper configurations listed in the earlier section. For example, no slope in the horizontal trap arm, a vertical drop greater than 24 inches, etc.
Prohibited Plumbing Traps
In addition to restrictions on plumbing traps, most codes also agree on avoiding using several different styles of traps.
These are the traps that most plumbing codes prohibit:
- Bell Traps
- Crown Vented Traps
- ¾-S Traps
- Running Traps
- Full-S Traps
- Drum Traps (Although not necessarily prohibited, many plumbers choose not to use them. Drum traps are somewhat difficult to clean out.)
The Most Common P-Trap Issues
If a P-trap is installed incorrectly or not maintained properly, you’ll likely encounter several issues. These problems can include leaks, nasty odors, slow-draining fixtures, and toxic gases. Several things can cause these conditions.
Lost Water Seal
When there is no water seal, sewer gases can build up and seep back into your home. Unfortunately, these gases can range from annoying to dangerous.
A lot of wastewater rushing through the pipe at once or too quickly can cause the seal to lose water. This could happen from an excess of water or a vertical drop that is too long. In some instances, like seldomly used fixtures, the water in the seal can even evaporate.
Leaks
If your P-trap or fixture has a leak, it’s essential to address it quickly. Although it may seem like a small issue, it can escalate rapidly. It can lead to a clogged drain, which sends unpleasant odors into your house.
Clogs
If the P-trap has a clog, you might notice that your fixture drains slowly. Eventually, a clogged P-trap will start to leak, leading to a smelly situation. In other situations, an object can pass through the P-trap, removing water from the seal.
How to Install a Simple P-Trap
If you have some plumbing knowledge and skills, you could potentially replace or install a simple P-trap yourself. You would only pay between $7 and $30 for the parts, depending on the trap’s material. Here’s a breakdown of the steps to follow to install a basic P-trap under a sink.
Tools You Need for the Job:
- Hacksaw
- Necessary pipe pieces and parts based on your installation
- Appropriately sized slip-nuts for the pipe you are using (one for the tailpiece and one for the wall fitting)
Step One: Align the Trap Arm with Wall
First, slide the P-trap’s shorter side onto the pipe that drops down from the drain (the tailpiece). Move the P-trap as necessary to align the horizontal trap arm with the opening in the wall.
Step Two: Adjust the Tailpiece as Necessary
If you can’t align the trap arm with the fitting in the wall, you’ll need to make some adjustments. For example, if the trap arm is lower than the wall fitting, you’ll need to shorten the tailpiece.
Use a hacksaw to cut the tailpiece so you can slide the trap up higher. If the trap arm is higher than the wall fitting, you need to purchase a longer tailpiece.
Step Three: Insert the Trap Arm Into the Wall
Take apart the lower part of the P-trap. Insert the horizontal trap arm into the wall drain fitting, going as far as it will go.
Step Four: Adjust the Trap Arm as Necessary
Next, slowly start to pull the trap arm out of the wall opening. Keep pulling it until you can line it up with the top part of the trap. (The U-shaped portion.)
You might need to make some adjustments in this step, as well, depending on the length of the trap arm. If the arm comes out of the wall entirely before you can attach it to the trap, it’s too short. You will need to purchase a longer pipe for the trap arm.
Alternatively, if the trap arm goes into the wall fully and still extends past the trap, grab the hacksaw. Cut the trap arm so that you can adjust it to line up with the U-shaped portion of the trap.
Step Five: Position the Trap
Once you get the trap arm to align with the trap, thread on the slip nut (but don’t tighten it). After joining all of the trap parts, you can tighten the slip nuts. If something is wrong with your existing P-trap and you don’t have much plumbing know-how, call a pro first. A professional can assess precisely what is wrong with your trap and determine what your specific needs are.
Possibly, there might be more going on beyond the P-trap, and trying to fix it yourself could cause more damage. If a plumber replaces or installs the P-trap, expect to pay between $200 and $300 or possibly more.
Do You Need to Hire a Plumber?
Get free, zero-commitment quotes from pro contractors near you.
Related Questions
What is an S-trap, and when is it used?
An S-trap is a plumbing trap found in many older homes. Named for its “S” shape, it is basically a normal trap with another trap installed right against it, upside-down. The Uniform Plumbing Code (UPC) prohibits S-traps because they siphon water from the trap and allow dangerous gases into homes. Therefore, if you are doing new construction or remodeling and find an S-trap, you must replace it. If not, you would violate the plumbing code.
What is a building trap?
Nowadays, building traps are not used, and in the majority of cases are considered a code violation. However, builders once used them as a sort of secondary line of defense against vermin, sewer gases, and odors. These traps were usually a larger diameter S-trap, placed on top of a house. People basically used them before understanding the importance of venting plumbing fixtures.
What is a deep seal trap?
A deep seal trap is a plumbing trap that features a trap depth of more than four inches. Although permissible, you won’t find them in many applications, although they do have several advantages. Because the trap holds more liquid, water in it doesn’t evaporate as quickly. Therefore, it is often suitable for locations that are remote and used infrequently. Also, it can typically handle a greater water flow, making it less likely to lose its seal. This quality makes a deep seal trap a good choice for an indirect waste connection. For example, fixtures like a salad bar or commercial ice maker may use a deep seal trap. Furthermore, they are also less prone to issues like back-pressure or siphonage. If a fixture can’t be adequately vented, a deep seal trap can be a good solution. However, deep seal traps are larger and, therefore, more challenging to fit in small spaces. They can also cause fixtures to drain slowly due to their increased depth and capacity. Therefore, they are not often used in residential applications and are certainly not the norm.

Stacy Randall is a wife, mother, and freelance writer from NOLA that has always had a love for DIY projects, home organization, and making spaces beautiful. Together with her husband, she has been spending the last several years lovingly renovating her grandparent's former home, making it their own and learning a lot about life along the way.
More by Stacy Randall


![10 Best Cordless Leaf Blowers – [2022 Reviews & Ultimate Guide]](https://cdn-fastly.upgradedhome.com/media/2023/07/31/9070789/10-best-cordless-leaf-blowers-2022-reviews-ultimate-guide.jpg?size=350x220)


