Maytag Washer Won't Agitate But Spins? (We Have A Fix!)
When you wash clothes, your top-loading machine may rely on an agitator to move the clothes through the water. This is how your clothes get clean. When your machine stops agitating, your clothes might end up looking less clean than you’d prefer.
If your Maytag washer won’t agitate but still spins, a likely cause is a broken agitator. However, a faulty transmission, damaged wash plate (if there is no agitator), or a worn-out drive block could be to blame. Your best bet is inspecting the agitator/wash plate first and then going from there; you might need to call a pro.
If your machine still spins, then you can pretty much rule out a broken motor, drive block, or drive belt. However, there are still a few scenarios to work through before your laundry keeps piling up. Therefore, check out some of the common causes for why your Maytag washer won’t agitate but still spins.
Related Content: Maytag Washer Violently Shaking During Spin Cycle? | How To Take The Top Off A Maytag Washer | Maytag vs. Whirlpool Appliances | Washing Machine Brands To Avoid | Most Common Washing Machine Problems
Do You Need Appliance Repair Services?
Get free, zero-commitment quotes from pro contractors near you.

Inspect the Agitator or Wash Plate First
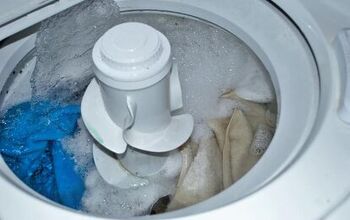
Your first stop on your troubleshooting expedition should be the agitator or wash plate (impeller) itself. Obviously, if your washing machine won’t agitate, but it still spins, you might have a broken agitator.
It is not uncommon for agitator parts to gradually wear down with regular use, eventually leading to a break. Depending on your washer model, your machine might have a single-piece agitator or a dual-action one. If single, it just means it’s one piece of plastic that moves back and forth to agitate the clothing.
A dual-action agitator features two separate pieces, a larger bottom piece that moves back and forth. Plus, a smaller top part that usually turns clockwise to move clothes toward the bottom of the tub. However, if your washing machine has no agitator, then you have an impeller or wash plate.
This piece is a low-profile plate at the tub’s bottom that generates motion and moves materials around in the machine. No matter which your Maytag washer uses, inspecting these parts and doing some troubleshooting are your first steps.
Step 1. Turn the Maytag Washer’s Agitator Manually
Inspecting the agitator can give you some insight into possible causes for your issue. First, unplug the washing machine from its power source. Before attempting to remove the agitator, simply try to turn it by hand. If you feel some resistance, this is normal.
Agitators have splines, or teeth, inside that connect to similar ones on a shaft of the transmission. If you feel resistance when moving the agitator manuall y, there is likely no issue with the drive shaft connection. However, if the agitator spins freely, then the agitator might have disconnected from the drive shaft.
If you’re lucky, it might be something as minor as a loose screw. Typically, a screw attaches the driveshaft to the agitator, usually under the top cap. Sometimes, this screw can loosen or get stripped. If this is the case, replace or tighten the screw to see if this solves your problem. If not, or the screw is tight and appears fine, keep troubleshooting.
Step 2. Remove the Agitator or Impeller
Next, you’ll have to remove the agitator. In some models, there will be a screw toward the bottom of the agitator that you need to loosen in some models. In other models, there is a cap or fabric softener dispenser on top of the agitator or impeller.
Remove the cap to access the set screw or bolt holding the agitator/wash plate onto the transmission shaft. You can pry the cap off in most cases using a flathead screwdriver. Remove the screw or bolt using a screwdriver or socket wrench, and carefully pull out the agitator or impeller.
Inspect it closely for any damage. The teeth may be worn down, especially if you were able to turn it freely by hand. If it’s a wash plate, it could be damaged or stripped, no longer connecting to the drive shaft.
Either way, in these scenarios, you likely need a new agitator or wash plate. If you need a completely new agitator or wash plate, you could spend anywhere from $75 to $140 or more. The cost depends on your exact model of washer.
Are You More Of A Visual Learner? Watch This Video Instead.
Step 3. Dual-Action Agitator? Check the Agitator’s Directional Cogs
If the agitator is dual-action, there could be a stripped connection where the upper and lower parts meet. Some models use a retainer to attach the top to the bottom. This secondary bolt could be loose or stripped.
But, you may need to replace the agitator’s directional cogs (also called dogs), which produce the agitating movement.
When you inspect the agitator, check out these cogs for any sign of wear or damage. You might even discover that you’re missing some cogs. If this appears to be the case, and everything else seems fine, get a set of replacement cogs.
If just replacing the dogs (or dog ears), you could get a set for as little as $4. However, if you need several parts, you might want to consider an agitator repair kit. Depending on your Maytag model, a kit can roughly run anywhere from $15 to $40.
Step 4. Check the Coupler Between the Agitator and Transmission
Possibly, your Maytag washer uses a coupler to attach the agitator and transmission. The coupler features teeth, or splines, on the inside that match the transmission. Conversely, the teeth on the outside of the coupler fit the agitator.
If your agitator turns freely while washing clothes, and you hear a grinding noise, you could have a damaged coupler. When you are performing your inspection, if your machine has a coupler, examine it closely. You can remove the coupler by loosening the bolt or screw that connects it to the transmission shaft.
If the coupler shows signs of damage, rust, or wear, then get a replacement. You can expect to pay about $15 to $20 for this part, depending on your model.
Your Maytag Washer Might Have a Bad Transmission
After your inspection, do the agitator/wash plate, and other parts appear to be in good shape? If so, it’s looking more likely that a faulty transmission is to blame for your washing woes.
The transmission helps the agitator move back and forth. If your washer spins fine but won’t agitate, and the agitator/wash plate is okay, you likely need a new transmission. Especially if your agitator’s input shaft turns, but not the agitator shaft.
Repair or Replace the Transmission? Or Buy a New Machine?
In these cases, repairing the transmission is not really an option, as Maytag doesn’t typically sell separate transmission parts. Therefore, you likely need to replace the whole thing.
Then, if you replace your washing machine’s transmission, you should also replace the tub seal. The tub seal prevents water from getting into the driveshaft. The only problem is, when you start looking into replacing these parts, you’re talking a lot more money. You could pay anywhere from $200 to $700 or more to replace your Maytag washer’s transmission and tub seal.
Therefore, before embarking on getting a replacement transmission, consider a few things first. If your machine is older, you may do better off buying a new one. Likewise, if a new transmission costs 50% or more than a new machine, get a new washer.
However, if you decide to press on and replace the transmission yourself, follow these steps.
Replacing Your Maytag Washer’s Transmission
If you have some DIY know-how and skill, you might decide to replace your washer’s transmission. However, if you don’t feel confident or are unsure, call a professional.
Tools You Need for the Job:
- A Phillips head screwdriver
- A buddy (optional, but handy)
- Pliers
- Tape
- Electrical tape
- Oil/Grease
- Spanner nut wrench
- Hammer
- Torx T20 screwdriver (depending on your washer model)
- Wire brush
- Two ½” socket wrenches
- Camera or phone to take pictures
Step One: Disconnect the Power
Unplug the washing machine from its power source. Safety first!
Note: You might want to take photos throughout the next several steps to remind yourself where things go. You will be doing the steps in reverse later to install the new transmission.
Step Two: Prepare Your Washing Machine for Inspection
Remove the front panel of your washing machine and set it to the side. Lean the machine back against the wall, making sure it can’t fall. If you’re able, you may want to enlist the help of a buddy to help hold the machine in place.
Step Three: Check the Transmission First
Remove the belts from the pulley at the bottom of the machine. Turn the pulley counterclockwise; you should be able to move it easily. When you turn the pulley, the agitator should move back and forth as well. If it doesn’t, this confirms you have a bad transmission.
Step Four: Remove the Tub Cover from Your Maytag Washer
Remove the rubber cap on the bottom of the pulley. Then use the Phillips head screwdriver to remove the screw. There should also be a washer beneath the screw; make sure you remove this as well.
Next, you need to remove a part called a stub lug key; it’s ring-shaped. You can do this using a pair of pliers. Then, spin the pulley counterclockwise to remove it, ensuring the bearing came off with it.
Stand your washer up, detach the hoses from the back (turn off the water), and open the tub panel. The tub panel attaches to the machine’s base by two screws toward the front of the washer.
Tape the lid of your washer shut, so it doesn’t flop around, remove the two screws, and lift the panel. Use a piece of electrical tape to mark the front of the tub cover. Then, carefully lift the tabs that hold the cover in place, and remove it.
Step Five: Remove the Agitator
Locate the screw toward the base of the agitator and loosen it. Then simply pull out the agitator. Or, if your agitator has a screw under the cap/dispenser, pry up the cap to reach the screw.
Step Six: Remove the Spanner Nut and Spin Drum
Spray some oil on the spanner nut and let it sit for several minutes. Then place the spanner nut wrench over the nut, and hit it with a hammer to loosen the nut.
Note: You need to hit the wrench from the right to move the nut clockwise.
Once the nut is loose, remove it, as well as the cone-shaped piece beneath it. Then you will be able to lift out the spin drum; let your buddy help you; it can get heavy.
Step Seven: Remove the Tub
Remove the set screws (you may need the Torx T20 screwdriver for this). Then use the spanner nut wrench and hammer again to remove the stem. Turn the rubber piece (the old seal) to remove it, then clean the area with a wire brush.
Disconnect the hose from the tub and remove the screws that hold the tub in place using the socket wrenches. Use one to keep the head of the screw in place inside the tub. Use the other to loosen the nut on the outside of the tub.
Remove all of the screws, nuts, washers, and other similar pieces, then gently lift the tub. Disconnect the remaining hoses so you can pull out the tub completely. Now you can access the transmission.
Step Eight: Remove the Transmission
Grab the old transmission, wiggle it gently from side to side, and pull it out.
Step Nine: Install the New Transmission
Set the new transmission in place, ensuring it is all the way in. Then, apply some grease to the neck of the transmission and slide on the metal sleeve. Apply some more grease to the sleeve.
Then follow the above steps in reverse to put everything back together. Consult your photos to verify you’re doing things correctly. Ensure you place the tub back in place with the warning label facing the front.
When you put the tub seal in place, ensure you do so carefully, not applying too much pressure. Make sure everything is nice and clean before you put it in place. Also, when you set the stem back in place, ensure not to overtighten. The same goes for the spanner nut.
When replacing the tub cover, align it properly, using your piece of electrician’s tape as a guide.
Do You Need Appliance Repair Services?
Get free, zero-commitment quotes from pro contractors near you.
Related Questions
Do front-load washers have agitators or impellers?
Front-load washers do not have agitators. They use impellers (wash plates) to agitate clothing and other items inside the tub.
How much does it cost for a professional to replace a washing machine transmission?
Although the price depends heavily on the model and make of your machine, this is a pretty costly fix. A transmission alone can cost anywhere from $150 or more. Then you need to factor in labor costs of roughly $50 to $100 an hour. Maytag washers can have a transmission that costs anywhere from $250 to over $700. When they discover it’s a bad transmission, most pros will likely advise you to get a new machine.
Related Articles

Stacy Randall is a wife, mother, and freelance writer from NOLA that has always had a love for DIY projects, home organization, and making spaces beautiful. Together with her husband, she has been spending the last several years lovingly renovating her grandparent's former home, making it their own and learning a lot about life along the way.
More by Stacy Randall