Kenmore Refrigerator Leaking Water? (Possible Causes & Fixes)

Modern refrigerators have come a long way in efficiency and convenience, and Kenmore is a highly respected brand. But aside from keeping foods cold and fresh, the main function we expect is for them to keep things inside. So it can be alarming when you find water running OUTSIDE of your fridge from places it shouldn’t.
The most common causes for a leaky Kenmore refrigerator involve clogged or broken elements in the waterline. Anything from clogged water lines, a cracked drain pan, or a malfunctioning water filter can precipitate a refrigerator leak. Some careful troubleshooting will help you repair the system and stop the leaks.
Before starting any repair, it’s important to start with safety in mind. Make sure you unplug the refrigerator or you turn off the circuit breaker. Additionally, turn off the water supply to the refrigerator, usually located under the kitchen sink.
Do You Need Appliance Repair Services?
Get free, zero-commitment quotes from pro contractors near you.

How Does Refrigeration Work?
There are four stages in the refrigeration cycle: evaporation, expansion, condensation, and accumulation. A liquid coolant is heated to a gas and pushed to another container at high pressure. When the pressure is released, the gas condenses back to a liquid and accumulates before it evaporates again. This cycle keeps the air inside the refrigerator cool, keeping food fresh longer.
When the refrigeration cycle includes a defrost function, timers and heat sensors help keep the inner workings from icing over. Any glitch in that system may lead to water accumulating and then leaking from the appliance to the floor.
How Do Leaks Start?
If you have a leaking Kenmore refrigerator, something is likely blocking your water line or your defrost drain. It could be either a foreign object, frost buildup from the refrigeration cycle, or a broken part. Clearing these blockages or breaks is the key to solving your leak issues.
How to Unclog the Defrost Drain
A blocked defrost drain will overflow, drip into the refrigerator, and eventually out onto the floor. To clear a defrost drain, you must start with the obvious: let it defrost. You can either cut the power and let the ice melt or pour hot water over it.
Once the ice melts from the drain, it should work correctly. If it still isn’t draining, there may be some solid debris blocking the drain path. Clean that out to get your drain clear again.
To get maximum results, you will likely need to remove the back panel before tending to the defrost drain. It is possible to leave the panel up and use a heat gun or compact hairdryer. However, you could risk melting the plastic, and you wouldn’t be able to get to any potential debris.
After tending to the defrost drain, it’s a good idea to check the drain tube leading down to the drain pan. This option may not be available on all models, so be sure to consult your appliance manual.
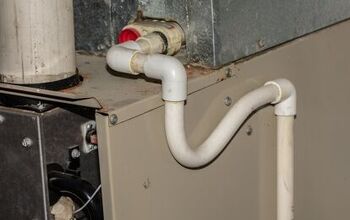
How to Unclog the Water Line
The drain water line leads the water down to the drain pan. If it’s frozen over like the defrost drain, the hot water should also clear the waterline. You may need a tool to remove it, like a turkey baster, compressed air, or a wire to remove debris. If the drain line is damaged, replace the tubing.
How to Clear the Water Inlet Valve
The water inlet valve controls the water supply to the ice maker and water dispenser. A loose water line connection or a failure in the valve solenoid switch can cause a leak.
If the leak is between the connection points, remove and reseat the water line to see if that stops the leak. However, if it doesn’t, the o-ring or water line needs replacing. If the valve failure is at the solenoid, or if the valve is cracked, you need a new part.
Do You Need to Replace the WHOLE Water Filter?
You can find the water filter in the bottom kick panel or the ceiling of the refrigerator. It may leak if it’s not seated correctly or if it’s cracked or damaged. Remove the filter to inspect for damage; if it’s intact, reseat it in the filter head or filter housing.
If reseating the filter didn’t work or if there’s damage to the part, then you need to replace it.
New Water Filter, Same Leak–Now What?
So now you’ve either reseated the functioning water filter or put in a replacement, but it’s still leaking. Depending on the model, the refrigerator may have a water filter head or water filter housing that it sits in. If the filter is intact, you’ll need to inspect these parts next.
The filter head could be cracked or have improperly connected supply hoses inside of it. Check the hose connections first, then check for a cracked or damaged head. If the filter and hoses check out, you should change out the water filter head.
The filter housing is a smaller holder similar to the filter head. As with the filter head, the filter housing needs to be free of cracks or damage. Otherwise, it’s time to order a new part.
Do You Have an Ice Maker?
If you have an ice maker installed in your refrigerator, this could be the culprit behind the leak. The cause can be as simple as an improper connection or as complex as a broken or failed part.
First, check the fill tube for the ice tray to make sure it is seated within the ice maker fill cup. Then, make sure the ice maker unit is level inside the freezer. Either of these parts out of alignment can mean water spilling into the compartment. If the installation is in order, see if your ice maker has a size adjustment function. This feature turns the water dispenser off sooner. A small turn of a screw could alleviate your problem.
Check the ice maker for any broken or eroded components. Next, check the control section for failing contacts, or the entire section may have gone bad. Any broken or failing components here mean replacing one or more parts or the whole ice maker unit.
There are two styles of ice makers: half-moon and flex-tray. The flex tray consists of several plastic components, so you may only need to replace one part. The half-moon model is a single metal unit that would require a full replacement.
You’ve Checked Everything…or Have You?
Once you’ve checked all of the obvious culprits: water lines, drains, valves and filters, what if there’s still a leak? If your Kenmore fridge is still leaking, there are two other parts of the refrigerator you need to check out.
Drain Pan
You can locate the drain pan underneath the refrigerator unit. When functioning, it catches any condensation from the defrost cycle so it can evaporate. If the drain pan is out of place or damaged, water can collect and overflow or leak from the pan.
First, check to make sure you have leveled the pan and inserted it correctly. If not, remove it, dump any collected water, then reinsert it. Make sure to align the pan and place it in the right position. Also, you need to replace a damaged drain pan.
Water Tank Assembly
The water tank assembly, which you can usually find inside the refrigerator wall, holds the dispenser’s water supply. Depending on the model, it’s either a long series of tubing or tubing alternated with small plastic tanks. You can reseat undamaged tubing first to fix the leak; otherwise, you need to replace the whole assembly.
Other Tips for a Smooth Running Fridge
Condenser Coils
In troubleshooting the causes of the refrigerator leaks, you may have made a horrifying discovery in the process. The condenser coils, which cools the interior, are notorious dust magnets. You likely found all manner of dirt, dust, grease, and possibly pet dander under there.
A good rule of thumb for maintaining your refrigerator is cleaning the condenser coils at least once a year. You’ll need a vacuum cleaner with a wand attachment and a stiff brush to get between the coils. If needed, some cleaning wipes will conquer any residual grease.
Keeping the coils clean and clear of dust helps the air circulate around them better. In turn, this allows the refrigeration cycle to run more efficiently and even saves on energy costs. If you have an Energy Smart refrigerator, that’s even more savings in your pocket.
Internal Storage
Your refrigerator’s efficiency is greatly dependent on HOW you store your food. The refrigeration cycle works best when the air is allowed to circulate within the refrigerator interior freely. Try to avoid tightly packing food containers inside your fridge.
The reverse is true for the freezer compartment: the more tightly packed, the better. A mass of food will retain the cold better, so the freezer doesn’t have to work as hard. Keep in mind, though, that the freezer vents still need to be unblocked to work efficiently.
Door Gaskets
One other important part of the refrigerator is the door gasket. The gasket is the rubberized strip surrounding the door that keeps it shut tightly. It’s a good idea to inspect the gasket for hold, wear, and contamination regularly.
Do You Need Appliance Repair Services?
Get free, zero-commitment quotes from pro contractors near you.
Related Questions
What’s the best refrigerator for my needs?
The refrigerator you decide to buy will depend on your household size and food supply. The main qualities you should consider are appliance size, cubic square footage for storage, and energy efficiency. The bells and whistles are nice to have but secondary to overall function.
How much does professional refrigerator repair cost?
The price you will pay for a professional repair depends on the problem. However, repair costs can range from about $150 to over $1,000. With such a wide range, it’s essential to weigh the costs of repairs against a new fridge’s price and the age of your current refrigerator.

Stacy Randall is a wife, mother, and freelance writer from NOLA that has always had a love for DIY projects, home organization, and making spaces beautiful. Together with her husband, she has been spending the last several years lovingly renovating her grandparent's former home, making it their own and learning a lot about life along the way.
More by Stacy Randall