How To Use A Zircon Stud Finder (Quickly & Easily!)
There are many methods to finding studs, with some requiring no tools at all. And while stud-finding hacks are useful to know, Zircon stud finders make any home DIY project accessible and painless, with no experience required. Whether you are hanging a television, a shelf, or a mirror, you can be confident of your handiwork.
Studs are the strips of wood beneath the drywall that function as the wall’s frame. If you’ve ever seen a house being built, you can recall the wood frame– sort of like a house’s skeleton. Most buildings have vertical studs spaced 16 inches apart. Electronic stud finders work to locate the edges of these studs through interior walls up to ¾” deep so that you can securely hang items up to 100 pounds.
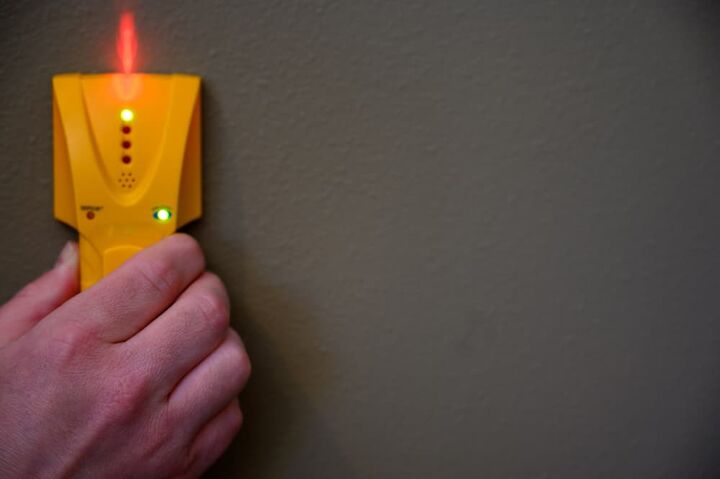
To use a Zircon stud finder, hold it flat on the wall. Press and hold the power button as you move the stud finder horizontally. When the stud finder beeps, stop and mark the edge of the stud as indicated.
When necessary, change direction and slide the stud finder along the wall until it beeps again to indicate another edge. Find the center between your two marked edges– that’s where you’ll want to drive into the stud.
Using a Zircon Stud Finder
When a stud finder is used correctly, you can hang heavy items safely and securely with a single screw. If you need to hang even heavier items, distribute the weight across several studs.
A single screw in drywall can handle up to 100 pounds, while an entire stud wall can support up to 20,000 pounds.
To get the most out of your Zircon stud finder, begin by installing a fresh battery and calibrating your device.
Tools You’ll Need
- Zircon stud finder
- Painter’s tape
- Pencil
Step One: Mark the Area
Once you have calibrated your Zircon stud finder, you’re ready to begin. First, mark the desired area using tape. For example, if you are hanging shelves, apply tape across the length of the wall where you plan to break drywall. This will streamline the process– plus it makes for easy clean-up.
Step Two: Position the Studfinder Flush with the Wall
Your hand’s position to the stud finder should stay the same as when you calibrated it. Holding the stud finder securely, make sure the tool is laying flat against the wall.
Step Three: Hold Down the Power Button
Press the power button on the side of the device and hold it down. The ready light will indicate when you can begin.
Step Four: Move the Stud Finder Along the Wall
Still holding down the button, slowly slide the stud finder along the wall horizontally. Keep your hand steady. The stud finder will beep when it detects an edge. Some stud finders have laser arrows to indicate. With your pencil, mark the first edge.
Step Five: Continue Moving the Stud Finder
Continue moving the stud finder horizontally until it beeps again or until it leaves the designated wall area.
Step Six: Change Direction
Without taking your fingers off the power buttons, change direction and continue moving the stud finder along the wall until it beeps again. Mark this as your second edge.
Step Seven: Locate the Center
Once you have marked both your edges, find the center by marking exactly halfway between the two. Drive into the stud here to securely hang any items.
How Stud Finders Work
Each wall is different. Some are covered in drywall and layers of paint. Some are thicker than others. And behind each wall is a different landscape, made up of studs, electrical wires, metal conduits, and PVC pipes. If you want to hang anything heavier than 10 pounds, you’ll need to locate a stud to drive into without hitting any wires or pipes.
A stud finder works by using a weak electrical field to measure the wall density. You must calibrate your stud finder so that it can recognize the density of the wall. Begin by placing the stud finder on an area of the wall with no studs. Once the stud finder grasps the density of your wall, the stud finder will alert when it senses a change in density.
Calibrating Your Stud Finder
Zircon stud finders are designed to be easy enough for anyone to use. Calibrating your device is essential to getting a correct reading. To calibrate, simply place the stud finder flat against the wall. Press the power button for 2 seconds. The stud finder will calibrate on its own.
If you began over a stud, the stud finder will flash and beep, indicating a calibration error. If the stud finder is letting out a continuous beep, try calibrating it on an area of the wall that you are sure does not have a stud behind it. Electrical boxes are always attached to studs, so find your nearest light switch and place the stud finder six inches away.
Common Mistakes
Miscalibrating Your Device
When calibrating your stud finder, hold it as you normally would. Any slight disturbance– even changing your hand position– could result in an error. Make sure you are not holding your pencil too close to your device, as the lead from the pencil could affect the calibration.
Old Battery
The most common way to troubleshoot your stud finder is to install a new battery. The manufacturer suggests loading your Zircon stud finder with a brand-new one, preferably with an expiration date three years from the installation date. Even if the battery is not entirely dead, it could be too weak to function properly.
If your stud finder flashes or blinks when you press the Power button, you have a battery issue. Zircon stud finders need a fully-charged 9V alkaline battery to function correctly, especially stud finders with LCD screens such as the StudSensor Pro LCD and StudSensor L50.
Alternative Solutions
Unfortunately, studs are rarely placed where we need them. The television would look great right here, but the nearest studs are way over there! We don’t have to sacrifice aesthetics for utility– not all the time, anyway. While the best option is to attach to a stud, there are a few sustainable solutions if you can’t find one.
Hollow Wall Anchor
If you can’t find a stud, consider using a hollow wall anchor. Hollow wall anchors can hold up to 50 pounds. When installed correctly, hollow wall anchors are a great alternative to studs.
Hollow wall anchors sometimes referred to as “molly bits,” are designed for thin materials like drywall and plasterboard that cannot support much weight. Hollow wall anchors work by piercing the drywall and distributing the weight evenly. For added security, double up on your hollow wall anchors to help disperse the weight.
Butterfly Toggle Bolts
Butterfly toggle bolts are perfect for anchoring heavy items to your drywall. Much like hollow wall anchors, butterfly toggle bolts secure items to thin walls when no stud is available. Butterfly anchors are a type of hollow wall anchor, but they can hold up to 100 pounds.
Butterfly toggles have a collapsible winged attachment that allows easy entry into your drill hole and expands once inside the wall for support. Once the “wings” have made it through the drill hole, they spring back open to hold the nut firmly to the wall.
Safety Considerations
Electric Shock
Stud finders may not detect live wires in the wall for many reasons. If the wires are encased in piping or there is moisture present in the wall, your stud finder will not alert. Never assume that there are no live electrical wires in the wall. Turn off all electric power and gas before penetrating the desired wall area.
Although hanging a shelf is a relatively simple task, failure to follow basic safety precautions could result in electric shock, fire, serious injury, or death. If you suspect the presence of live wires in your wall, turn off all power beginning.
If your Zircon stud finder has a Metal Scan mode, use it to locate any metal conduit or wiring. Using a nail shorter than two inches will also prevent penetration of any electrical wires or plumbing pipes.
Injury or Property Damage
Hanging heavy items without properly attaching them to a stud can be dangerous. If your wall hanging does not have the proper wall support, the weight can cause the wall to collapse, causing injury or property damage.
Always make sure your device is calibrated and double-check your edges. Make sure that you are attaching to a stud, and not a metal conduit or water pipe.
Related Questions
What does one continuous beep mean?
If your Zircon stud finder lets out one continuous beep, there is a calibration error. For a clean reading, place your stud finder on the wall where you know there are no studs, press and hold the power button, and move it horizontally in the desired direction. Your stud finder should stay silent until it detects a stud.
Can you hang something without a stud?
A typical nail or screw will hold 10 pounds securely without a stud. Light items such as posters, picture frames, blankets, and hats are safe to hang with a single nail. Hanging anything heavier without a stud will result in a compromised structure.

We are a team of passionate homeowners, home improvement pros, and DIY enthusiasts who enjoy sharing home improvement, housekeeping, decorating, and more with other homeowners! Whether you're looking for a step-by-step guide on fixing an appliance or the cost of installing a fence, we've here to help.
More by Upgraded Home Team


![The 5 Best Angle Grinders – [2022 Reviews & Buyer's Guide]](https://cdn-fastly.upgradedhome.com/media/2023/07/31/9071326/the-5-best-angle-grinders-2022-reviews-buyer-s-guide.jpg?size=350x220)