How To Use A Stanley Stud Finder (Find Out Now!)
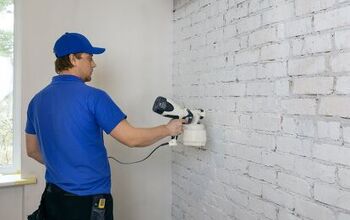
Stanley is one of the most recognizable brands when it comes to power tools and accessories. They make just about everything under the sun, making it possible for craftsmen to have an entire workbench full of Stanley.
Stanley also makes stud finders, which are the key to remodeling jobs and will come in quite handy for even the smallest jobs. Using it is as simple as managing a few buttons and watching for the red light to indicate that you are near a stud. It is a simple yet effective tool that can take on a huge array of tasks around the home or construction site.
Do You Need Handyman Services?
Get free, zero-commitment quotes from pro contractors near you.

Finding Studs
Studs offer structural strength. They are the backbone behind the drywall that allows for heavy anchoring. Before you can start hammering into a wall, you need to first know where the studs are located.
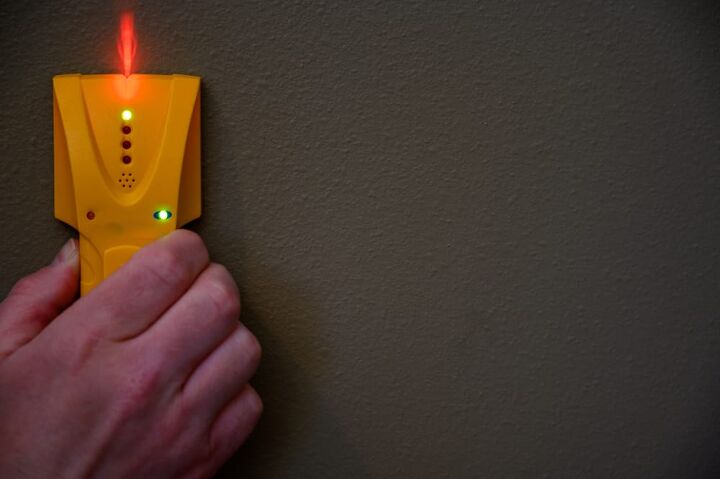
The old school way involved tapping the walls and carefully listening. But now, there are electronic stud finders like the Stanley Stud Sensor that make it super easy to find studs. Moreover, these devices can be accurate up to about 3mm or so.
Step 1: Turn it On
Can’t expect it to work if you don’t turn the device on, right? For the most part, Stanley stud finders require a 9-volt battery to supply power. Check to make sure that the battery is seated properly to ensure that it works.
Turn the unit on. When it is started properly, there will be a green indicator light that pops up. This lets you know that it is ready to go. If your stud finder doesn’t display the green light and the batteries are in place, it could be indicative of malfunction.
Step 2: Place it on the Wall
Next, place the stud finder up against the wall that you plan to work on. Make sure that you hold the stud finder at the height that you are planning to nail or drill into the wall. Try to make it as comfortable as possible so that you can drill or hammer as straight as possible.
There are some studs that jog or slant. When this happens, it can throw off calculations unless you happen to be at the exact height. Know ahead of time what kind of studs you are dealing with to make the process just a little bit easier.
Step 3: Positioning the Stud Finder
Slowly slide the Stanley stud finder across your wall. Start by moving horizontally as you go. There are red lights on the unit. These are meant to indicate the depth of the wall as you drag over the various pieces of the wall.
When the red light finally lights up, stop moving. This is an indication that you are approaching the location of a stud. When you are close, slowly move the stud finder back and forth until you are able to locate the stud. At this point, most of the lights should be on by now. Depending on your model, there may also be a tone of some sort that indicates that the stud has been located.
Step 4: Mark the Spot
This is the easy part. Now that your Stanley stud sensor has located the stud, simply mark off the spot using a pencil. You want to use a pencil for two reasons. First, it erases. You can make little marks here and there and simply get rid of them later.
The second is to remind yourself where to drill or nail. Even if you just had the stud finder up, it is easy to lose track of the exact location. Save yourself the trouble and mark all of these spots using a pencil and eraser.
What Do the Lights Mean on a Stanley Stud Finder?
For those who have not used a stud finder before, the different lights can be initially confusing. But once you know what each of them means, you can use them to quickly identify what is happening as you are locating a stud.
The red light is used to indicate wall depth. On some models, you may see “AC” lit up. That AC detection is meant to identify any potential live wires behind the wall. The AC detection can pick up wires that are up to 2” deep.
Beeps and sequential LEDs. When your stud finder starts to beep or flash in some kind of sequence, that indicates a reading. Depending on your model, there may even be a marking channel that makes marking the surface quick, accurate, and easy.
What Do I Do if I Don’t Have a Stud Finder?
Stud finders have made it easier than ever before to locate structural support behind walls. Though the process wasn’t exactly rocket science, it did leave questions about accuracy. Stud finders have since removed those questions.
But what do you do if you don’t have access to a stud finder? Thankfully, there are a couple of common solutions that you can implement to get the job done. Keep in mind that a stud finder will always be the quickest and easiest way, so make sure you have yours on you whenever you tackle a job.
Using Magnets to Find Studs
While this might seem like a bit of an odd method, it has been proven to work. All you need is a magnet and a little bit of tape or string to get the job done. Start out by taping or tying the string to the magnet so that you can drag it.
Put the magnet against the wall and slowly drag it until you feel it stick to the surface of the wall. More often than not, that will indicate where your stud is. Keep in mind that the stronger the magnet, the easier time you will have locating the studs.
Look at the Trim to Find Studs
What you may not have realized is that each of the baseboards in your home are connected to those studs that you are looking for. So, it only makes sense to check out the baseboards for an indication as to the location of the studs.
Check out the baseboards to see if you can see where they may have gotten nailed. Those small holes, called dimples, generally get filled with caulk or painted over. Still, you might be able to see one of them, giving away the location of the stud. When you find one of these small holes, measure out in 16” allotments to find the location of any additional studs.
Measure from the Corner to Find Studs
Here’s a good rule of thumb to consider: studs are typically about 16” on center. So, knowing that, you can perform calculations on where the other studs are by measuring out the corner of a room. Just be aware that not all rooms are built with numbers that are divisible by 16”, so you may find a stud that is under 16” away from a corner.
Start by doing a knock test near one of the corners. This can help you find the location of the shorter stud-spacing. If you are measuring the corner of the exterior of a house, the more effective you will be. Given that you have to go outside to do that, it isn’t anywhere near as effective as using a stud finder to do the job.
Do You Need Handyman Services?
Get free, zero-commitment quotes from pro contractors near you.
Why is My Stanley Stud Finder Not Working?
Even though Stanley makes a line of reliable power tools and accessories, there is no such thing as a perfect tool. From time to time, even the most reliable tools can break down and stop working. Your stud finder is no different.
That said, there are a handful of common reasons why it may stop working. Some are simple fixes and can be done in short order. Others are a bit more complicated.
1.) The battery. When your stud finder isn’t working, 9 times out of 10, a weak or failing battery is the cause. Whether the battery is defective, drained, or past its expiration date, it doesn’t matter. Replace those suckers to get your stud finder working properly once again.
2.) Know the materials. Believe it or not, stud finders are not meant to be used universally. Typically, they are meant to work with plywood and drywall (which are the most common materials used in home construction). When it comes to plaster, lath, or another type of material, you may need a different solution to locate the studs.
3.) Know your finder. There are basic stud finders out there, but there are also some that are a bit more precise. There are some stud finders that are either a center finder or an edge finder. Some are equipped to do both. Marking only one edge is a common mistake that many DIY homeowners make.
4.) Improper placement. This may sound completely obvious, but the stud finder has to be up against the wall in order to do its job. When you press the button, it starts to scan for studs accordingly. A common mistake is pressing the button before placing the stud finder, which produces a calibration error.

Ryan Womeldorf has more than a decade of experience writing. He loves to blog about construction, plumbing, and other home topics. Ryan also loves hockey and a lifelong Buffalo sports fan.
More by Ryan Womeldorf