How To Test A Dryer Thermal Fuse (Quickly & Easily!)

Your clothes dryer is running perfectly. The only problem is it isn’t drying the clothing. The dryer is not even getting warm. More than likely, the thermal fuse that protects the dryer from overheating has failed. The question is, how do you test the thermal fuse on your dryer?
Testing the thermal fuse in your clothes dryer is a simple matter using a multimeter. Set the multimeter to test for continuity. A bad fuse will not have any continuity and needs replacing.
The bigger challenge may be finding the thermal fuse in your dryer. There is no standardized location for these fuses with so many different models and styles of clothes dryers. Understanding how the thermal fuse works and its function gives us clues on where to look for this small device.
Do You Need to Hire an Electrician?
Get free, zero-commitment quotes from pro contractors near you.

What Is A Thermal Fuse and How Does it Work?
The thermal fuse in your clothes dryer is a small device that is sensitive to temperature. Clothes dryers have thermal fuses to prevent the dryer drum’s heat from going over a set temperature. This small sensor protects your clothing and your home from possible damage.
Typically, thermal fuses come in different styles, shapes, and designs. These sensors may be plastic or metal but usually have two wires and are attached somewhere near the exhaust from the dryer drum.
Where Should You Look for the Thermal Fuse?
On most clothes dryers, the thermal fuse mounts on the exhaust from the dryer drum. Locating the thermal fuse often requires removing the back panel of the clothes dryer. Clothes dryers vary by manufacturer. However, almost all share some basic steps to finding the thermal fuse.
Step 1 – Make Sure the Dryer Has Power
Before you do anything else, make sure that the clothes dryer has power. Most clothes dryers operate on 220 volts. Check your service panel and make sure that the circuit breakers have not tripped out.
220 Volt circuits usually have two circuit breakers. If one of the circuit breakers trips out, the dryer may still turn and seem to operate normally but may not heat.
Step 2 – Unplug the Clothes Dryer
Unplugging is the most important step you can perform to locate your clothes dryer’s thermal fuse safely. Most electric clothes dryers use 220 volts of electricity. Two hundred twenty volts can be a deadly shock if you inadvertently get your hands in the wrong place.
Step 3 – Remove the Back Panel of the Clothes Dryer
Look at the back panel of the clothes dryer carefully. Some models have retaining clips that release the back panel of the clothes dryer. Other models use small sheet metal screws to hold the back panel in place.
Have a small container handy in which to put the retaining clips or screws as you remove them. Set the back panel aside.
Step 4 – Examine the Clothes Dryer Interior
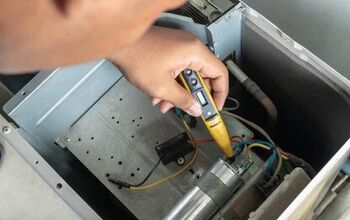
Look at the inside of your clothes dryer. You may need a small flashlight for this job. Locate the dryer exhaust. The thermal fuse is usually on the dryer exhaust close to the dryer drum. It may be metal or plastic and will have two wires attached.
While the dryer is open is a good time to check out the rest of your clothes dryer’s internal parts. It would be best if you took the time to check any drive belts for wear. Pay special attention to any lint build up around the motor or other moving parts. If there is lint buildup, use a small vacuum to clean out the inside of your dryer.
Keeping lint buildup from occurring in your dryer will extend its life and help prevent accidental fires.
Removing the Thermal Fuse
The only safe and reliable way to test the thermal fuse in your clothes dryer requires removing the fuse. With the fuse out of the dryer, you can use a multimeter to check the fuse. Often it is impossible to tell the condition of a thermal fuse from the outside.
Different models of clothes dryers have different methods of removing the thermal fuse. Some may have screw tabs that allow the fuse to be attached to the dryer vent. Others may use a strap or have clips into which the thermal fuse slides.
Examine the mounting method of the thermal fuse and carefully remove it from the mounts. Disconnect the two wires from the thermal fuse. The wires have different colors, and it is important to note the proper connection to the thermal fuse.
Using Your Multimeter to Check the Thermal Fuse
You can now easily check the thermal fuse condition using a multimeter in a few easy steps.
Step 1 – Set up Your Multimeter
Plug the test probe leads into your multimeter. The red probe plugs into the VOLTS plug on the multimeter. The black probe connects to the Common plug on the multimeter. With the probes connected properly, turn on your multimeter and put the selector onto the continuity setting.
On most multimeters, the continuity or Ohms setting is indicated by the Ohm’s symbol. (Ω). Some multimeters have a dedicated continuity setting. If your meter doesn’t have a dedicated continuity setting, chose the lowest resistance setting on your meter.
Step 2 – Test the Multimeter
Test your multimeter for proper continuity readings. Touch the ends of the red and black probe to each other. When you touch the probes together, the multimeter should sound a buzzer or tone.
The tone indicates that there is no resistance in the circuit. No resistance is commonly called a short or fault. A tone when touching the probes together is a good indication that your meter is working properly.
Step 3 – Test the Thermal Fuse
To test the thermal fuse, touch the red and black probe from the multimeter to the two wires attached to the thermal fuse. The test may be easier if your multimeter probes have small clamps or jaws on end. Otherwise, you can hold the probes and the wires safely.
Step 4 – The Multimeter Remans Silent
If the multimeter remains silent, the thermal fuse is probably bad. If the thermal fuse is not allowing any current to pass, the clothes dryer will not heat. At this point, you should purchase a replacement thermal fuse. Install the new thermal fuse in the reverse order that you removed the old one.
Step 5 – The Tone Sounds
If your multimeter begins to sound a tone when connected to the thermal fuse, the fuse is probably still good. You can reinstall the old fuse. However, if the clothes dryer still doesn’t heat, you have a more serious problem that requires further investigation and diagnosis.
If the Thermal Fuse is Good, What Else Could be Wrong?
If the thermal fuse tests good, several other things could be wrong with your clothes dryer. Some of these you can check and possibly repair. Others will need the attention of a trained appliance technician.
Check the Heating Coil
Every electric clothes dryer has a heating coil. These heating coils can fail over time as the coil continually heats and then cools. The heating coil is usually located near the clothes dryer drum’s bottom and is inside the dryer drum housing.
The heating coil’s electrical connections are visible on many models, which can make checking the heating coils much easier. Performing a continuity check on the heating coil is much like checking the thermal fuse. You need not remove the heating coil if you can access the electrical connections.
If the continuity check produces a tone on the multimeter, the heating coil is probably still good. If no tone results, the heating coil is broken and must be replaced.
If the Heating Coil is Good, What Then?
If both the thermal fuse and the heating coil test good, the problem with your clothes dryer needs the attention of a certified technician. Many newer models of clothes dryers have sophisticated control systems that have diagnostics built-in.
A trained service technician will have the instruments and equipment to diagnose further and repair any other problems with your clothes dryer.
Do You Need to Hire an Electrician?
Get free, zero-commitment quotes from pro contractors near you.

Finding the Fault
A little diligence and work can help you find a simple problem with an easy fix in your clothes dryer. A clothes dryer that operates but doesn’t get hot is many times a bad thermal sensor. The thermal fuse should be the first thing you check in these circumstances.
We hope that this article has pointed you in the right direction to diagnose and repair your clothes dryer. Remember to work safe and disconnect the power before opening any panels on your clothes dryer.

Dennis is a retired firefighter with an extensive background in construction, home improvement, and remodeling. He worked in the trades part-time while serving as an active firefighter. On his retirement, he started a remodeling and home repair business, which he ran for several years.
More by Dennis Howard


