


How To Tell If A Thermal Fuse Is Blown (Quickly & Easily!)
Protecting your appliances is crucial for keeping them in tip-top shape so that they can last you for the years to come. That’s why many different machines contain a thermal fuse, a device that helps your appliance protect itself. But what happens if the unit begins malfunctioning? How can you tell if your thermal fuse is blown?
To tell if a thermal fuse has blown, check your appliance for heat. If it’s not producing heat, you need to remove the thermal fuse and test it with a multimeter. If the multimeter has no significant change in readings, then this means your thermal fuse has blown and needs to be replaced.
The thermal fuse is a safety device that’s necessary for keeping your appliance safe. But this fuse can malfunction and blow. This guide will help you understand how to tell if your thermal fuse is blown and what steps you need to take after such a discovery.
Do You Need Appliance Repair Services?
Get free, zero-commitment quotes from pro contractors near you.

What Is A Thermal Fuse?
A thermal fuse is a component included in many of your heat-producing appliances that allows your unit to open your circuit if your machine is overheating. Think of it as a type of safety device.
The fuse can help detect heat due to a component breakdown or a short circuit. However, they don’t reset themselves once this is detected, so you will need to replace it once triggered or set off. It is essential for you to know that the thermal fuse only reacts to situations where the temperature is excessive, not the current unless the current is what causes excessive heat.
How To Tell If Your Thermal Fuse Has Blown
A sign that your thermal fuse has blown is that your appliance stops generating heat. For this article, we’ll use a dryer as an example, but this also applies to other appliances such as:
- Coffee makers
- Hairdryers
- Dishwashers and more
Let’s take your dryer, for example. When your dryer’s thermal fuse blows, then your dryer will stop generating the heat needed to dry your clothing. Generally, this happens right away. If your dryer is slowly losing heat, this would be a sign of your heating element going bad, not your thermal fuse.
Testing Your Thermal Fuse
To test your thermal fuse, you will need to remove it from your appliance so that you can test it with your multimeter. Below are the instructions.
- Isolate the thermal fuse. To test your thermal fuse, you will need to remove it from the appliance in which you believe your thermal fuse has blown. To find where the thermal fuse is located on your device, you can research the best way to remove it. Certain brands make it impossible to access the thermal fuse, which means you will have to call a specialist instead.
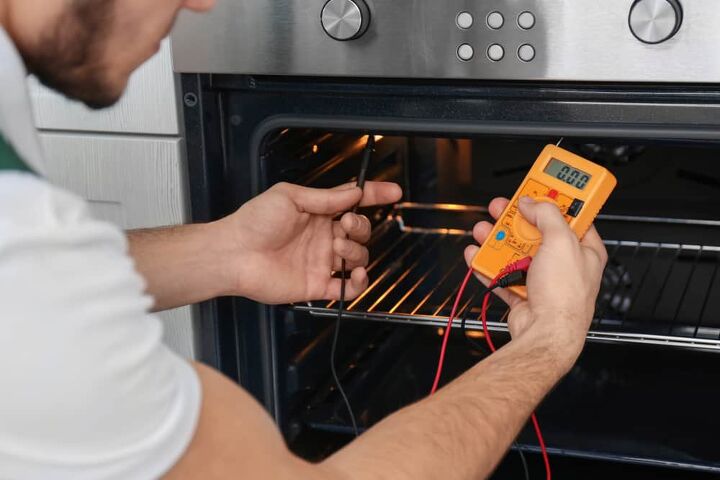
- Set up your multimeter. When your thermal fuse is removed, you will need to check to see if there is a continuous electrical path that is present. To do that, turn your multimeter to the lowest setting, which is Ohms of resistance.
- Apply the leads to the terminals. Now, take the black lead and touch it to one of the terminals on the fuse. Then, take the red lead and connect it to the other terminal. If your meter says 0, then this means that the fuse has electrical flow, and it has not blown. This means you’ll have to check into other causes of your issue. However, if there is no significant change in the multimeter from when you remove the leads and apply the leads, then this means your thermal fuse has blown and will need to be replaced.
Thermal Fuse For Dryers
If you have figured out that the thermal fuse on your dryer has blown, then you will need to make sure you clean the venting to prevent your newly installed thermal fuse from blowing. Typically, when thermal fuses in dryers fail, it’s due to lint building up in the exhaust venting, causing the dryer to overheat.
This is the classic reason why it’s crucial that you take a vent brush and clean out your vent at least once a year. This will help prevent fires, overheating and keep your dryer in its best working condition. You can also use a vacuum to clean this up as well as it will help to suck all the lint out of the exhaust tube.
Replacing A Thermal Fuse On Your Dryer
Replacing the thermal fuse on a dryer is more involved than replacing one on a coffee pot or hairdryer. That’s why we’ve included these instructions for you because the thermal fuses for dryers are the most common ones to blow.
However, the first thing you want to do before proceeding is to buy a replacement fuse. Check the make and model of your dryer first, and then go and buy the thermal fuse specifically for that. There are many ‘universal’ thermal fuses out there, but it’s best to get the one that’s created especially for your dryer.
Instructions
- Disconnect the power source. Before you get into the electrical panel of your dryer, ensure you disconnect the power source. If you don’t, you run the risk of severe electrical shock and burn injuries.
- Remove the panel. Check where your thermal fuse is according to the make and model of your dryer, and then remove that panel covering the thermal fuse so you can gain access. Usually, you will need a flat head screwdriver to pry the cover.
- Disconnect the thermal fuse. There are wires and a mounting screw that will be connected to your thermal fuse; all these need to be removed. Take care to pay attention to where the wires are connected, as you will need to know this when you install the new fuse. Also, remove the mounting screw.
- Install the new thermal fuse. Insert the new thermal fuse in the same place you just removed the old one from. Then, attach the wires the exact way they were connected to the old one. After the wires are attached, reapply the mounting screw to secure the thermal fuse to the unit.
- Replace the panel. Reattach the panel. When you do, make sure it pops on so that it doesn’t fall off.
- Turn your dryer on. Now you can plug your dryer back in and turn it on. Run it on the heat setting for 10 minutes, then check inside. If you feel heat, this means you’ve successfully fixed the issue. If not, you may need to check to make sure you’ve attached the thermal fuse correctly, or maybe enlist the help of a professional.
What If It’s Not The Thermal Fuse?
If you discover that the thermal fuse isn’t the issue, this can be extremely frustrating. For your dryer, you’ll also need to check a few things to get to the bottom of the problem. The heating element and the lint traps are both components that assist with adequate heating. You need to check both if the thermal fuse hasn’t fixed the problem.
Heating Element
The heating element is a piece that’s within your dryer that’s made up of several coils protected by an aluminum or metal casing. This is where the heat in your dryer comes from when it’s running your laundry.
If there’s anything wrong with this heating element, then you will most likely need to run your dryer a couple of times to dry your clothing thoroughly. Also, you may notice a sort of burnt metal smell. These are indications that your heating element is failing and needs to be replaced.
Lint Trap
If you don’t frequently clean your lint trap, this will block the hot airflow through your dryer. You should always clean your lint trap each time that you do a new load of laundry. Also, you should clean your dryer’s exhaust vent as well about once a year.
Do You Need Appliance Repair Services?
Get free, zero-commitment quotes from pro contractors near you.
Our Takeaway
Our heat-producing appliances are made up of an intricate and detailed system that helps keep them self-regulating. Part of this automated system includes a thermal fuse, which will open the circuit upon an incidence of overheating. The thermal fuse will need to be replaced since the thermal fuse does not reset itself once tripped.

Heather is a passionate writer who loves anything DIY. Growing up, she learned everything from home repairs to design, and wants to share her tips with you. When she's not writing, she's usually hiking or searching for her next DIY project.
More by Heather Robbins


![10 Best Electric Lawn Mowers - [2022 Reviews & Top Rated Models]](https://cdn-fastly.upgradedhome.com/media/2023/07/31/9070486/10-best-electric-lawn-mowers-2022-reviews-top-rated-models.jpg?size=350x220)
![10 Best Zero Turn Mowers – [2022 Reviews & Ultimate Buyer's Guide]](https://cdn-fastly.upgradedhome.com/media/2023/07/31/9070522/10-best-zero-turn-mowers-2022-reviews-ultimate-buyer-s-guide.jpg?size=350x220)


![10 Most Dangerous Neighborhoods in Baltimore [Updated]](https://cdn-fastly.upgradedhome.com/media/2023/07/31/9075655/10-most-dangerous-neighborhoods-in-baltimore-updated.jpg?size=350x220)

![How To Reset A Whirlpool Cabrio Washer [In 5 Easy Steps!]](https://cdn-fastly.upgradedhome.com/media/2023/07/31/9076531/how-to-reset-a-whirlpool-cabrio-washer-in-5-easy-steps.jpg?size=350x220)


