


How To Staple Insulation To Studs (Step-by-Step Guide)

One of the most important aspects of a well-built home is excellent insulation. If you mess up the insulation, it can cause significant spikes in heating or cooling bills and potential fires. You need to know how to staple insulation to your studs.
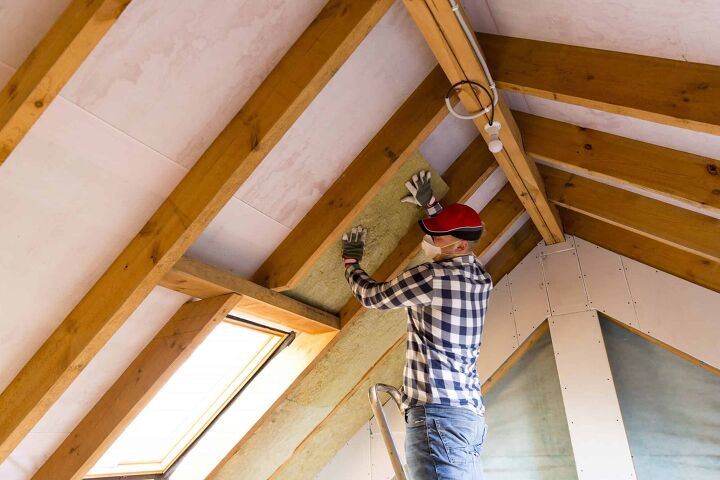
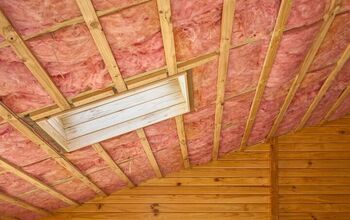
Looking at the cavity of your walls, be sure that your insulation fits those cavities. Next, staple your roll to the face of your stud using the insulation flange, which helps to prevent fires. Always use the flange when pinning, as that will avoid placing holes in your insulation. Be sure that the insulation is flush with the studs, and there are no gaps.
Below, we will be getting into the details behind this step-by-step guide on stapling insulation. We will also look into unique types of insulation and how to handle irregular studs.
Do You Need Spray Foam Insulation Installers?
Get free, zero-commitment quotes from insulation installers near you.

Stapling Insulation To Studs: A Step-by-Step Guide
- Research r-value
- Purchase or check your current equipment
- Remove old insulation if needed
- Cut insulation as needed
- Place flush with the wall and staple using the flange.
A good deal of this will change depending on the type of insulation you purchase. For this step-by-step guide, we are assuming that you are buying standard batts.
Step One: Research The R-Value Based On Your Zone
Before getting this started, you are going to want to be aware of the necessary r-value based on your zone. An r-value determines the amount and quality of insulation you need in order. Given that we are dealing with rolls, they are often aware of the required R-values.
In this case, a standard wall usually comes in 2×4 or 2×6 wall studs. The difference being that the 2×6 has studs that are two inches deeper, therefore having a higher R-value requirement.
In this case, you will want to be around R13 through R15 for 2×4 walls and R19 to R21 for 2×6 walls. It is the standard that most walls follow unless we are dealing with some extreme exceptions.
Step Two: Purchase Or Check To See If You Have The Necessary Equipment
Your next step is to do an inventory of the items you currently have. For anything you don’t have, you are likely going to make a trip to the hardware store. Below is a list you should consider.
- Utility knife
- Thick, plastic bags
- Face, eyes, and body protection
- Staples and staple gun
- Several rolls of insulation
The eye and body protection are incredibly important, as any insulation making contact with you can irritate. If you manage to get any on your skin or eyes, be sure to wash immediately with water and mild soap.
Step Three: Remove The Old Insulation If Needed
Your next step is going to be to check on the old insulation. If there is none, this step will not apply to you.
If you are keeping any of the old insulation, check for any mold or mildew spots. You don’t want to keep any of that stuff on your wall. If you find mold or mildew, tear the entire chunk of insulation out to replace it with a new roll.
This open wall is an opportunity to check if there are any water leaks, which are typical causes of mold or mildew in walls. If you found one, do not install new insulation if you can help it, that will only push the problem down the road.
Step Four: Cut The Insulation To Meet Your Wall’s Needs
Your next step is to check for any unusual sizes of insulation. While the studs should remain the same depth and width, the height may change depending upon various features and windows.
Measure out these sections and cut them down so that they remain snug. Be sure not to cut up and down, as that will prevent you from being able to staple the flanges.
You should also be aware of pipes and electrical features in the walls. Be sure to turn off the power before starting. You may have to cut the insulation in such a way where it wraps around pipes and other fixtures.
Regardless of what you do, always remember that your insulation needs to be snug.
Step Five: Place Your Insulation Roll Flush With The Wall And Staple Down The Flanges
If your cuts are proper and the inadequate insulation is gone, it is finally time to insert the new set. With any insulation job, you will want to be incredibly careful to address any gaps.
If you have already cut to the point where everything fits, you shouldn’t have to worry about this part. When you staple down the flanges, do so on the face of the stud.
Failure to follow this will cause your home to be a fire hazard, as it will allow for gaps in your electrical wiring. Also, you will release a good deal of warm air, eliminating the purpose of your insulation. Any building inspector will agree with this statement.
Related Questions
What If I Have Very Irregular Studs?
If you have unusual studs, your insulation project may be a bit tricker. While you could spend hours cutting up specific dimensions of insulation, this is where spray foam insulation comes in handy.Be especially careful with any gaps when you have irregular studs. If you end up cutting into foam, you an invest in a heat knife, but those can be incredibly expensive.
Which Side of The Insulation Goes Against The Wall?
Faced insulation is a type of insulation that has a paper on one side. This paper should go on the outside of the insulation; the flange for stapling is part of the paper. “Faced” insulation is also known as paper backed insulation.In unfaced insulation, the side that faces the outside does not matter, as both sides are just insulation. Be sure that you wear gloves if you plan on handling either type of insulation.
Can You Staple Unfaced Insulation?
No, unfaced insulation does not have a method in which to staple them on. You typically use friction to hold the insulation.If you have a separate vapor retarder, you can staple this across unfaced rolls. Rolls with faces already have the vapor retarder attached.
Do I Need To Staple Faced Insulation?
It is not required to staple your insulation. Insulation is typically able to keep itself contained with a combination of drywall and friction. However, staples do work well as an extra measure to ensure your rolls do not slip.If you have any section of insulation that seems off, you should staple the entirety of it. If it is loose on one side, it does have the chance to slip out on the other side.
Do You Need Spray Foam Insulation Installers?
Get free, zero-commitment quotes from insulation installers near you.
If you consider Joists to be the studs of ceilings, you can still staple using the same insulation flange. In this case, friction still applies to do most of the work for you.
With gravity working against you, you should feel more encouragement to use staples. Having insulation fall out at this level Is a bit harder to handle.
I'm a guy who becomes the expert of whatever I stumble upon, writing-wise. I've written tons about cool home products, home improvement, and smart technology in the home. I'm also the proud father of a kiddo born on new years, making my holidays very busy.
More by Eli Smith


![The 5 Best Angle Grinders – [2022 Reviews & Buyer's Guide]](https://cdn-fastly.upgradedhome.com/media/2023/07/31/9071326/the-5-best-angle-grinders-2022-reviews-buyer-s-guide.jpg?size=350x220)
![10 Best Electric Lawn Mowers - [2022 Reviews & Top Rated Models]](https://cdn-fastly.upgradedhome.com/media/2023/07/31/9070486/10-best-electric-lawn-mowers-2022-reviews-top-rated-models.jpg?size=350x220)


![Cost To Drill A Well [Pricing Per Foot & Cost By State]](https://cdn-fastly.upgradedhome.com/media/2023/07/31/9074980/cost-to-drill-a-well-pricing-per-foot-cost-by-state.jpg?size=350x220)
