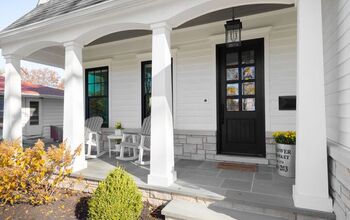
How To Secure Porch Posts To Concrete (Do This!)


Porches add value to a home, especially when they have handrails with well-installed posts. Unfortunately, that means that you’ll have to spend some time and use some elbow grease to make that happen. With that said, how exactly do you secure a porch post to concrete?
First, determine the post location and place post anchors on the ground to visualize it. Mark the post anchor’s holes so that you know where to drill and use a masonry bit to create holes. Secure the post anchors, place the posts inside of them, and screw them into place with 1 ½” lag screws.
Do You Need Landscaping Services?
Get free, zero-commitment quotes from pro contractors near you.

How To Secure Porch Posts To Concrete
Make sure that you have safety goggles and gloves so that you can avoid wood splinters. A porch is only as good as it is secure, so it’s important to follow each step closely. Let’s take a look at how you can secure porch posts to concrete so that they are sturdy.
Tools For the Job
You need to gather the proper tools before you can secure a porch post to concrete. Most of the tools required are things that many builder-owners already have on hand, such as:
- Drill machinery
- Masonry bit
- Post anchors
- Posts
- Plastic anchors
- Rubber mallet
- Circular saw
- Eye protection/safety goggles
- Lag screws (1 ½” & 3”)
Eye and face protection is extremely important if you have to cut the posts with a saw. Make sure that whatever drill machinery you use has a hammering function to drill into the concrete. You will also need a masonry bit or else you risk damaging the tool.
Plastic anchors can be swapped out for metal or wood, but plastic is best for this job. Buy lab screws that measure 1 ½” for the post itself, and 3” for the post anchor. The rubber mallet will come in handy when you hammer the plastic anchors into the holes in the concrete.
Follow along as we go step-by-step on how to secure porch posts to concrete.
1. Determine Post Location
Look at your porch and determine where you plan to place your posts in the concrete. It’s common for builder-owners to place multiple posts on the porch to support the railing. Decide where you want your posts to be located, and then mark them with chalk or a pencil dark enough that you can see it.
This is where you will eventually place the post anchors so that the posts stay in place and are secure. Before you move on, take a precise measurement of the diameter of the post anchor to make sure that it is equal to the posts.
2. Cut the Posts
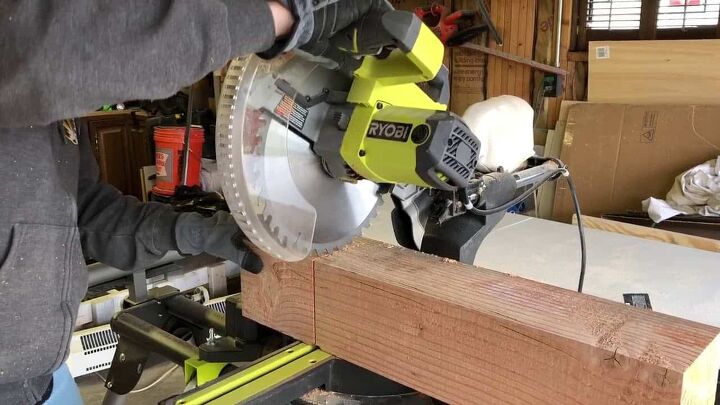
Unless you bought pre-cut posts, you will need to carefully cut your own to fit the post anchors. Try to find pressure-treated wood that you can easily paint or stain to your liking. Measure the length and width of the posts, and make sure that the width doesn’t exceed that of the post anchors.
You can cut your wooden posts with a chainsaw, but a circular saw may be more precise for this job. Cut the posts to the exact measurements of the post anchors and be sure to wear protective eyewear. Try to cut the posts for width before length so that you can check the width before you move on.
If you have rails that you are placing over the posts eventually, you can cut the posts for height to suit them. You can cut the posts to whichever height you like, but avoid making them too tall if it’s for a handrail.
3. Position the Posts
Grab your post anchors and place them where you intend to put them on the concrete. Hold the anchors in place while you slide the wood into them to see if they fit. If they do fit, you won’t need to cut the posts any further.
However, if the posts don’t fit inside the anchors, you will need to trim them accordingly. Now, take the posts out of the post anchors and mark all 4 hours with a pencil. Make the marks dark enough that you’ll be able to drill into them exactly.
4. Drill Holes
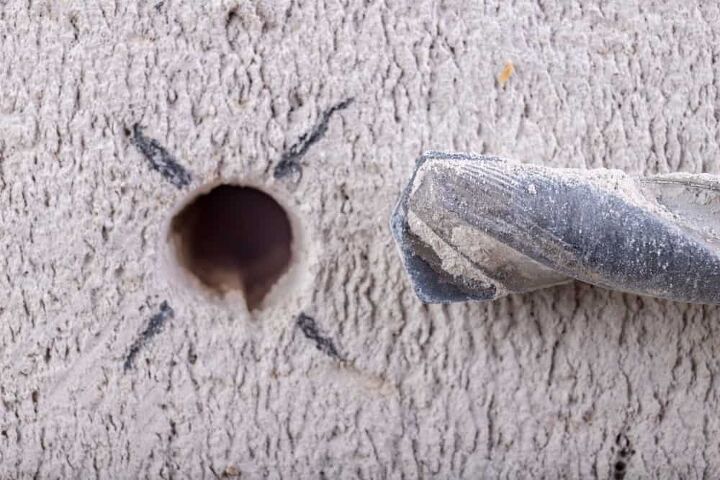
Remove the post anchors after you mark the holes dark enough for you to see them. Make sure that you have drill machinery on hand that can be fitted with a masonry bit to penetrate the concrete. Attach the masonry bit and begin to drill into each hole that you marked while keeping the machinery straight.
If your machine does not have hammering abilities, you will have trouble drilling into the concrete. After you drill the holes, use a small brush to clean out each hole after you have drilled them all to remove any debris. You can use pressurized air to clear out any concrete debris after you drill the holes.
5. Plastic Anchors
Once you’ve cleaned out the holes, you can hammer plastic anchors into them. Plastic anchors, or dowels, will go into the holes on the post anchor eventually, so proper placement is critical. You can use metal or wooden dowels, but plastic anchor dowels are the best for securing porch posts.
Position the plastic anchors so that they are completely straight and even before you hammer them in. You can place the anchors into the holes and slip post anchor over them to make sure that they fit first. Once you know you have a good fit, it’s time for you to hammer them into the holes in the concrete.
Use a rubber mallet to drive the plastic anchors into the holes while keeping them straight. It should take you up to 4-5 whacks with the mallet to properly drive them into the holes. Be careful to not drive the dowels in so that the top of them is sticking out.
6. Screw-In Post Anchor
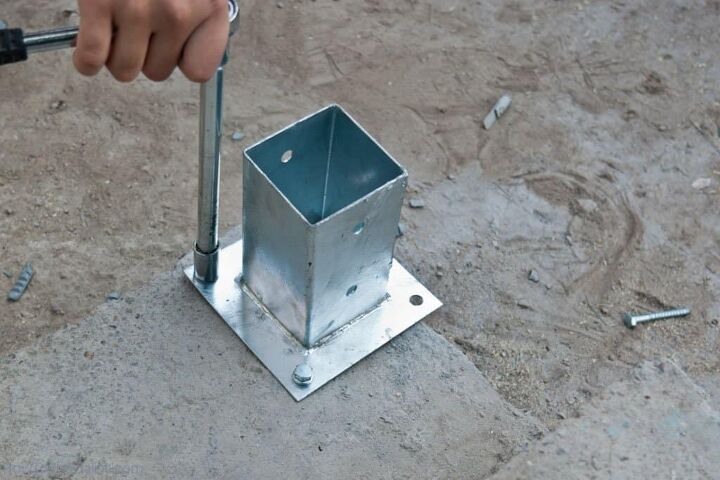
Now, it’s time to screws the post anchors into place so that the posts will stand even. Position the post anchor over the plastic dowels so that the holes are directly above them. You will need to secure the post anchor using lag screws, and you want to use at least 3” screws.
Use a wrench key to screw each lag screw into place and put washers on top of them to secure them. Check each plastic anchor to make sure that it’s straight before you drive the screws into the post anchor. Once you’ve screwed in each lag screw, you can move on to the next step.
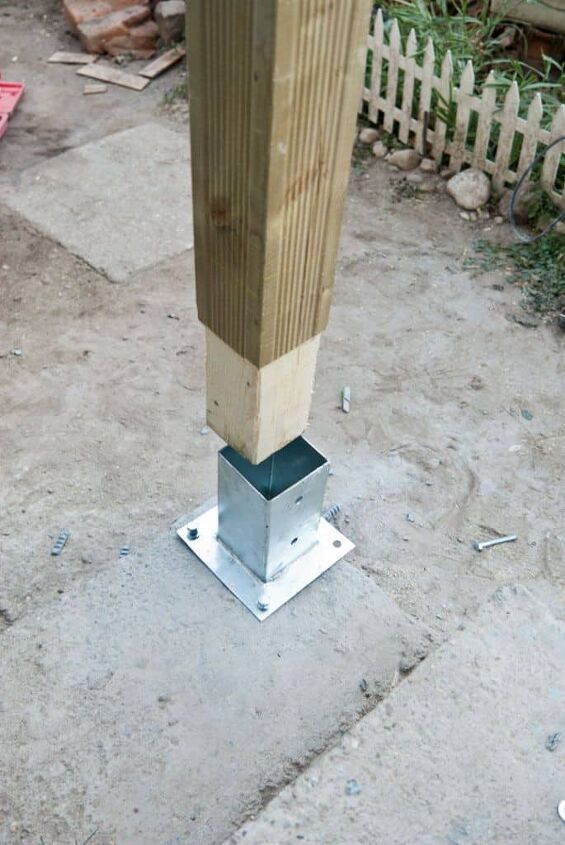
7. Insert the Post
Now, you can slide the post into the post anchors by hammering them in with the rubber mallet. The post should fit perfectly if you’ve taken the proper measurements in the previous steps. You can choose to apply wood primer to the posts beforehand to make them water-resistant, but that’s optional.
8. Screw the Post In Place
Now, use lag screws that are smaller than the ones that you used for the dowels to screw the posts in place. You won’t need more than 1”-1 ½” lag screws to screw the posts in place unless they are very wide. Most post anchors have holes for screws, but if yours doesn’t, you’ll need to drill your own with a bit suitable for metal.
Otherwise, you can insert the lag screws into the holes in the post anchors and drive them into the posts. You can use the same wrench key to secure the posts as you used to put in the plastic anchors. Once your lag screws are in place, your post is secure and properly anchored to the porch.
Repeat the above steps for however many posts that you decide to install. As long as you take the proper measurements you can ensure that your porch posts are even and secure.
Related Questions
Do porch posts need to be anchored?
Yes, porch posts need to be anchored and that’s often required by building regulations. Securing them to the concrete is the best way to anchor posts, but you can also secure them to the post footings.
How much does a porch cost?
A porch costs between $2,800 and $10,000 to install, on average. However, a screened porch costs up to $22,000 or more in construction costs and materials.
Do You Need Landscaping Services?
Get free, zero-commitment quotes from pro contractors near you.
What Did We Learn?
The first thing that you need to do is take measurements so that you can make sure the posts are even. Place post anchors on the concrete and mark the holes with chalk or a pencil so that you know where to drill. Use a drill that has hammering abilities and masonry bit so that you can drill into the concrete.
Clean the drill holes with a brush or pressurized air, and place plastic anchors (dowels) into them. Use a rubber mallet to carefully hammer the plastic anchors into the holes. Now, place the post anchor over the plastic anchors and screw 3” lag screws into them.
Secure the lag screws with washers to form a tighter, more secure bond. Now, slide the posts into the post anchors and screw 1 ½” lag screws into them. Your porch posts are now secured to the concrete and you’ll have nothing to worry about.
Related Guides
Nick Durante is a professional writer with a primary focus on home improvement. When he is not writing about home improvement or taking on projects around the house, he likes to read and create art. He is always looking towards the newest trends in home improvement.
More by Nick Durante