How To Remove Deck Boards Attached Using Screws (Do This!)
The deck is supposed to be a hugely positive addition to your home. It becomes harder to say that when the deck boards you used are looking worn down or are just plain broken.
You must replace those boards if you want to restore your deck to its former glory. Before you can replace the boards though, you will first have to remove them.
To remove the deck board that is attached with screws use pliers to grip the head of the screw, lock them into position, and turn counter-clockwise to pull the screw out. You can also remove your bit from the power driver, and use the chunk over the screw head to remove the screw.
The sight of a worn-down deck can be quite unpleasant. Work on fixing that part of your home through proper removal and replacement. Read on to learn more about deck boards and how you can care for them better.
Do You Need a Deck or Porch Contractor?
Get free, zero-commitment quotes from pro contractors near you.

What Are the Common Problems That Affect Wooden Decks?
Wood is a very durable and resilient material. However, even wood has its limits. When it’s constantly exposed to the elements, it will inevitably encounter certain problems.
Listed below are some of the common problems that may affect your wooden deck. Be mindful of them if you want your deck to stay intact for as long as possible.
Fading
A wooden deck will look absolutely spectacular when it’s first installed. The shine of the wood is one of a kind and it adds an element of refined design to your home.
Sadly, that shine won’t stay on the wooden surface forever. The elements will eventually alter the appearance of the wooden deck and cause that shine to disappear. You can do things to revitalize the shine, but replacing the boards is the best way to bring it back completely.
Shrinking
Shrinkage is another problem that can affect the wooden boards that form your deck. Since wood has a tendency to shrink over time, small gaps may form along the deck over the years.
Those small gaps are likely not enough to compromise the structural integrity of the deck. However, they could turn out to be unsightly blemishes that you’ll want to remove.
Rotting
This is the most serious problem that could affect your home’s wooden deck. Granted, it can take a long time for wood to rot, but once it happens, immediate replacement is necessary.
It’s not just the appearance of the deck that suffers from rotting. Someone could also slip through the deck if they step on a rotten board. Stay clear of that problem by removing and replacing the rotten wooden boards.
Why Should You Remove Individual Wooden Boards Instead of Replacing the Whole Deck?
So, why should you go through the trouble of removing and replacing individual wooden boards? The answer typically boils down to cost.
Wooden decks tend to be quite expensive. You may have to pay thousands of dollars for a new deck to be installed. If only a few boards are damaged, it’s worth taking the time to remove and replace them to restore the deck.
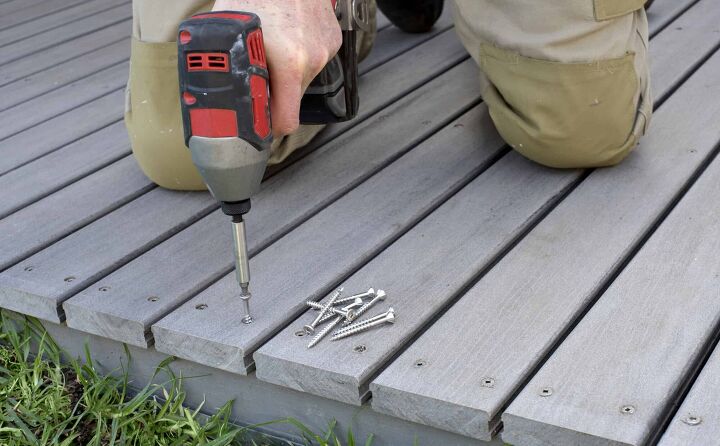
How to Remove the Screws Holding the Deck Boards in Place
Removing the individual deck boards could turn out to be a pretty easy task or a labor-intensive one. The status of the deck and the screws used will determine what kind of job you’re looking at.
The most straightforward method of removing the deck boards is to simply remove the screws. Here are the steps you need to follow if you prefer this approach.
Step 1: Get the Items Necessary for Removing the Screws
The basic tool you’ll need here is a screwdriver that matches the screws installed, but that likely won’t be enough. You may also need a flathead screwdriver, hammer, a rotary tool, pliers, and even some cloth. There’s no guarantee that you’ll need all those items, but get them ready if you have them.
You should also prepare some Screw Grab if you have it lying around. It could come in very handy during this job.
Step 2: Remove All the Intact Screws
Let’s ease into this project by targeting the intact screws first. Look for the intact screws attached to the damaged boards and start removing them. You shouldn’t have that much trouble removing them as long as you grabbed the right kind of screwdriver earlier.
Step 3: Remove the Stripped Screws
Removing intact screws is not much of a problem. You cannot say the same thing about the stripped screws.
Stripped screws are the ones with damaged heads. Due to the damage present on the screw head, removing it with a matching screwdriver will no longer be possible. You will have to enlist the help of other tools to get the job done.
Step 3.1: Use Pliers
A pair of pliers can be used to remove stripped screws if their heads are raised above the wooden surface. Grab the head of the stripped screw with the pliers and twist it out.
Step 3.2: Use a Screwdriver and Cloth
If the stripped screw still has a bit of a groove, it may still be removable using a screwdriver. Place a piece of cloth over the screw and start turning the flathead screwdriver.
The cloth should go into the small groove and allow your screwdriver to engage the screw better. You can also use a rubber band or a thin piece of cardboard instead of the cloth.
Step 3.3: Use Screw Grab
Screw Grab is a special product that you apply to stripped screws in order to create friction. The increased friction makes it possible for the screwdriver to grab a firm hold of the stripped screw. Apply the Screw Grab to either the screw head or the screwdriver to make use of it.
Step 3.4: Use a Screwdriver and Hammer
Screws that are so badly damaged that they no longer have notches have to be handled differently. To be more specific, you’ll have to create the notches yourself.
Position a flathead screwdriver over the screw head and then gently strike the aforementioned tool with a hammer. Keep going until you’ve carved a deep enough notch inside the screw head for the screwdriver to fit in.
Step 3.5: Use a Rotary Tool
Similar to step 3.4, your goal with using a rotary tool is to create a notch deep enough for the screwdriver. Using a rotary tool is easier because it’s more precise, but you don’t have to go out and buy one.
How to Remove Broken Screws Using a Pry Bar
The steps above are useful for removing intact and stripped screws. You’ll have to use a different approach if you want to remove deck boards with broken screws.
Step 1: Gather All Your Tools
For this method, you’ll want to prepare a pry bar, hammer, and pliers. You should also don some safety gear. Gloves and goggles are essential so put them on now.
Step 2: Pry the Deck Board Free
Go to the spot closest to the screws and position your pry bar next to a nearby side of the board. Use the pry bar now to grab hold of that side and start pulling it up. Keep going until the screws have been exposed from underneath.
Step 3: Hammer the Screws Upward
You’re probably wondering why you cannot just use the pry bar to remove the deck boards completely. The reason why is because you could damage the rest of the deck by doing that.
Refrain on pulling them out that way and focus on getting the screws out of position instead. Move to the underside of the board and use your hammer to strike the screws. Continue striking the screws until they protrude from the top side.
Step 4: Extract the Screws Using the Pliers
Now that the screws are exposed up top, you should be able to free them using your pliers. Just hold the head of the screw firmly and twist it loose.
Do You Need a Deck or Porch Contractor?
Get free, zero-commitment quotes from pro contractors near you.
Related Questions
Can You Restore the Wooden Deck’s Appearance without Removing the Boards?
Removing and replacing the deck boards is not necessary if they’re still in good condition from a structural standpoint. Instead, what you can do is stain the deck. Start by cleaning the deck and then sand down the boards. After sanding, you can apply some deck stain. Pick the color of your choice and watch your wooden deck come back to life.Also, consider applying some sealer after applying the stain. The sealer will preserve the appearance of the deck and allow it to look its best for a longer period of time.
How Do You Clean a Wooden Deck?
If you want to clean a wooden deck properly, you have to be thorough. Begin by dislodging any debris stuck between the deck boards as they can cause problems down the line. Next, sweep the wooden deck and make sure it’s clear of any debris. You can now apply the wood cleaner to a paint roller and start working over the surface of the deck. Follow the manufacturer’s instructions regarding how long to let the cleaner soak.Note that vinyl and composite decks don’t respond well to wood cleaners. It’s best to just scrub them clean with a soft brush if you want to maintain their appearance.

We are a team of passionate homeowners, home improvement pros, and DIY enthusiasts who enjoy sharing home improvement, housekeeping, decorating, and more with other homeowners! Whether you're looking for a step-by-step guide on fixing an appliance or the cost of installing a fence, we've here to help.
More by Upgraded Home Team