How To Remove Aluminum Siding Without Damaging It
Aluminum siding can be a huge benefit to homeowners. A house outfitted with aluminum siding is easy to maintain and doesn’t require painting. However, there may come at a time that you need to repair or replace some of your aluminum siding. Such situations raise the question, “How do I remove the aluminum siding without damaging it?”
Removing aluminum siding without damage is much easier than most people think. The process is almost exactly the reverse of the installation process. The trick is getting the first piece started. With the first piece of aluminum siding free, you can work methodically in reverse to remove as much siding as you need for replacement or repair.
Following a few step-by-step instructions, having the right tools, and taking some time are the key ingredients to a successful aluminum siding repair. Out tips, tricks, and instructions will help you repair your aluminum siding without damaging it further in the process.
Do You Need Metal Siding Installation or Replacement?
Get free, zero-commitment quotes from pro contractors near you.

Do a Little Prep Work – Getting Ready for the Job
One of the tricks to almost any repair job is to do your homework. There are a few things to figure out, and some preparations to make before you begin the job. Having the right tools on hand also makes the job easier and quicker.
Step 1: Investigating the Situation – Where to Start
Figuring out where to start can be the biggest challenge. If you are removing old siding to install new sections, the choices may be much easier. However, if the repair you are doing is to the structure of the house, you may want to reinstall the existing siding. Take a moment to consider the following.
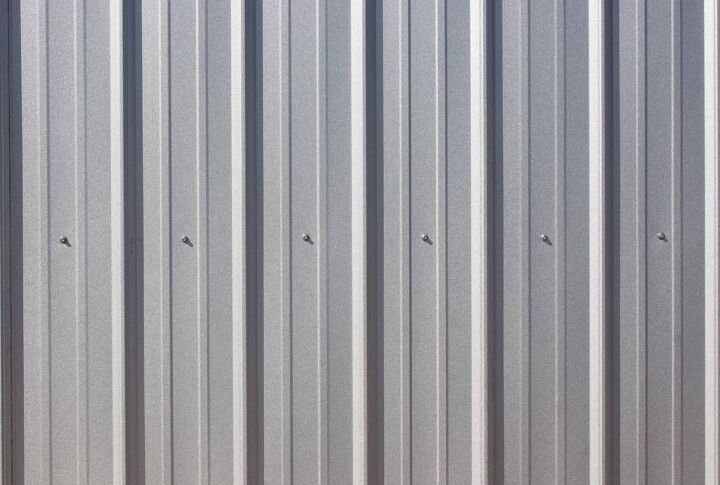
Look at the SidingThe first step is to look at the siding to see if you understand how the installation works. Most aluminum siding has nails across the top of each section. The sections lap together with a simple join between the lower edge and the upper edges of the aluminum siding.
Are there any loose pieces of siding in the area you need to remove? Sections of aluminum siding that are already loose are a perfect place to start removing the existing siding. Unzip the lap joint between the upper and lower section of aluminum siding.
Where the aluminum siding is in good shape, you should look for an edge on the damaged section. An edge that butts against a window frame or door frame are your best option. Using a thin tool or a piece of wire, work the lap joint loose and then unzip the joint.
Step 2: Determine the Tools You Need
Having the right tool handy is the best start for a successful project. In this case, determine the proper tools by looking at the installation method. On older homes, the aluminum siding will have nails along the top edge. Newer installations may have special screws.
Carefully lift the section of siding where you unzipped the lap joint and look underneath. You should be able to see the fasteners along the top edge. You will need the proper tool to remove the fasteners without damaging the siding.
- Where screws hold the aluminum siding, make sure that you have the proper type of screwdriver. Some siding screws have unique styles of screwheads that require a particular bit.
- If nails are holding the siding, you will need a small nail bar to remove the nails effectively. Removing these nails without damaging the siding can be tricky. A smaller nail bar with a thinner edge is the best. A pair of pliers is also handy.
- Protect your hands. Aluminum siding is sharp and can inflict serious injuries. Wear a pair of suitable leather work gloves or cut-resistance gloves when handling aluminum siding.
Removing the Siding – Patience and Care
Armed with an understanding of how your aluminum siding connects and with the right tools, you are ready to start. The trick to this part of the process is to work methodically and carefully to prevent damage to the aluminum siding.
Step 1: Getting to the Fasteners
You should have the first section unzipped from the section below at this point. You need to remove the fasteners along the top edge of the lapped section. Getting a start on the fasteners can be challenging without bending or creasing the upper section.
Placing a small block of wood under the edge of the loose siding may make it easier to work. Just don’t bend the siding too much as you raise to get access to the fasteners holding the lower section.
Step 2: Removing the Fasteners
If nails hold the siding to the house, a small pry bar and a pair of pliers are your best choices. Don’t use the siding as a fulcrum for the prybar. You will dent and crease the thin aluminum. A small piece of thin stiff material under the pry bar can help prevent damage to the aluminum siding.
With the fasteners on the section removed, carefully slide the length of aluminum siding down and free of the house. Lay the section of siding flat somewhere out of the way.
Step 3: Repeat
Continue the steps until you have removed as much siding as necessary to allow the repairs. Number the sections of the siding as you remove them. Siding installation requires custom cuts and it is crucial to replace the sections in the same order.
If you are removing several sections of siding over a larger area, you may need to draw a diagram of the siding. Numbering the pieces of siding can help return the sections to the same spot on the wall. Number the siding sections and put the corresponding number on the diagram.
Step 4: Replacing the Siding
Before you replace the aluminum siding, inspect, and clean the panels. Look at the edges, especially where the lap joint edge. If there is any damage to these edges, consider replacing that section of siding.
When nailing or screwing the sections back in place, leave a little wiggle room. The nails or screws should not be so tight that they dimple or bend the edges of the holes. The section of siding should be able to move slightly to allows for contraction and expansion.
Work Slowly and Carefully
Work slowly. Be careful about bending or creasing your siding sections as you move them and reinstall them. If you inadvertently damage or bend a section, it should be replaced and not reinstalled.
It is also a good idea to wear leather work gloves. The edges of aluminum siding can be extremely sharp, and the slightest slip can leave a nasty cut. Better to be safe than spend the afternoon in the emergency room getting stitches.
Do You Need Metal Siding Installation or Replacement?
Get free, zero-commitment quotes from pro contractors near you.
Keeping your Home Attractive and Protected
Aluminum siding can add value and curb appeal to your home. The proper maintenance and repair of your aluminum siding are crucial to keeping your siding performing. Aluminum siding removal and replacement are well within the capabilities of most home do-it-yourselfers.
With the proper tools and a little preparation, you can keep your siding looking good and working correctly. These simple steps outlined above should help you with the tasks of removing and replacing your aluminum siding.

We are a team of passionate homeowners, home improvement pros, and DIY enthusiasts who enjoy sharing home improvement, housekeeping, decorating, and more with other homeowners! Whether you're looking for a step-by-step guide on fixing an appliance or the cost of installing a fence, we've here to help.
More by Upgraded Home Team