How To Remove A Schlage Door Knob (Quickly & Easily!)
Schlage is a hardware and home security product manufacturer. They have a line of products meant to make the home safer and more secure than ever before. That includes a line of doorknobs, including those for the home’s front door.
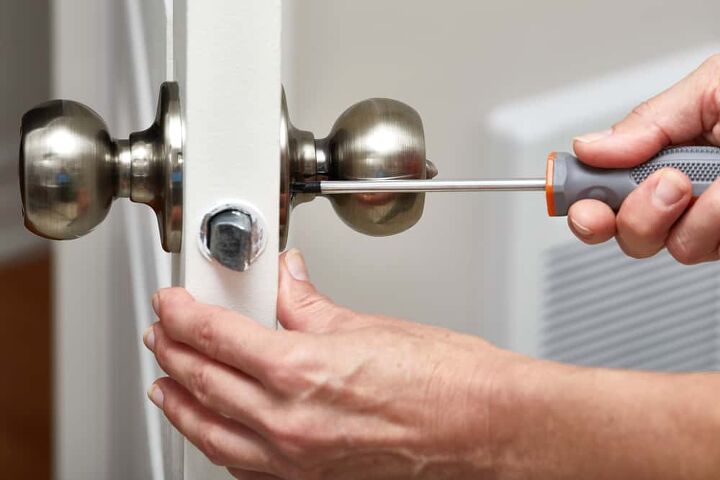
Whether it becomes broken or you simply want to swap it out for something else, it helps to know how to remove a Schlage doorknob. The process is relatively simple. You simply need a flat-head screwdriver so that you can pry the screw cover off. Then, take the screws out, slide a pin into the pinhole, and pry the doorknob off entirely.
Do You Need Hardware, Latches and Tracks Repair or Replacement?
Get free, zero-commitment quotes from pro contractors near you.

Removing a Schlage Door Knob
Step 1: Pry Off the Screw Cover
In order to remove your Schlage doorknob, you first need to get access to the screws that hold it into place. If you try to remove the doorknob without removing those screws, you not only risk damage to the doorknob, but you run the risk of damaging the door as well.
Simply use a flat-head screwdriver to pry the screw cover off from the handle set screw. The latter is located just below the handle or knob itself. Using the edge of your flat-head screwdriver, gently slide under the cover and pry it loose. Don’t pull hard or you could run the risk of breaking the cover or slipping and gouging the door.
Step 2: Extract the Screws
For the next step, you will need a power drill or power screwdriver. When you have pried the cover off, you should now see the set screws that secure the doorknob in place. A power drill will provide the best results, but a power screwdriver should work fine.
Put it in reverse and carefully extract both the bottom and top screws from the handle escutcheon. If you plan to keep the doorknob for any reason, it is a good idea to have a plastic Ziploc bag on hand to store the screws. When all of the screws have been removed, simply remove the escutcheon itself.
Step 3: The Interior Door Lever
You will need a pin – an unraveled paper clip may work just fine – for this next step. Take your pin and put it into the pinhole located on the side of the door’s interior lever. Slide the knob or door lever (whichever you have) off of the spindle underneath of it.
- Remove the rose. There should be a rose behind the knob or lever. Pry it loose, completely off of the door. Use your flat-head screwdriver to gently pry it away and be careful not to gouge the door in the process.
- Extract the screws. Just like in step two, there will be a couple of screws here that need extracting from the chassis. Use your power drill or power screwdriver (set in reverse) to remove them. You can then remove the chassis from the door itself.
- Remove the handset. With all of the screws removed, there is nothing keeping the handset to the door. Pull it off and you are ready to install the new doorknob.
How Do You Remove a Doorknob That Has No Visible Screws?
If you have a different kind of doorknob or handle, it may come as a surprise when you get into removing it and there are no visible screws. Don’t panic; there is a relatively simple process for removing the doorknob effectively even if there are no screws.
- Small latch. Start by looking for a small latch. It should be around the base of the handle or knob, generally somewhere on the exterior side of your door. It may take a moment to locate this latch, so don’t panic if you don’t find it right away.
- Push the latch in. When you locate the latch, push it in firmly. This should allow you to pull the handle off of the door completely. If it doesn’t come off easily, don’t just pull forcefully on the knob or handle. Make sure that you check to see that the latch has been properly pushed in.
- Find the small slot. Finally, you will need to find the small slot generally located somewhere on the edge of the trim piece that the door is attached to. Using a flat-head screwdriver, insert the tip and gently pry away the trim piece.
Removing a Doorknob When You Get Locked Out
We have all been there before. Pull into the driveway, get up to the front door, rummage in our pockets or purse for the keys – and nothing. It is an awful feeling knowing that you don’t have your keys and it means one of two things: finding another solution or waiting for someone else with keys to arrive.
Thankfully, there is a method for removing a locked doorknob on your house door. Keep in mind that this should not be a regular occurrence. If you are losing or forgetting your keys regularly, that is a separate issue to tackle and figuring that out will save you a lot of time and hassle.
How to Remove a Locked Doorknob
- Look at the shank. The first thing that you need to do when facing a locked doorknob is to check out the shank. The mounting screws will probably be hidden somewhat, but you can generally find them by looking for a tiny hole or slot in the shaft.
- Insert your tool. Depending on how crafty you are, there are several viable options here. If you have a nailset, use the end of that. If you have access to a small screwdriver, use the flat tip of that. You can even use a straightened paper clip in a jam.
- Push and pull. Push your tool into the slot or hole. There will be some resistance at first, comparable to the feeling of a spring that is being compressed. Push that spring in as far as you can using your tool with one hand while pulling at the doorknob using your other hand.
- Twits. If the doorknob is seemingly resisting your best efforts, give the tool a twist. Should it continue to resist, keep twisting and depressing the tool while also twisting the doorknob at the same time. This should allow you to remove the knob.
- Remove the rose. Having a small, flat screwdriver will ultimately be the best tool you can have in this instance, but anything you can use to pry off the decorative plate will work fine. This is also known as the rose. You should see lockset mounting screws underneath.
- Unscrew. All you have to do is remove the screws. That should separate the doorknob from the inside, allowing you access into your home. The only pain is that you then have to put the doorknob back on when you are finished.
Do You Need Hardware, Latches and Tracks Repair or Replacement?
Get free, zero-commitment quotes from pro contractors near you.
Unlocking a Door on the Side without Screws
Like just about anything in life, doorknobs can break from time to time. It could be an interior mechanism that keeps it from rotating, or it could be something like exposed screws because of a broken knob or damaged cover.
Whatever the case may be, you can still open the door relatively easily. How easily depends on whether or not you have access to the screws underneath the knob. You won’t be using a credit card like you see in the movies, but with another long, thin object, you can achieve the same result.
- Use a butter knife (or something similar). Using a butter knife, piece of PVC, or something else that is long and thin, insert it about three inches over the doorknob where the door and the frame meet.
- Contact the latch. Slide the knife around until it makes contact with the latch. Press the knife in and move it around until you feel that the bolt has been freed.
- Different latch. There may be a chance that the latch is not moved all the way into the mechanism. In that instance, you can use something like a flat-head screwdriver, pressing the tip onto the latch. Doing so will help to move the latch back so that it makes full contact with the mechanism.

Ryan Womeldorf has more than a decade of experience writing. He loves to blog about construction, plumbing, and other home topics. Ryan also loves hockey and a lifelong Buffalo sports fan.
More by Ryan Womeldorf


![12 Washing Machine Brands to Avoid [with Recall Data]](https://cdn-fastly.upgradedhome.com/media/2023/07/31/9075781/12-washing-machine-brands-to-avoid-with-recall-data.jpg?size=350x220)