How To Make A Tree Branch Railing (Step-by-Step Guide)
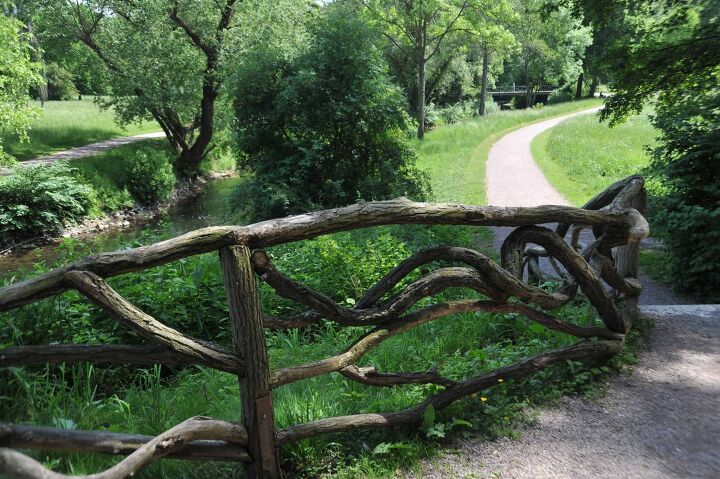
Homeowners are constantly searching for new ways to bring unique features into their homes. One option you may be considering is a tree branch railing. These are charming, rustic, and easier to install than you’d think.
To make a tree branch railing, start by finding the right branch. Remove its bark, sand the branch smooth, then apply finish to it. Next, determine the height you’d like it to sit at, locate the nearest studs in your wall, and attach handrail brackets to them. Finish by attaching your tree branch railing to these brackets.
A tree branch railing could be just what you need to make your home stand out. However, it can be challenging for some DIYers to complete this project successfully.
If you’re interested in making a tree branch railing, you’ve come to the right place. Continue reading to learn everything you need to know to get the job done right.
Do You Need Handyman Services?
Get free, zero-commitment quotes from pro contractors near you.

What Tools and Materials Do I Need to Make a Tree Branch Railing?
Before you can get started on your tree branch railing, you’ll want to make sure you’ve gathered all of the tools you need for the project. Here’s what you need:
- Measuring tape
- Drill
- Stud finder
- Pencil
- Laser level
- Drawknife
- String or chalk line
In addition to those tools, you’ll want to gather the following materials before getting started:
- Handrail brackets
- 1 box of 2 1/2-inch screws
- 150 grit sandpaper
- Polyurethane wood finish
- The perfect tree branch
How Do I Find the Right Tree Branch?
One of the most challenging parts of this project is finding the right tree branch. DIYers can’t exactly visit the branch section at their local hardware store.
Instead, you’ll likely need to venture out into nature to find the right branch for your home. Consider visiting local outdoor areas and nature preserves to look for candidates. You may need to be patient before finding the right tree branch for your home.
That being said, there are only a few requirements your tree branch needs to meet. First, it should be long enough to cover the length of the handrail you’re planning. You don’t want to have to try and glue two separate branches together.
Second, your tree branch should be sturdy. The last thing you want to happen is to invest your time and energy in creating a tree branch railing just to see it fall apart.
As long as your tree branch meets those requirements, feel free to pick any option that suits you. We recommend a maple branch if you can find one that meets your needs.
How to Make a Tree Branch Railing: Preparing the Branch
- Find the right branch by following the guidance from the section above.
- Remove the bark from the branch. You can use your drawknife to do this or any other tool you have around your house that will get the job done.
- Dry the branch for a few weeks. This will ensure that the wood is ready to meet your needs during the handrail installation process.
- Sand the branch with your 150-grit sandpaper. Your goal is to make the branch smooth all over.
- Apply a coat of finish to the branch. We recommend using polyurethane wood finish, but your favorite wood sealant will do the trick too. This ensures the branch will last after you’ve installed it.
How to Make a Tree Branch Railing: Installation
- Start by determining the height of your railing. It’s measured from the nose of the stair tread to the top of the railing. The average railing is between 34 and 38 inches high. Mark the wall once you’ve found the height you want.
- Use your stud finder to locate and mark the first bracket location.
- Attach the first handrail bracket to your wall with screws.
- Attach the tree branch handrail to the bracket with the U-shaped bracket sleeve.
- Move to the second end of the handrail and drive a 2 1/2-inch screw to hold the railing in place. You can double-check that the height of your railing is consistent by measuring diagonally at both ends from the stair nose.
- Repeat steps 3 and 4 on this end of the railing.
- Determine the railing dip by running your chalk or string across the top of the handrail. You’ll find that somewhere in the middle it will likely dip about 1/2-inch.
- Elevate the railing to meet the chalk line. You can use scrap lumber or any other material you have lying around that will get this job done.
- Repeat steps 3 and 4 to install the middle staircase railing bracket.
- Test the handrail to make sure it’s sturdy.
How Do You Calculate the Angle of a Handrail?
If you’ve never installed railing before, you may be wondering how to calculate the angle of your new tree branch handrail. The math is a bit complex but you should be able to do it with the right guidance.
Start by determining the total rise and run of your staircase. Then, use that information to calculate the inverse tangent. Once you’ve calculated this number, you’ll know the angle that your staircase makes at its bottom. That’s going to be the same angle at which your railing should rise.
Alternatively, you can try to use a specialized calculator to do the math for you. This one may do the trick.
What’s the Best Finish for a Tree Branch Railing?
DIYers have many options to choose from when finishing a tree branch railing. The goal of this process is to ensure your railing’s wood has the protection it needs to last. Several different products can accomplish this.
Many homeowners choose to use wood stain on their handrails. However, you probably won’t need to do that if you want the appearance of your tree branch railing to be rustic and natural.
Instead, you can skip directly to treating your tree branch railing with a wood wax, wood oil, or varnish. These products will perform the crucial task of sealing the wood.
How Many Handrail Brackets Do I Need?
The general rule is that homeowners should install a new bracket every four feet. So, if you plan for your tree branch railing to be 12 feet long, you’re going to need to install three brackets.
The average railing will call for a bracket at its bottom, top, and in the middle. You probably won’t need more than that unless your railing is exceptionally long.
To make things easier on yourself, take the time needed to measure everything before beginning the installation process. Doing so will help you avoid a situation where you have too few brackets to fully support the weight of the railing.
Do You Need Handyman Services?
Get free, zero-commitment quotes from pro contractors near you.
Related Questions
How high should a handrail be?
According to United States building code requirements, all handrails must be between 34 and 38 inches. This leaves homeowners little wiggle room to determine the height of their railings.
Do all stairs need handrails?
Generally speaking, yes, most sets of stairs require a handrail. The more detailed answer is that the U.S. building code requires handrails for stairs that are more than four risers in height.
How do you dry tree branches?
The easiest way to dry a large tree branch is to place it in front of a space heater. You can do this in your garage. It may shorten the length of time you need to wait before proceeding with your tree branch railing installation project.

We are a team of passionate homeowners, home improvement pros, and DIY enthusiasts who enjoy sharing home improvement, housekeeping, decorating, and more with other homeowners! Whether you're looking for a step-by-step guide on fixing an appliance or the cost of installing a fence, we've here to help.
More by Upgraded Home Team