


How To Install A Range Hood Vent Through The Ceiling
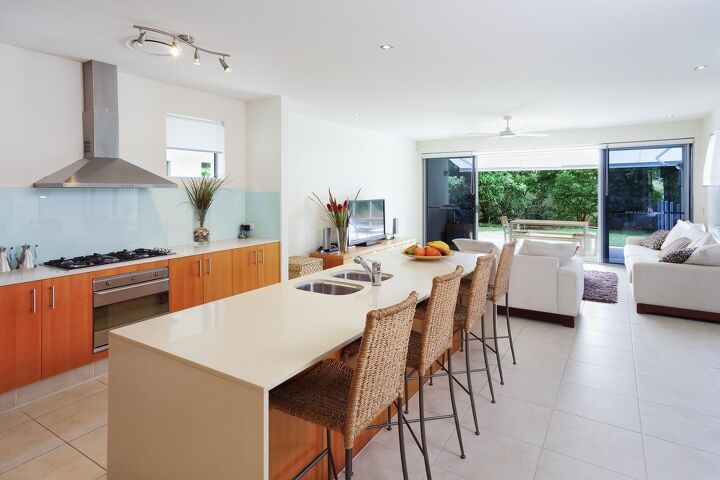
Kitchen remodels are some of the most popular projects for homeowners. Many homeowners decide to upgrade their range vent hood in the process. Many range vent hoods installed as original equipment in homes recirculate the filtered air back into the house. A better option is to install a range vent hood through the ceiling and roof.
Installing a range vent hood that vents outside the home through the ceiling and roof is a much better option. An outside vent removes the heated air, odors, and airborne food particles out of the kitchen. Installing a range hood vent through the ceiling and roof can be challenging. Here are the steps you should follow to complete this project.
Working systematically and following the range vent hood manufacturer’s instructions are critically important to managing this project. Each range vent hood manufacturer has its specifications and requirements. Our steps to installing your range vent hood through the ceiling are not specific to allow for differences in the manufacturer’s requirements.
Do You Need Appliance Installation or Replacement?
Get free, zero-commitment quotes from pro contractors near you.

Gather the Materials and Tools
Before beginning any project, we always recommend that you have all the materials, parts, and tools gathered. Having everything located and at hand will make the project go smoother and faster. Being prepared reduces frustration and shortens the project time.
Your New Range Vent Hood
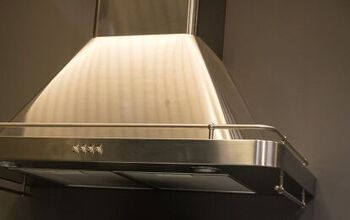
Don’t start the installation until you have your new range vent hood. It is important to have the instructions that come with the range vent hood. The instructions will give you the proper sizes of vent pipe and vent weather cap for the size fan. In the instructions, you will also find recommendations for tools, fittings, and other fasteners that you may need.
It is also important to inventory the contents of the range vent hood packaging. You should make sure that all the proper parts are included, down to counting the screws, nuts, and bolts that are supposed to be in the kit.
Have the Right Tools for the Job
In general, you will need some power tools to do this job correctly. The tools you will need to get this installation done include the following.
Drill and Bits: A fully charged battery-operated electric is a must. You will need a long drill bit for making pilot holes, and a hole saw to make the holes in the ceiling through which the vent pipe will pass.
Caulk Gun and Roof Asphalt: To seal the vent cap to your roof shingles, you will need a caulk gun and at least one tube of roofing asphalt cement. Ensuring a tight seal against water invasion where the roof vent cap covers the vent pipe is critical.
Roofing Nails and Hammer: Making the opening in the roof and installing the roof vent cap the removal of some shingles. You will need to reattach these shingles once the roof vent cap is in place. Roofing nails are the best choice for this job.
A Ladder: You will be working at ceiling height to make the holes for vent work and electrical installations. The safest way to work high is to use a good ladder. Step stools are not a good idea for this kind of work. Chairs and other makeshift devices are accidents in the making and should be avoided.
Materials – Get The Right Stuff
The most important thing you will need is the vent pipe that runs from the range vent hood to the roof vent cap. Vent pipe comes in a variety of sizes, styles, and materials. Follow the installation instructions that come with the range vent hood kit. These instructions will tell you what size, style, and material of the vent pipe is required for your vent hood installation.
Extras You Will Probably Need: There are a few things you will probably need before the job is done. Having them on hand, even if they aren’t needed in the end, may save you frustration and time. We suggest that you have a roll of aluminized duct tape, self-tapping sheet metal screws, and the proper size bit for the screws.
Locating the Vent – Into the Attic We Go
Step 1 – Location, Location, Location
You must know exactly where your range vent hood will be installed. This determines where you will make the openings for the vent pipe and any electrical connections that may be needed.
Often the manufacturer will include a template that can be taped in the place where you intend to install the range vent hood. This template will show the proper location of holes for mounting hardware, electrical connections, and the location of the vent pipe opening.
Step 2 – Through the Ceiling
We suggest that you drill all the holes that you will need. Be sure that you use the proper size drill bit for the hole as specified in the installation instructions. However, don’t drill a large hole for the vent pipe. Use a smaller drill bit to create a pilot hole in the center of the vent pipe opening.
Drilling a pilot hole in the ceiling opening for the vent pipe allows you to inspect the area of the vent pipe opening in the attic. You want to make sure the area is clear of HVAC ducts, electrical wiring, plumbing, or structural members of your home.
Step 3 – All Clear and Ready to Cut
Once you are sure that the area where you will cut the vent pipe hole is clear, you can proceed. Use your drill and the appropriately sized hole saw to cut through the sheetrock.
Making the Opening – Getting to the Outside
Try to locate the opening through the roof for your range vent hood directly over the opening in the ceiling, if possible. A vertical run of ductwork is the ideal situation
Step 1 – Go Vertical – Straight Up is Best
The best option is to locate the opening in the roof for the vent pipe directly over the opening in the ceiling. This eliminates any turns in the vent pipe. Straight vents are more efficient and easier to install.
Mark the center of the opening in the roof. Using a smaller drill bit (we suggest a ¼”), drill a hole up through the center of your vent pipe opening. Push something through the hole. This makes locating the hole from the outside easier.
Step 2 – Up on the Roof Top
It’s time to go outside and up on the roof. Locate the hole your drilled from inside and examine the shingles around the hole. You must remove enough of the shingles to install the roof vent cap and then reseal the roof around the cap.
Each style of roof vent cap comes with its own methods and recommendations for installation. Follow the manufacturer’s directions carefully. We suggest that you apply roof asphalt liberally on the top and bottom of the roof vent cap flange. This will ensure a water-tight seal on the roof.
Step 3 – Back in the Attic
Now that the roof vent cap is installed and your roof is again weather-tight, it is time to install the vent pipe from the vent hood to the roof cap. The method of this installation depends on the type and style of the vent pipe that your range vent hood requires. Install according to the manufacturer’s specifications for the pipe and vent hood.
In all installations, we suggest that any seams or joints in the vent pipe be sealed with aluminized duct tape. This prevents any exhaust air from escaping into your attic, where it could cause problems later.
A Few Do’s and Don’ts You Should Consider
- Do only use vent pipe made of galvanized metal for rated for HVAC use.
- Don’t use clothes dryer vent pipe or vent caps.
- Don’t use a plastic vent pipe.
- Do seal all the joints with aluminized duct tape.
- Do seal all exterior vent pipe caps with roofing cement
- Do use only a roof vent cap of the proper size and that has insect screening
- Do keep ductwork runs to less than 35 feet.
- Don’t reduce the size of the vent pipe.
Do You Need Appliance Installation or Replacement?
Get free, zero-commitment quotes from pro contractors near you.
A More Pleasant Kitchen Experience
The result of your handiwork will be a much more pleasant kitchen experience for you and your family. A range vent hood that carries the heat, odor, and particulates from your cooking to the outside will make a world of difference. We hope that this article has given you the confidence to upgrade your vent hood or install a new vent hood over your range. Good luck.

Dennis is a retired firefighter with an extensive background in construction, home improvement, and remodeling. He worked in the trades part-time while serving as an active firefighter. On his retirement, he started a remodeling and home repair business, which he ran for several years.
More by Dennis Howard


![Standard Dining Room Table Dimensions [for 4, 6, 8, 10 and 12 People]](https://cdn-fastly.upgradedhome.com/media/2023/07/31/9074335/standard-dining-room-table-dimensions-for-4-6-8-10-and-12-people.jpg?size=350x220)


