How To Hang Christmas Lights Outside Without Nails
Displaying Christmas lights on the outside of your home can be a great way to show your holiday spirit during the most wonderful time of the year. The season truly would not be the same without lights decorating homes and businesses in your area. For many, hanging Christmas lights can be a drag, as the task tends to be rather challenging.
This is especially the case if you’re inexperienced in affixing lights to your home’s exterior, or simply never done it before.
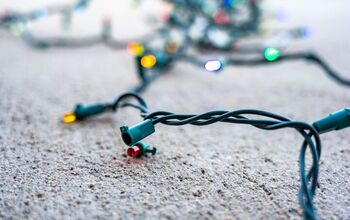
There are several ways you can hang Christmas lights outside without nails. Using hot glue, plastic clips, draping techniques, and staple guns are some of the best alternatives to nails. To use hot glue, put a dab of glue on the side of the socket, and hold it against the desired surface for 20 seconds.
Although the use of nails tends to be safer, cheaper, and easier, alternative methods can make your home look just as festive without the need for creating holes in your house. As an added bonus, installing clips can allow you to use them year after year, making next year’s light-hanging much faster and quicker.
Do You Need to Hire Christmas Light Installers?
Get free, zero-commitment quotes from pro contractors near you.

Method #1: Hanging Christmas Lights Outside With Hot Glue
When you use nails to hang Christmas lights, the fasteners must be placed permanently into the brick, concrete, or stucco. They can damage walls, exterior surfaces, and leave undesirable marks and nail heads. As an effective alternative, you can use hot glue to fasten Christmas lights to these exteriors.
Hot glue dries fast and can be easily removed when you’re ready to take your lights down after Christmas is over. This method allows you to enjoy loads of Christmas cheer, with no damaged masonry. Follow the steps outlined below to effectively hang Christmas lights outside using hot glue.
Step One: Prepare the Hot Glue Gun
For hanging your Christmas lights, choose a large glue gun and a type of glue that is ideal for outdoor use. Load the gun with the glue and plug it in with an extension cord that allows you to reach the areas you will installing the lights.
Wait about five to ten minutes for the glue to heat up before proceeding. Use special care as the glue gun is heating up, as some glue could leak out and will burn your skin if touched.
Note: Hot glue is not suitable for stucco that is applied over Styrofoam. If you’re unsure if there’s Styrofoam underneath your stucco, tap the surface lightly. A hallow noise indicates that you do, in fact, have Styrofoam beneath your stucco. If this is the case, you should choose a different method.
Step Two: Select a Light Strand With Bulbs Unscrewed
Although this is not required, choosing a light strand that has the bulbs unscrewed from the sockets makes the hanging process much simpler. When the bulbs are unattached from the strand, you won’t risk getting hot glue on them during the install.
If you do accidentally drop hot glue on your light bulbs this will cause them to look dim. Instead, opt for a spool of bulbless lights, then purchase the bulbs separately in your desired shape and color.
Step Three: Start Applying Hot Glue
Take one of the empty sockets on your light strand into your hand and locate the clip on the side that releases the bulb. You’ll want this side facing out. Flip the socket over and place a pea-sized bead of glue directly onto the side of the socket. Then, attach the socket to your concrete, stucco, or brick walls. Do not allow the glue to dry before you stick it to the wall.
Immediately after you’ve applied the glue, press the socket onto the wall, in the desired position, for at least 10 seconds. You can position the socket facing up, down, or tilted to one side depending on which direction you’d like the bulb to face for your particular display. While some prefer to have them all facing in one direction, others like to situate them randomly or in a pattern.
Quick Tip: If the socket slides down the wall after you’ve let go, you didn’t allow enough time for the glue to dry. Continue holding the socket in place until the hot glue is secure on the surface.
Step Four: Screw-in Bulbs
Once all of the sockets are glued in the desired positions, you can start adding in the bulbs. Screw them in, being careful not to scratch them against the wall as you’re placing them in the sockets. While some bulbs screw in like regular light bulbs, many others will simply snap into the socket.
Method #2: Hanging Christmas Lights Outside With Clips or Hooks
The second method for hanging Christmas lights without nails involves the use of plastic hooks or clips. You have a couple of options for this method, as the type of hook or clip you use will depend on where you’re placing your lights. For instance: lights on your gutters will use gutter hooks, lights on top of your roof will use shingle tabs, and lights on your siding will use adhesive clips or hooks.
For best results, leave 6-8 inches of space between each hook or clip. This will make your display look cleaner and prevent you from using more clips than necessary. Also, when hanging your light strand, place the male end near the outlet and work from there.
Hanging Christmas lights on gutters:
To hang lights on your gutters, you’ll need to purchase S-shaped gutter hooks from your local home improvement center. These are hung by pressing the top part of the S into the gutter, while the rest of the hook sits out front. When you’re reading to hang your lights, you’ll simply use the bottom portion of the S as a hook to string the wire along your gutters.
Hanging Christmas lights on top of your roof:
For hanging lights on the top of your roof, you’ll use shingle tabs, which are L-shaped and have a small hole on top and two prongs on one side. To install, slide the prongs underneath a shingle, leaving the side with the hole protruding into the air. You will then simply slide a bulb into the hole to hold it in place and position your lights. The hole is generally large enough to accommodate C7 or C9 Christmas light bulbs.
Hanging Christmas lights on siding:
To install Christmas lights on siding, or any other smooth surface, you can use adhesive clips or hooks. Positioning these plastic clips are as easy as peeling off the protective paper on the back and pressing the sticky side onto the surface. Then, snap the base of the bulb into the clip in order to hold it in position. Repeat this for all the bulbs on your light strand. Keep in mind that adhesive hooks or clips will not work on any textured surfaces like stucco, brick, or concrete.
Do You Need to Hire Christmas Light Installers?
Get free, zero-commitment quotes from pro contractors near you.
Method #3: Hanging Christmas Lights Outside with Draping Technique
The final option for hanging Christmas lights outdoors without using nails, is to implement one, or more, of the following draping techniques.
- Wrapping lights around tree trunks. With this technique, you will need to make use of an extension cord to allow you to run lights to the tree and then wrap them around the tree trunk. Wrap tightly, leaving six inches of space in between strands, and continue until you’ve reached the first branch. Then, wrap the lights back down to the base of the trunk, filling the space between strands.
- Net lights for bushes. You can purchase net lighting for quick and convenient Christmas décor. Simply plug the lights in and drape the square over top of your bushes. For a natural look, pull the corners down and hide them underneath the foliage.
- Create a random pattern by snaking lights on shrubs. Another option for your bushes is to use a strand of lights to create a pattern on the front-facing sides. Move in a winding shape from the bottom of the shrub to the top, achieving the effect of randomly dispersed lights.
- Arrange strips along your walkways and/or driveway. This method allows you to add some holiday cheer by simply laying small LED lights on the ground, lining your driveway or a walkway. If you’re concerned about them moving, you can use a bit of hot glue to hold them in place.
By using hot glue, plastic clips or hooks, or a draping technique, you’ll never have to use nails again for hanging Christmas lights outside.

Jessica considers herself a home improvement and design enthusiast. She grew up surrounded by constant home improvement projects and owes most of what she knows to helping her dad renovate her childhood home. Being a Los Angeles resident, Jessica spends a lot of her time looking for her next DIY project and sharing her love for home design.
More by Jessica Stone