How To Flare Copper Tubing (Step-by-Step Guide)
Making connections can be easy when it comes to social media, but it is getting more and more complicated in the real world of building. There are so many connections needed when you are building or repairing something around the house and some of them have to do with copper tubing, which can be a pain to work with sometimes.
Flaring copper tubing is simple if you know what you are doing and you have the right tools. To flare the tube, you have to use a flaring kit that comes with a flare form and a reamer, a hammer flaring kit, or an expander tool. You can get these from any hardware or plumbing store.
Although copper tubing is often joined by brazing or soldering, a mechanical joint is sometimes required. For example, in a situation where an open flame is not feasible or with water tubing. This is a nice safety feature when working with oil or gas lines. While all national model codes allow flared copper tubing joints, you should always check with your jurisdiction first.
Do You Need to Hire a Plumber?
Get free, zero-commitment quotes from pro contractors near you.

Steps for Flaring Copper Tubing
If you are flaring a type K or L copper tube, you should use soft temper or annealed tubing. Also, when flaring types K, L, or M hard or rigid temper tubing, you should anneal the end of the tubing first. But it is easier to solder rigid or hard temper tubing. Here are the steps to take in order to flare copper tubing.
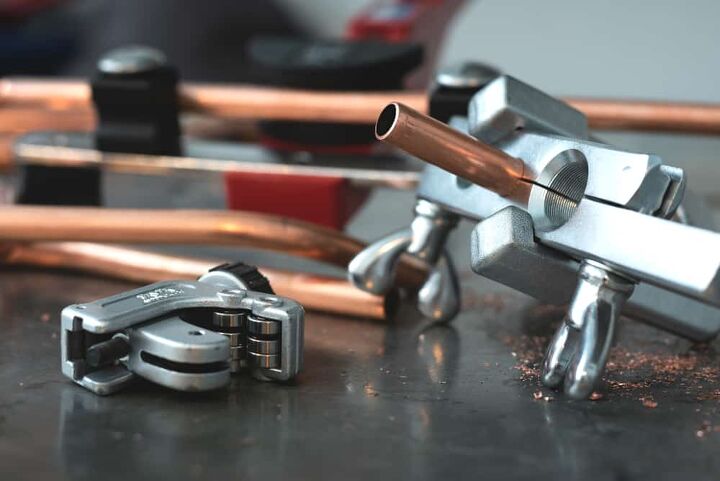
Step One: Cut the Tubing
Be sure to use a tube cutter rather than a hacksaw because you will not get a proper seal if the cut is not smooth. The cutting saw cuts in a circle around the pipe to make a nice smooth cut. Make sure you have a good grip on the tubing when you cut it and turn the saw slowly, tightening it as you go.
Step Two: Deburring the Tubing
There should be a blade on the back of your tubing cutter. Use this to ream the end of the tubing that you cut. Make sure it is the original diameter it was before.
Important Tip: Put the coupling nut onto the tubing first because you won’t be able to get it on there after you flare the tube. This is a common mistake made by first-time DIYers.
Step Three: Insert the Tubing into the Flare Form
The flare form is similar to a clamp that has a variety of holes in different sizes. It will hold the tubing while you are flaring it so you can work with it easier. Make sure you choose the right diameter for the tubing you are using and leave about 1/16th of an inch of the tubing sticking up.
Step Four: Tighten the Nuts
You should tighten the nearest nut by hand and then the far nut to make sure the block grips the tube tight enough.
Step Five: Fit the Yoke on the Block
Be sure the slots in the yoke are in the right spot to engage the flaring block properly.
Step Six: Put the Reamer on the Flare Form
The reamer has a point on it as well as holding arms and a screw. This is the tool that actually does the flaring. Put the reamer on top of the flare form so the point is centered on the tubing you want to flare.
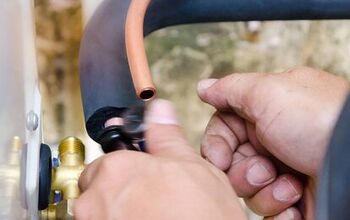
Step Seven: Flaring the Tubing
Tighten the screw on the reamer. Then loosen it and retighten it again to make sure the reamer is fully seated in the tubing. Do not overtighten the screw.
Important: In some cases, the flaring is not smooth because the piping may have moved slightly when you turned the reamer screw. Make a new cut and try again.
Step Eight: Attach to the Fitting
Remove the tubing from the flare form and attach it to the fitting. While you are holding the flared end on the fitting, tighten the nut to make a secure fit. Test for air leaks afterward.
Hammer Flaring
Hammer flaring is also called swaging. You can also use hammer flaring tools to flare your copper tubing. They are typically used to make 45-degree flares on Type K copper water tubing. The steps to hammer flaring are as follows.
Step One: Cut the Tubing
Be sure to use gloves and safety glasses. Secure the tubing in a vise or clamp. Use a tubing cutter to cut the tubing to the right length.
Step Two: Deburring the Tubing
Use the reaming blade to ream the end of the tubing that you cut to get rid of burrs or other issues. You can also use a flat-file to get rid of the burrs from the outside of the tubing.
Step Three: Placing the Coupling Nut
Make sure you put the nut on the tubing before flaring. You will not be able to get it on there afterward.
Step Four: Grease the Tools
Apply potable grease on the shoulder and shank of the flaring tool to make it easier to flare the tubing. Then insert it into the tubing.
Step Five: Flaring the Piping
Use a soft brass hammer to strike the flaring tool several times. Turn the tool a little bit after each strike. Continue until the flare gets to the edge of the coupling nut.
Step Six: Checking the Piping
Check both surfaces of the piping to make sure they are free of blemishes and scratches. If you see any abnormalities, start over.
Step Seven: Tightening the Tubing
Placing the end of the tube you just flared to the connection, hand tighten the coupling nut.
Another Option is the Tube Expander Tool
Another tool for flaring copper tubing is the tube expander. It has several different sized heads to use on different sized tubing. All you have to do is attach the correct sized head to the tool and put the end into the tubing. Squeeze the handles until the tube is completely flared.
The Benefits of Copper Tubing
There are many benefits of using copper tubing, especially for plumbing, HVAC, and other building projects. The reasons that copper is usually the best choice is because:
- Copper is recyclable so it can be reused over and over again.
- Copper lasts a long time. It is resistant to scaling and corrosion, has high mechanical strength, and resistant to UV rays and temperatures.
- Copper is dependable because it has to be made to certain standards. It is also marked with identification numbers, so you always know who made it.
- Copper is a safe material and will not decompose, burn, or combust. It does not carry fire through ceilings, walls, and floors.
- Copper is easy to join with different fittings. There is no need to use extra material to connect the joints because of the capillary fittings and flanging options.
- Copper can be shaped and bent into different forms, so you do not have to have elbows or major joints. Instead, you will have smooth bends that can go around almost any corners.
- Copper does not weigh much because there are no thick ferrous or threaded pipes, so it is easier to handle and takes less room.
- Copper is also less expensive than many other choices because it is so malleable, and it lasts a long time.
Related Questions
Can I Solder or Braze My Copper Tubing Instead?
As long as you are not connecting gas or oil lines, you can certainly use soldering or brazing. In fact, the most common ways to join copper tubes have typically been soldering or brazing. They call this a capillary or lap joint because the sockets hang over the end of the tube. Then you join the two connections by melting a filler material into the capillary spaces.The main difference between soldering and brazing is the temperature to melt the filler material. Any material that melts below 840 degrees Fahrenheit is considered to be soldering but anything above that temperature is brazing.
| Soldering Materials | Brazing Materials |
| Nickel | Copper-phosphorus |
| Bismuth | Silver |
| Antimony | Aluminum |
| Silver | Gold |
| Copper | Nickel |
| Holtite for soldering | Holtite for brazing |
Brazing is a good way to bridge the gaps between those joints that have loose fittings. However, when brazing you have to run neutral nitrogen through it to prevent oxidization. But when soldering, you should use flux to prevent the oxidization and wipe it off when you are done working.
Do You Need to Hire a Plumber?
Get free, zero-commitment quotes from pro contractors near you.
You can solder copper alloy flanges for horizontal or vertical joints by using these simple steps.
- Step One: Measure the tubing so you can reach the back of the female socket of the flange.
- Step Two: Cut the tube with a tube cutter.
- Step Three: Use a file or the deburring blade on the tube cutter to ream the inside and outside of the tubing.
- Step Four: Clean the oxides from the tube and the inside of the socket.
- Step Five: Apply flux to the outside of the tubing and the inside of the female socket.
- Step Six: Remove excess flux.
- Step Seven: Preheat the bottom of the tubing and the flange socket according to specifications.
- Step Eight: Apply soldering material and heat with soldering gun.
- Step Nine: Allow it to cool naturally.

I am a DIYer who loves writing about anything home-related. When I am not writing, you can find me studying for my PhD in Psychology, photographing nature, and swimming at the lake with my grandkids.
More by Patricia Oelze