


How To Cut Metal Roofing With Electric Shears
If you’re anything like professional roofers, you’re on the hunt for the most efficient and convenient way to cut metal roofing materials. Unfortunately, while there are a significant number of tools on the market for this purpose, roofers have a tough time finding the right one to reduce their labor costs and time and still produce metal roof panels of the best quality.
There are a variety of tools that you can use to cut metal roofing, each with its own drawbacks and benefits. However, many choose to use power tools, such as electric shears, for the job. To properly cut metal roofing with electric shears, you must wear all the necessary safety equipment, simply hold the shears where you want to make your cut, press the trigger, and control the device along the metal.
We’ll explore all the steps to successfully cut metal roofing using electric shears, along with some other cutting alternatives. That way, you can make an educated decision on what tool is best for your metal roofing project.
Do You Need Metal Roofing Installation or Replacement?
Get free, zero-commitment quotes from pro contractors near you.

How to Cut Metal Roofing with Electric Shears
Most professional roofers believe that power tools can greatly speed up the production time when it comes to installing metal roofs. While there is no doubt that the use of electric shears and other power tools can save time, there are some limits to what these devices can achieve. For instance, you may not be able to cut roofing pieces at the job site if you don’t have access to electricity.
Using electric shears also requires that you wear additional eye protection, ear protection, and some sort of face shield. On the other hand, electric shears will make far better-quality cuts than would hand tools. Regardless, if you decide to use electric shears to cut your metal roofing, follow the steps outlined below for the best results.
Step One: Calculate Panels Needed
If you haven’t already discovered how big your panels should be, you need to gather roof measurements. This should always be your first step. To make an educated estimate of the number of panels you need, measure the length and width of each section of your roof. In order to fit the panels together, you will also need to know the proper size of roofing sheets to order.
Once you calculate the area of your roof, divide this number by the average size of the sheets to yield how many you need for your project. An online metal roofing calculator will help you figure out how many sheets you need. Then, using this number, simply fit the sheets together based on your measurements.
For example: If you have a roof that is 21 feet long by 10 feet wide, you need to cover 210 square feet of space with metal panels. Divide the square footage you calculated by the average 18 square foot roofing sheet, and you will receive an estimate of roughly 12 sheets.
Step Two: Place and Secure Metal Roofing Sheets
Before you begin the physical cutting, you need to prepare your workspace and the metal itself. Start by finding a stable surface to work on that will prevent the sheets from moving around while cutting, such as a workbench. Lay the roofing sheets out flat and turn them so that the proper sides are facing upwards. Then, secure with adjustable clamps.
The top side of each roofing sheet will have ridges that stick out, making it exceptionally tricky to cut across. The proper placement is ridges facing down, or valleys instead of mountains. This will make the metal sheets much easier to cut.
Step Three: Measure and Mark Your Cuts
With the correct number of roofing sheets and your workspace prepped, you can start marking the spots where you need to cut. Using a tape measure, notate where you want to begin and end each cut with a permanent marker. Refer back to your calculations in step one to determine how big each panel should be.
Once you mark the start and end points, use a combination square or large ruler to connect them. Use special care with this step and ensure that marks are precise on each sheet. Any mistake could cause the metal to rust or result in gaps on your roof. Gaps between roof panels can cause serious leakage problems, so be as accurate as possible with your markings!
Step Four: Don Your Protective Gear
Before you can start cutting you want to make sure that you put on all of the necessary protective gear. For safety reasons, this step is probably the most important of all. Cutting metal is dangerous and creates a risk of metal dust and flying metal fragments, especially with power tools. Ensure your safety by taking the appropriate precautions, regardless of the tool you are using.
Wear goggles to protect your eyes from debris and put in earplugs to protect your ears from the loud noises that come from electric shears. Cover up your body with long pants, a long shirt, and boots for added protection. A dust mask and gloves are also a great idea when working with metal and power tools.
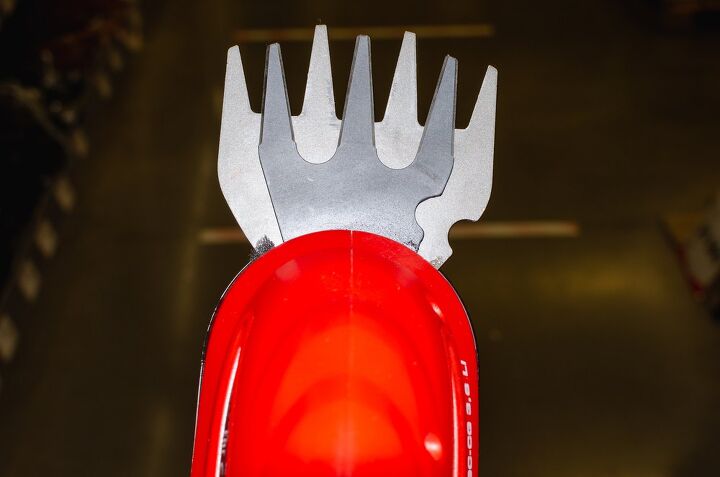
Step Four: Cut with Electric Shears
At this point, you can start cutting. Electric shears are very similar to tin snips, except they are powered by electricity and make much quicker and better-quality cuts. This tool is often the ideal choice for those who want to cut a lot of metal sheets in a short amount of time.
First, make sure that you have access to a power outlet and plug the device in. Shears cut very similar to scissors, with the added electric component. To cut with electric shears, simply hold them where you intend to cut, press down on the trigger, and control the blade along the metal. Work slowly as the shears move along the metal to ensure that your cuts are straight and accurate.
While good quality electric shears will cut relatively smooth, you still need to be careful. These tools can have a tendency to get stuck, forcing you to perform the cut from an opposing angle. So long as you don’t rush or force the cuts, you shouldn’t have much trouble working with electric shears.
Do You Need Metal Roofing Installation or Replacement?
Get free, zero-commitment quotes from pro contractors near you.
Alternatives to Electric Shears
If you’d rather use a different tool to cut metal roofing, you have plenty of options to choose from. The following are some alternatives to electric shears:
- Tin snips: Tin snips are essential hand shears that are used for cutting metal roofing panels. They come in a variety of sizes and calibers and can be used to cut tin, steel, aluminum, and even vinyl. Using tin snips is more labor-intensive, takes more time, and can be less effective, but is the cheapest way to cut metal roofing. They also don’t allow you to cut along the sheet, only cross-cutting.
- Nibbler: Nibblers can be found as hand tools or as an electric power tool. They are designed to cut pre-shaped holes in sheet metal with a variety of pre-cut dies. Using an electric nibbler is understood by some as the best way to cut metal roofing. It allows you to move easily and quickly around corners with jamming.
- Circular Saw: Similar to a nibbler, a circular saw is a quicker way to cut multiple sheets of metal. However, they are loud and can be quite destructive if you are not careful.
- Angle Grinder: If you’re looking for an alternative to the circular saw, you may consider an angle grinder. It is essentially a handheld version of the circular saw and is much more mobile. However, angle grinders can leave behind dangerously sharp edges and sparks that could damage the paint finish.
Whether you choose to use a hand tool or a power tool to cut your metal roofing, practice extreme caution when working with metal. Mistakes could result in dangerous sharp edges and rust, rendering the piece virtually useless. Also, since metal roofing sheets tend to be somewhat delicate, handle them with care to avoid bending them.
If you ever feel uncomfortable with your ability to cut metal roofing, you can always hire it done or purchase pre-cut metal from a roofing company.

Jessica considers herself a home improvement and design enthusiast. She grew up surrounded by constant home improvement projects and owes most of what she knows to helping her dad renovate her childhood home. Being a Los Angeles resident, Jessica spends a lot of her time looking for her next DIY project and sharing her love for home design.
More by Jessica Stone


![10 Best Electric Pressure Washers – [2022 Reviews & Guide]](https://cdn-fastly.upgradedhome.com/media/2023/07/31/9070600/10-best-electric-pressure-washers-2022-reviews-guide.jpg?size=350x220)


![Standard Dining Room Table Dimensions [for 4, 6, 8, 10 and 12 People]](https://cdn-fastly.upgradedhome.com/media/2023/07/31/9074335/standard-dining-room-table-dimensions-for-4-6-8-10-and-12-people.jpg?size=350x220)
