How To Clean A Wax Warmer (Step-by-Step Guide)

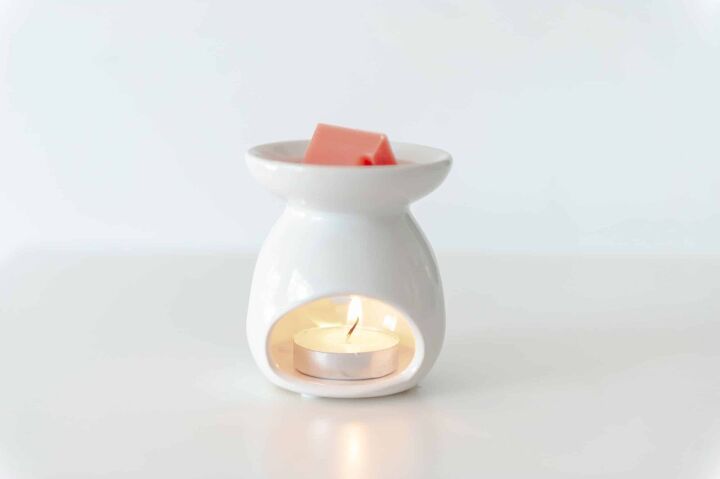
Cleaning a wax warmer or a wax pot is difficult since traditional cleaning methods and tools don’t really help here. But what if we tell you it’s easy to do it?
All you need to do is heat the pot to remove the hardened wax, sterilize it, and use oil or some other emollient to wipe down the wax warmer. That’s it.
Here’s a thorough guide to doing it right. Read on!
How To Clean Your Wax Warmer Like A Pro
Here’s a complete guide to cleaning your wax warmer:
Wash The Inner Pot
Step 1: Turn Up The Heat Settings Higher Than Usual
If the wax you use melts under medium heat, you need to turn up the heat settings to medium-high, whereas, if the wax melts at medium-high, then set it up at higher heat settings. In either case, the wax needs to melt so that you can start cleaning the insides of the pot.
If possible, keep the lid of your wax warmer open, so you can keep an eye on it as it boils up.
While it heats and starts melting, you need to look for bubbles. Once you see it, use a brush or stick to stir it to melt any solid wax in the pot.
Pro tip: Be extra careful while heating and stirring the wax as it can burn your skin if you make contact with it. Also, don’t forget to turn off the heat.
Step 2: Take Out The Inner Pot With A Tong, Handle, Or An Oven Mitts
Use the handle of the wax warmer to lift the inner pot out by pulling it out. If the warmer has no handle, you can use a tong or an oven mitt to take out the pot.
To make sure you don’t get burned, use a thick oven mitt on the hand that holds the bottom.
Pro tip: the method works best for wax warmers that have a removable inner pot. However, if yours is a one-piece pot, simply pour it out.
Step 3: Pour Wax Into A Waste Container
Since you can’t pour the melted wax of your wax warmer into the sink, you need to pour it out into a metal or disposable container.
To avoid spilling, make sure to put one thick towel under the disposable container. Also, wear an oven mitt to prevent contact. Now, carefully tilt the wax and pour it entirely into the waste container.
Pro tip: Don’t drain the wax into the sink as it can dry in pipes and choke them.
Step 4: Set Aside The Inner Pot To Cool
Once the wax is poured into a container, set aside the inner pot to cool for about 3 hours.
To accelerate the cooling process, put the inner pot of the wax warmer on a plate and put it in the refrigerator. But make sure that the pot doesn’t have any electrical components.
Step 5: Use A Spatula Or A Rubber Scrapper To Take Out The Remaining Wax
Before proceeding, wear your rubber gloves to keep the hands clean. Now, grab a spatula or rubber scraper and scrape any remaining wax inside the inner pot of the wax warmer.
Once you’ve scraped out all the remaining wax, dump it in the bin.
Pro tip: While cleaning the wax, never use metal or other utensils with a sharp edge; otherwise, you can damage the inner pot.
Step 6: Clean The Pot With Wax Cleaner Or Mineral Oil
Most wax warmers come with a cleaning solution that makes it easy to empty the pots. However, if your warmer doesn’t have one, try using mineral oil for a quick cleanup.
Pour a few drops of the oil or cleaner on a paper towel and buff the insides of the pot.
Step 7: Wipe Out The Insides Of The Pot With A Sterilizing Solution
In case you plan to give some rest to your wax warmer, then you can disinfect or sterilize it. Use a sterilization solution or sanitizing wipe to clean the insides of the pot.
Remove The Wax From The Case And Rim
Step 1: Turn The Heat On
To clean wax remains from the rim or face of the wax warmer, you need to turn on the heat to melt the residual wax. This should help loosen up any remaining wax outside the pot.
Step 2: Use A Popsicle Stick
Grab a Popsicle stick and hold it horizontally to the rim with both hands. Now, start scraping wax from the edge of your wax warmer.
Step 3: Wipe Out With Paper Towel And Rubbing Alcohol
After you have taken out the wax, pour a few drops of the rubbing alcohol on a paper towel and start cleaning the rim and face of the wax warmer by rubbing it so that the wax can be removed easily.
Pro tip: Make sure you never approach a plugged in wax warmer to clean it. Any number of issues, including a problematic wall outlet, can lead to electric shock.
Step 4: Use Dry Paper Towel To Clean The Container
This is important since you cannot leave the outsides of the wax warmer wet, particularly if it has an electrical heating system. Grab some dry paper towels and clean every side of the wax warmer so that there is no wax or alcohol left.
Cleaning An Improvised Wax Warmer
Step 1: Heat The Improvised Wax Warmer And Pour Out The Liquid Wax
In case you’ve got an improvised warmer, the cleanup process remains the same. You’ll have to start by heating it up. It doesn’t matter you have a mason jar or a metal pot on the burner, just heat it like you usually do when melting the wax.
Pour out the melted wax into a plastic container like you’ve done it before.
Pro tip: If the heating element is damaged, try using a blow dryer.
Step 2: Boil Adequate Water To Fill The Container
Fill up the pot with enough water to fill the container. Now, put it on the gas stove and start heating it for about 15 minutes until it reaches the boiling point. Now, put the wax warmer in the sink.
Step 3: Pour Boiled Water Into The Pot
Before doing this, make sure you wear a pair of oven mitts before touching the warmer. Now, carefully lift it from the sink and pour the boiling water into the inner pot very carefully until there is only 1 to 2-inch space left in the container.
In case you filled the wax warmer to the brim and it overflows, then drop some water so that it leaves a 2-inch space from the top.
Step 4: Let The Water Cool And Then Strain It Via A Colander
The boiled water will melt the wax particles and force them to come up to the surface. As the water cools down, it’ll harden all remaining wax. Now you can strain the water with a colander and separate it from the wax.
Pro tip: Throw away all the wax if you’re not planning to use it again, but don’t let it go down the drain.
Step 5: Clean The Pot With A Soft Dishwashing Liquid And Water
Pour a few drops of your dishwashing liquid into the wax warmer and fill it with moderately lukewarm water; also, check this guide if your tap water only runs lukewarm water. Now, start scrubbing the insides of the container with a clean cloth to take out the remaining wax.
Drain out the water completely and use a paper towel to wipe out the insides of the wax warmer.
Related Questions
How Frequently Should One Change Wax Melt?
Although one wax melt can last about 20 hours. However, you can change anytime when there is no fragrance coming out of it.
How Many Times Can I Reuse The Wax Met?
You can reuse the melted wax number of times until there’s no fragrance left in it. Since melted wax doesn’t evaporate, you need to take out the used wax from the wax warmer before placing the new one.
How Long Does A New Cube Of Wax Melt Last?
A complete bar can last for about 60 to 80 hours. But you may want to replace it sooner, depending on the usage and how strong a scent you like.
Ian Haynes is a digital marketing specialist and has successfully written hundreds of home improvement guides. Outside of his work, Ian likes fixing old bikes and exploring Brooklyn with his Labrador.
More by Ian Haynes