How To Bypass Garage Door Sensors (Step-by-Step Guide)
The sensors on your garage door are exceptionally valuable safety features. It is their job to prevent the doors from closing if there is something blocking the way. Garage door sensors became the standard back in the early 1990s to avert any unnecessary injuries or damage to vehicles.
While we can all appreciate the security that comes with these sensors, they can be quite a nuisance when they malfunction. Whether they start blinking constantly or do not allow you to close your garage door, even when there is nothing in the way, these are good indications that you have faulty sensors. Although you can try disconnecting them completely, this will likely cause your door to stop functioning altogether. Instead, you want to bypass your garage door sensors until they can be properly fixed.
We’ll explore how garage door sensors work, how to know when they’ve gone bad, and what you can do to bypass them so you can open and close your garage door manually.
Do You Need a Garage Door Repair Service?
Get free, zero-commitment quotes from pro contractors near you.

What Are Garage Door Sensors and How Do They Work?
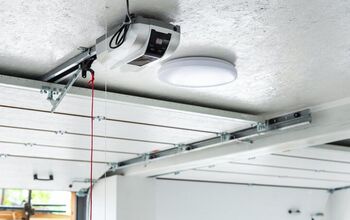
Garage door sensors are the safety add-on to your garage doors. When something or someone is in the doorway, the sensors are designed to prevent the doors from closing. Located slightly above the ground on both the left and right sides of the garage doors, the sensors operate on a low-voltage beam.
There are two essential elements involved in the functionality of garage door sensors:
- Photo-eye: Garage door sensors operate with the use of a photo-eye system. The sensors are infrared and are positioned two to six inches above ground, on either side of the garage door. When you press the remote control or key in the code, it sends a signal to the sensors to open the door. However, the primary purpose of the photo eyes is to keep the door from closing onto something or someone blocking the path.
- Line of sight: When the door is open and nothing is blocking it, the photo eyes on either side of the garage door send an infrared beam to each other. The door will then be permitted to close only if the beam remains undisturbed. If a vehicle, person, animal, or bike gets in the way, the beam is blocked and the door will not close.
If the beam becomes interrupted, the door is only allowed to reopen. It will not close until the infrared beam has been restored.
How to Know If Garage Door Sensors Are Bad?
As of 1993, all garage doors installed on a home in the United States are required to have garage door sensors for safety. In order for your particular garage door to pass inspection, it must have an operational sensor system. Before you attempt to bypass the system, you should try to troubleshoot the problem.
- Check the path of the sensor. First, you should always verify that nothing is blocking the beam of light. The infrared beam is sensitive and even something as simple as a leaf or thick spider web could prevent the garage door from closing. Search along the length of the path to make sure that nothing is blocking it.
- Confirm that there is power to both sensors. To confirm that the power is on for both sensors, look for the light. Each sensor will have either a green or red light. If both are functioning correctly, their lights will be green. This confirms that the infrared lights are being produced and read by both sensors. If one light is green and one is red, or both are red, there is something wrong with the system. If you have no lights at all, check that each sensor is connected to the power supply and wait for them to turn back on.
- Make sure that the sensors are properly aligned. Take a close look at each sensor to determine whether or not they may have been kicked or hit out of alignment. Even such small taps with your garbage cans or a bike can knock them off their path. The system can also malfunction or run inefficiently if the sensors are just slightly out of place.
- Check for loose or damaged wiring. This may be the cause of your sensors no longer functioning correctly. Look for burned, frayed, or damaged wires coming out of your sensors. If you discover some, you should shut off the power to the garage door and consider contacting a certified electrician.
- Clean the sensors lenses. Your garage can be a dirty place. It’s very possible that mud or dirt has become caked on the lenses on either one or both of the sensors. Every so often, give your sensors a good cleaning to remove any of this build-up.
- Verify that the sensors are dry. If you’ve been experiencing heavy amounts of rainfall, your sensors may simply be wet. Before you proceed, make sure that the sensors are completely dry.
- Check for wear and tear. It is good practice to check your sensors often for any wear and tear. Just like any electrical equipment in your home, your garage door sensors do get old and being to show wear and tear eventually. Look out for signs of age, indicating that it may be time to replace them.
Do You Need a Garage Door Repair Service?
Get free, zero-commitment quotes from pro contractors near you.
How to Bypass Garage Door Sensors
If you’ve done all the necessary troubleshooting and haven’t found a solution, you’ll need to know how to bypass the sensors. This will allow you to manually operate your garage door so you can install replacements. Bypassing your garage door sensors should only be done if you’ve confirmed that there is no other option for getting them to function properly. Follow the steps outlined below to safely bypass your garage door sensors.
Step One: Attempt to Close the Door
It is best to disengage the garage door sensors when the door itself is closed. If your garage door is stuck in the open position and the spring is damaged, it could fall closed when you’re switching to manual mode. Although, this may not be possible based on the current condition of your sensors.
If your garage door will not close and is stuck open, move on to the following step. However, if you were able to get the garage door closed, you can skip to step three.
Step Two: Prop the Garage Door Open
If your garage door is stuck in the open position, measure the distance between the ground and it. Then, cut two pieces of 2×4 lumber to that size. Place one piece of lumber under each side of the garage door and position them so that one end is holding up the door and one rests on the ground.
Use a hammer to knock the 2x4s into place so that they are tight inside the gap. This will prevent any movement of the door while you are bypassing the sensors and engaging manual mode.
Quick Tip: If you cannot easily get ahold of some 2×4 pieces of lumber to brace the door, any strong piece of wood will work. You can use a couple of ladders, or even a shelf angled on its side.
Step Three: Engage Manual Mode
The next step is to detach the trolley that opens and closes the garage door from the automatic system. To achieve this, search for the manual release cord. It is bright red and can generally be found right next to the motor that powers the door. Simply pull down on the cord and you should now be able to operate the garage door by hand.
If the door was stuck in the open position, ask for some assistance in holding the door while you remove the braces. They’ll need to hold the weight of the door, until the braces are gone, and then slowly lower it down.
Step Four: Install the New Garage Door Sensors
All that’s left at this point is to install your new sensors to get your garage door functioning properly again. Start by cutting off the power source for the sensors and the garage door system. It may be run by a switch or plugged into the wall. Once the power is off, remove the old sensors by detaching the wingnut holding them in place.
Use a wire cutter to cut the wires that are attached to the sensors. Then, using your pliers, strip some of the casing back to expose the wires and connect them to the wiring of the new sensors. Match like colors to like colors, generally a white and black wire. With the wiring connected, simply replace the sensors in their housing and fasten with the wingnuts.

Jessica considers herself a home improvement and design enthusiast. She grew up surrounded by constant home improvement projects and owes most of what she knows to helping her dad renovate her childhood home. Being a Los Angeles resident, Jessica spends a lot of her time looking for her next DIY project and sharing her love for home design.
More by Jessica Stone