Garbage Disposal Spits Up In The Other Side Of The Sink?
The garbage disposal is a component of your kitchen that deserves a whole lot of praise; it helps keep the kitchen neat and tidy. On top of that, you’re also reducing the amount of waste that you have to take outside, which is a plus. The only real downside to garbage disposals is that they tend to have issues from time to time. When they do, they spew out all kinds of nastiness that can leave your kitchen smelling truly awful.
Your garbage disposal spits up in the other side of the sink because of a clog in the drain lines. Debris in the drain builds up until it fully blocks the pipe, causing water to back up into the sink. To get rid of the clog, use a sink plunger on the sink drain opposite the garbage disposal side to release the clog.
Don’t allow the issue of a clogged garbage disposal to linger. Follow the tips included in this article and resolve your garbage disposal problems.
Do You Need Appliance Repair Services?
Get free, zero-commitment quotes from pro contractors near you.

The Reasons Why Your Garbage Disposal Is Backing Up into the Other Kitchen Sink
Issues related to your garbage disposal can pop right away or emerge over a certain period of time. Regardless of when they emerge, you need to understand why they’re happening in order to apply the proper fix. The reasons listed below could explain why your garbage disposal is malfunctioning.
The Wrong Pipes Were Used
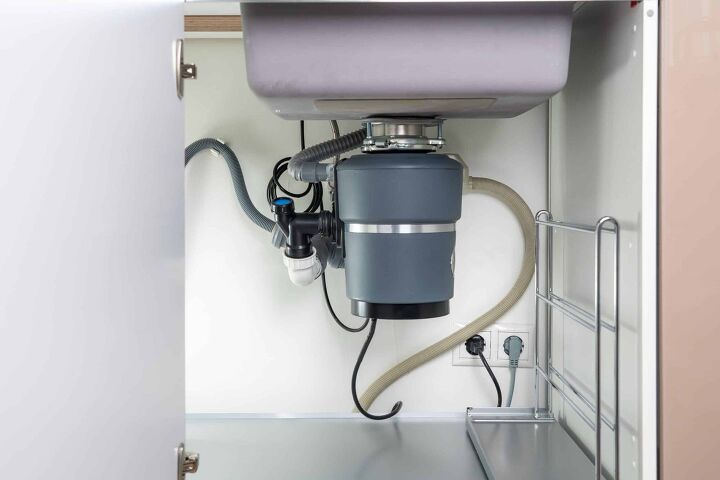
The way your garbage disposal and sink are connected to the main drain line can be problematic. To be more specific, the problems may stem from the types of pipes used to make the connections.
When it comes to the sink and the garbage disposal, you want them connected to the drain via a Y-shaped pipe. The Y-shaped pipe directs the flow of water and debris from the openings down to the drain line directly. There is no risk of the water going elsewhere as long as the pipes are clear.
However, if T-shaped pipes were used for your kitchen sink and garbage disposal, there could be problems. The wastewater coming from the garbage disposal could flow into the other sink’s pathway and push out at the top.
Take the time to see if this could be the issue affecting your garbage disposal and kitchen sink. If that is indeed the case, you’ll want to replace those Y-shaped pipes sooner rather than later.
You’re Not Using Enough Water When You Dispose of Garbage
Garbage disposals can process all kinds of materials you throw down the pipes. Still, it could use some help to ensure that the materials are properly ground. You need to pour enough water down the drain to make that happen.
If you just toss fruit or vegetable peelings into the disposal without flushing them with water, clogs can form quickly. Let the water flow freely in order to prevent the waste materials from getting trapped.
Waste Has Accumulated inside the Pipes
You can do everything right when it comes to garbage disposal maintenance and clogs may still form. Over time, traces of the substances you flush down the pipes will leave trails on the pipe walls. Eventually, the pipes will simply get too clogged up with that accumulated waste to function like normal.
How to Unclog the Pipes under Your Kitchen Sink
Since clogging is inevitable, you’ll want to learn how to deal with it now. Included below are some of the simple steps you can follow at home to clear up any clogs.
Step 1: Get Your Tools Ready
It’s time to get your tools in order before you start working on unclogging the pipes. You’ll just need a sink plunger, a garbage disposal plug, a cup, and some water.
Step 2: Prepare the Two Sinks
Start by working on the sink beside the garbage disposal. Turn on the faucet and pour some water into a cup. You will need about three to four inches of water.
Turn off the water and then pour the water into the sink. Don’t allow more water into the drain than what you have in the cup. While all that is happening, you should also remember to use the garbage disposal plug on the other sink.
Step 3: Start Plunging the Sink Next to the Garbage Disposal
Grab the sink plunger now and position it directly over the opening. Remember that you’re starting with the sink opposite the garbage disposal here.
Get to work next by moving the plunger up and down over the sink. Make sure that you’re getting that suction as you continue to move the plunger. You may have to re-position the plunger if the suction is lacking.
Step 4: Work on the Other Sink
It’s now time to work on the sink with the garbage disposal underneath. Remove the garbage disposal plug first and then let some water flow down the pipes.
You can now pick up your plunger again and work on the garbage disposal’s sink. Just like earlier, try to line up the plunger properly so that it’s directly above the opening.
Step 5: Check on the Clog and Continue Plunging if Necessary
After plunging, try to check if water is still coming out the wrong opening when you use the garbage disposal. If the pipes are still clogged, you’ll want to continue plunging. You may also have to call in the professionals if the plunging is having no effect.
How Do You Prevent Your Garbage Disposal from Clogging?
Although a clogged garbage disposal is almost inevitable, you can still do things that will discourage clogging. The tips in this section should help keep your garbage disposal from clogging for a long time.
Be Wary of What You Throw Down the Garbage Disposal
The clogs in the garbage disposal can be explained by in part by what you decide to throw away. Starchy and fibrous foods in particular are notorious for clogging. The blades in the garbage disposal simply have a harder time processing them.
Coffee grounds and eggshells are also bad for your garbage disposal. When ground up, those items can quickly bind with any other accumulated and speed up the formation of a blockage.
You should also avoid disposing of oil and excess grease via the disposal. Those substances can harden when exposed to cold water and cause clogging.
Clean Your Garbage Disposal Regularly
Don’t forget about your garbage disposal whenever you’re cleaning the kitchen. It needs to be regularly cleaned as well if it’s going to work properly. Cleaning the garbage disposal at least once a week should suffice.
Avoid Placing Too Much Waste in the Garbage Disposal
Even if you have a lot of waste materials to discard, don’t throw them all out at once. You’ll make it harder for the garbage disposal to process them correctly. Dispose of your waste in batches and give the garbage disposal the chance to work its magic.
Do You Need Appliance Repair Services?
Get free, zero-commitment quotes from pro contractors near you.
Related Questions
What Are Other Issues That May Affect the Garbage Disposal?
Aside from clogging, there are other things that could cause the garbage disposal to malfunction. They can also vary in terms of how difficult they are to fix.For instance, a worn-down O-ring can cause the garbage disposal to spring a leak. The blades themselves may dull over time and be rendered incapable of processing waste. Some of the garbage disposal’s components may also move out of place thus causing problems themselves.Clogs and leaks are problems you can probably handle on your own. If the issue is related to the blades though, you may want to entrust that potentially dangerous task to the professionals.
How often Should You Use the Garbage Disposal?
Running the garbage disposal every few days is important for maintenance purposes. Flushing cold water down the drain and running the garbage disposal simultaneously can keep the blades from rusting over. Make it a habit to perform this task even if you aren’t doing a lot of cooking in the kitchen.

We are a team of passionate homeowners, home improvement pros, and DIY enthusiasts who enjoy sharing home improvement, housekeeping, decorating, and more with other homeowners! Whether you're looking for a step-by-step guide on fixing an appliance or the cost of installing a fence, we've here to help.
More by Upgraded Home Team


![10 Best Electric Lawn Mowers - [2022 Reviews & Top Rated Models]](https://cdn-fastly.upgradedhome.com/media/2023/07/31/9070486/10-best-electric-lawn-mowers-2022-reviews-top-rated-models.jpg?size=350x220)