Can You Replace A Capacitor With Higher UF? (Find Out Now!)

When it comes to energy exchange, things can get pretty complicated. Capacitors, micro-farads, voltages– what does it all mean? If you plan on replacing a capacitor yourself, you will need to understand the basic concepts of energy storage. Once you understand voltage and capacitance, you can replace your capacitor using tools you already have at home.
There are several reasons why you may need to replace a capacitor. While most capacitors can last up to 20 years, using improper voltage can overwork the system and cause it to burn out early. Additionally, if your capacitor won’t hold any voltage, your electronic device will not function properly.
Can you replace a capacitor with one of a higher uF? Yes, you can replace a capacitor with one of a slightly higher uF, but try to stay as close as possible to the original number and don’t go lower. Replacing a capacitor is sometimes referred to as “recapping a circuit board,” and it’s important to match the new capacitor up to the old one. Both the capacitance (uF) and the voltage (V) should remain constant.
Related Content: AC Capacitor Cost | How To Discharge A Microwave Capacitor
Do You Need to Hire an Electrician?
Get free, zero-commitment quotes from pro contractors near you.

What Is a Capacitor?
Capacitors are similar to batteries but aren’t able to store as much energy. However, capacitors can charge and release energy much faster than a battery, making them a necessary element of the modern circuit board. Capacitors are used to store energy, smooth the output of power, and hold information. We can find these handy devices in washing machines, ceiling fans, DVD players, refrigerators, medical devices, and even smartphones.
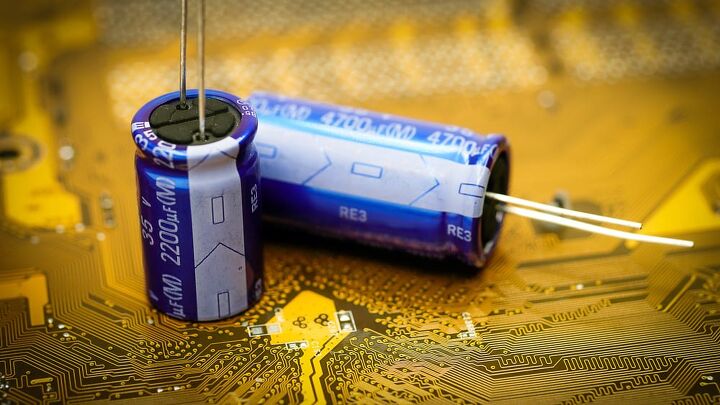
A capacitor is an energy storage device used to regulate voltage output. A capacitor has two different measures or “ratings.” The first is the capacitance rating, measured in microfarads and listed on the capacitor as uF. This first number indicates the amount of energy the capacitor can handle at a certain voltage. The second number is the voltage rating, which indicates the maximum voltage to which the capacitor can be exposed.
For example, if your capacitor reads “470uF 25v,” it can hold 470 micro-farads at 25 volts. Twenty-five volts is the maximum voltage allowed for that capacitor. If you subject the capacitor to a voltage rating higher than 25, the capacitor will explode.
What is uF?
We measure the capacitance rating in microfarads, denoted by uF. The capacitance essentially lets you know how much energy the capacitor can hold. The higher the number of micro-farads, the more energy the capacitor can hold. In theory, if a device has a high uF, it will last longer in a power outage.
What is V?
We measure the voltage in volts, or V. The voltage rating indicates the maximum voltage that the capacitor can handle. The V doesn’t necessarily indicate the current voltage but rather indicates the maximum. So if the voltage is marked “16V,” the capacitor can handle 16 Volts at the very most.
Capacitor Replacement Tutorial
Replacing a Capacitor
If your computer or electronic device is malfunctioning, you may need to replace the capacitor. You will need to match up the uF, although most capacitors have a 10 to 20% tolerance. This means that you can opt for one with a slightly higher uF, or capacitance rating, without any major consequence when replacing your capacitor.
If you’re in doubt about using a higher capacitance, you can always replace your capacitor with the same model. You can check the model number in the upper left-hand corner of the label. It’s usually above the capacitance and voltage ratings, which can look like this: 370 uF 16V.
If you choose to replace your capacitor with one of a higher uF, stay within close range. If you replace your capacitor and double the uF, for example, you would overload the capacitor. You would think that doubling the capacitance would be a good thing since it would mean that the capacitor can store more energy. But by overloading the capacitor, you can damage your external device.
Step One: Discharge Voltage
As with any electrical repair, make sure that you are utilizing safe practices. Remember that a capacitor can hold a charge even after it is disconnected, so make sure to discharge the capacitor completely before handling it.
Step Two: Remove Old Capacitor
Locate the capacitor’s leads on the back of the circuit board. Use the soldering iron to apply heat. You can also do this without a soldering iron. The capacitor should pop off easily. It may have visible signs of damage, such as corrosion or a burst top.
Step Three: Match New Capacitor
Once you have disconnected and discharged the old capacitor, you can compare it against the new capacitor. You will want to match them as closely as possible. Order the same model, if possible. You can find the model number in the upper left-hand corner of the label.
If the old capacitor reads “370uF 35V,” the new capacitor should read the same. You can opt for one with a slightly higher uF rating but not a lower one. You can replace a 370uF with a 440uF, but not vice versa. Not only should the uF match, but the voltage, physical size, and lead spacing should match up as well.
Warning: The voltage, indicated by V, marks the maximum voltage the capacitor can hold.
Step Four: Line Up Polarities
If you’re dealing with an electrolytic capacitor, polarity matters. Line up the negative side of the capacitor with the appropriate lead hole on the circuit board. You’ll be able to tell the negative side by the dashed line on one side. If you’re dealing with a ceramic capacitor, you can use the leads interchangeably.
Step Five: Replace Capacitor
Once you have the correct polarity, insert the new capacitor and solder it into the circuit board.
Types of Capacitors
A capacitor is made of two metal plates that are separated by a dielectric, or a non-conductor. When we talk about different kinds of capacitors, we’re generally referring to the dielectric used between the plates.
Electrolytic Capacitor
Electrolytic capacitors are polarized, meaning that one side is positive and the other negative. With electrolytic capacitors, you must connect them to the correct terminals for them to work. Reversing the polarity will cause the capacitor to burst.
With an electrolytic capacitor, there are a couple of ways to check the polarity. On one side is a dashed line, or a negative sign, to indicate negative polarity. Of the two leads (wires), the longer lead is to indicate positive polarity. First check for the dashed line, as the leads are often cut down during installation.
Tantalum Capacitor
Like electrolytic capacitors, tantalum capacitors are polarized and have a higher capacitance. Tantalum capacitors are reliable because of their low leakage current. They’re generally more expensive than electrolytic capacitors. Since they can store more energy, tantalum capacitors are popular in TVs, submarine cables, and communication devices.
Film Capacitor
There are several types of film capacitors: polystyrene, polyester, and metalized polyester. Film capacitors are a cheaper alternative but offer limited frequency response. They are generally only available as leaded electrical components.
We often call film capacitors “plastic capacitors” because of the materials used as their dielectrics. Because the dielectric often needs to be thicker, film capacitors are larger and more expensive. Film capacitors are widely available in a variety of voltages.
Ceramic Capacitor
Ceramic capacitors are not polarized, so you can use the two sides interchangeably. With ceramic capacitors, you don’t have to match up polarities, such as positive to positive and negative to negative. Even more, ceramic capacitors are cheap and accessible.
Safety Considerations
Remember that electricity can be dangerous. Before replacing any electrical components, make sure that you are qualified and check that all voltage has been discharged from the capacitor. Do NOT touch the two wires coming out of the capacitor, as these transfer stored energy and can deliver an electric shock, even when unplugged.
Wrapping It Up
When replacing a capacitor, you should match the make sure that the new capacitor has the same uF as the old one. So if the old capacitor reads “440uF 16V,” the new capacitor should also read “440uF 16V.” And while you can increase the capacitance (uF) slightly, it shouldn’t be by more than 20%.
Do You Need to Hire an Electrician?
Get free, zero-commitment quotes from pro contractors near you.

Related Questions
How can you tell if a capacitor is bad?
If your capacitor has lost its charge, your device will not operate. In some cases, your electronic device will still function, but your energy bill may go up as your capacitor struggles to keep up.A blown capacitor will often show visible signs of damage, such as a popped top, corrosion, or leaking fluids. The top can swell or burst if exposed to more than the maximum voltage.
How long will a capacitor last?
Manufacturers design capacitors to last 20 years, but they can wear out much quicker. For example, faulty capacitors are one of the most common issues with residential air conditioners. Many carry a five-year warranty, but you’ll need to replace your capacitor in your A/C after approximately ten years.
Related Guides

HK Sloan is a freelance writer currently covering DIY Home Improvement, Health, and Lifestyle. Sloan is passionate about improving situations for less, whether it be working on mind, body, or home.
More by HK Sloan


