Can You Use Peel and Stick Backsplash On Textured Walls?


Peel and stick backsplash is widely popular due to its affordability, and how great it looks. It can cost as little as $4.00 per sq. ft. and as much as $17.00 per sq. ft., making peel and stick a cheap alternative to tile. However, many builder-owners and renovators are left wondering if you can use peel and stick backsplash on textured walls.
You can technically use peel and stick backsplash on textured walls; however, it is not optimal. That is because peel and stick backsplash only works as well as its adhesiveness allows it to. In other words, walls that have a prominent texture won’t respond as well to the adhesive of peel and stick backsplash, so it won’t lay evenly.
Some renovators and DIY enthusiasts make adjustments to the textured walls to allow for peel and stick backsplash. In that case, you could lightly sand down the textured wall. That way, you have a smooth surface for your peel and stick to adhere to.
Let’s get into the ins and outs of using peel and stick backsplash on textured walls.
Do You Need Handyman Services?
Get free, zero-commitment quotes from pro contractors near you.

What is Peel and Stick Backsplash?
Peel and stick backsplash is an affordable, adhesive alternative to traditional backsplashes. Typically, there is a liberal layer of adhesive brushed onto the back of peel and stick backsplash tiles. When you remove the backing paper, you can then stick the backsplash to the wall.
Peel and stick backsplash is made of several materials, such as:
- Vinyl
- Plastic
- Vinyl foam
- Metal-coated plastic
Because the materials for peel and stick backsplash are synthetic, they are highly affordable.
How Do You Install Peel And Stick Tile Backsplash?
Peel and Stick Backsplash Cost Comparison
Besides ease of installation, the price of peel and stick backsplash is its main appeal. Compared to most other types of backsplash, peel and stick can save you a fortune.
| Backsplash Material | Cost |
| Peel and Stick | $4.00 -$17.00 per sq. ft. |
| Tile | $7.00-$20.00 per sq. ft. |
| Metal/steel | $6.00-$12.00 per sq. ft. |
| Onyx | $10.00-$18.00 per sq. ft. |
| Brick | $7.00-$20.00 per sq. ft. |
| Stone | $8.00-$14.00 per sq. ft. |
| Tin | $8.00-$15.00 per sq. ft. |
Peel and stick backsplash often mimics the look of other types of backsplash, such as tile or onyx. Because of that, peel and stick is the choice of many conscious builders and owners looking to save money while getting the best look possible.
Can You Install Peel and Stick Backsplash on Textured Walls?
Yes, you can, but it is not the best option. Essentially unless you take some sort of action, such as smoothing the surface, the backsplash will have a hard time sticking. Peel and stick backsplash relies on its adhesive evenly sticking to the surface it is applied to.
In the case of textured walls, you can’t count on the peel and stick backsplash to lay evenly. Your 2 best options to install peel and stick backsplash on textured walls are to skim coat the wall, or lightly scrape the wall.
How to Install Peel and Stick Backsplash on Textured Walls
Follow along as we get into the two ways that you can install peel and stick backsplash on textured walls. To start, let’s use skim coating the wall as Option A. Skim coating is essentially just re-texturing the wall.
1. Prime the Wall
Use a stain-sealing primer to prepare the textured wall. It is easiest to use a roller to prime the wall. By using a roller, you can ensure that the primer hardens evenly across the wall.
Before moving onto the next step, allow between 1 and 3 hours for the stain-sealing primer to dry.
2. Mix and Apply the Joint Compound
To skim coat and re-texture a wall, you must mix a joint compound. In order to get the best results, you need to mix the joint compound so that it is thick. The thicker the joint compound, the easier it will apply to the wall.
Mix the joint compound in a bucket. Use less water to ensure that your joint compound is thick. Now, you can apply the joint compound using a roller. As you roll on the joint compound, smooth it out with each stroke of the roller.
3. Smooth it Out
Using a squeegee knife, smooth out any inconsistencies in the joint compound. Try to smooth out the compound by using large, sweeping strokes going downward for the best effect. Minimizing the amount of the squeegee knife strokes that you make can ensure the smoothest outcome possible.
Now, apply repeat steps 2 and 3 by applying and smoothing out a 2nd layer of joint compound.
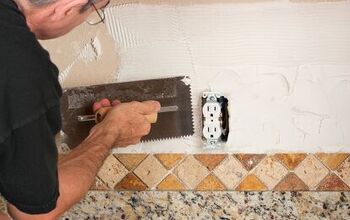
4. Apply Peel and Stick Backsplash
Once your joint compound is dry and your wall is retextured, apply the peel and stick backsplash. Simply remove the backing paper from the backsplash and apply it as needed. It is that simple!
Install Peel and Stick Backsplash on Textured Walls Option B
Option B for installing peel and stick backsplash on textured walls involves scraping the walls. Before starting with Option B, make sure you have the following tools:
- Sanding pad
- Drywall scraper
- Water/spray can
- Eye protection
1. Soak the Walls
Before you can scrape the texture off of the walls, you must soak them first. Your best bet is to use a spray can so that you can evenly douse the walls. After 15-20 minutes of letting the water soak in, check to make sure that the wall is smoother.
If it is not smoother, re-soak the wall. Otherwise, proceed to the next step.
2. Begin Scraping
Using a drywall knife, carefully start to scrape the textured wall. Your best bet is to make downstrokes while scraping. If possible, use a ladder to begin your strokes as high as you can. Be sure to wear eye protection during this step, as debris can easily get into your eye.
Depending on how long it takes you to scrape, the wall may re-harden during the process. If so, simply douse the wall with water again, wait 15 minutes, and get back to work. Continue this step until the wall is smooth.
3. Sand it Out
You are almost done. Allow 24 hours for the wall to fully dry. After that, take a sanding pad and go over the spots that you just scraped with it.
Apply gentle pressure and make sweeping motions with the sanding pad until it is entirely smooth.
4. Install Peel and Stick Backsplash
Be sure to brush off the wall as there will likely be residue from the scraping and sanding. Once you have done that, you can apply the backsplash. Just as with the other method, all that you need to do is remove the backing paper and stick the backsplash to the wall.
Do You Need Handyman Services?
Get free, zero-commitment quotes from pro contractors near you.
Summing it Up
Peel and stick backsplash is not ideal for textured walls unless you do some prep work. Whether you use the re-texturing method utilizing a joint compound, or the scraping and sanding method, you can make your textured wall optimal for peel and stick backsplash.
Considering that peel and stick backsplash only costs $4.00-$17.00 per sq. ft., it is a cheap and effective way to add character to the room it occupies. Easy installation, affordable price, and a look comparable to high-end alternatives is what makes peel and stick backsplash highly sought after.
Good luck installing peel and stick backsplash to your textured walls.
Related Guides
Nick Durante is a professional writer with a primary focus on home improvement. When he is not writing about home improvement or taking on projects around the house, he likes to read and create art. He is always looking towards the newest trends in home improvement.
More by Nick Durante


![10 Best Cordless Leaf Blowers – [2022 Reviews & Ultimate Guide]](https://cdn-fastly.upgradedhome.com/media/2023/07/31/9070789/10-best-cordless-leaf-blowers-2022-reviews-ultimate-guide.jpg?size=350x220)