Is Your Bathroom Sink Stopper Stuck? (We Have a Fix!)

Like any mechanical device, even sink stoppers are subject to problems. It often seems the simplest device can be the most frustrating of them all. Nothing is truer of a bathroom sink stopper stuck in the closed position. If the stopper breaks in the open position, at least you can still brush your teeth.
Bathroom sink stoppers are relatively simple devices with few moving parts. When something does go wrong, the problem usually stems from a broken part. Fortunately, bathroom sink stopper problems are easy to diagnose and repair with only a few tools. These repairs are within the capabilities of most homeowners.
The biggest challenge to repairing a broken bathroom sink stopper is getting under the sink and behind the drainpipe to access the mechanisms. If your bathroom sink cabinet is like most, it may take longer to clear space beneath the sink than it does to make the repair. A basic understanding of how most bathroom sink stoppers operate can make finding the problem a bit easier.
Do You Need to Hire a Plumber?
Get free, zero-commitment quotes from pro contractors near you.

A Simple Design – Levers in Action
Most bathroom sink stopper mechanisms have only three parts. These three parts work together to move the sink stopper up and down at the touch of a finger. When everything is working properly, it is an elegant and efficient system. Let’s look at these parts and the functions they play to operate your bathroom sink stopper. Learn how to remove a sink stopper so you don’t make the problem worse.
The Pushrod – You Basic Sink Drain Human Interface
The pushrod that operated the drain mechanism is usually located at the back and on top of the faucet. Your interface to drain operations occurs through this pushrod. The button on the pushrod is the point where all the action starts.
Typically, pushing down on the pushrod button causes the bathroom sink drain stopper to lift, allowing the water in the sink to drain away. Pulling up on the pushrod button reverses the action and closes the drain preventing water from entering the drainpipe.
The Lever, Translating Down to Up and Vice Versa
The pushrod connects under the sink with the action level. The action level can be a small metal strip or a metal rod. One end of the lever, called a clevis, attaches to the pushrod using a thumbscrew.
The other end of the level is inside the drainpipe. Some people wonder how the lever operates inside the drainpipe, allowing water to leak under the sink. Plumbing manufacturers address this challenge in many ways. The most common means is a ball and cap. A ball washer fits inside the drainpipe, and the cap tightens against the drainpipe and pulls the ball tight to the opening. There are other types. However, they all operate basically the same.
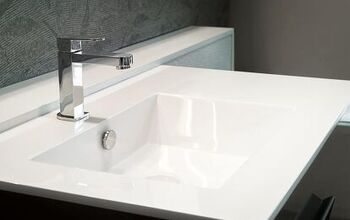
The Popup Drain Plug – Filing the Gap
The third component of your bathroom sink drain plug is the actual drain plug. The plug design has a rubber gasket under a lip that fits tightly in the drain opening from above. Everything that is below this rubber gasket is technically a tailpiece.
At the bottom of the tailpiece is a ring or hook. This ring or hook engages the end of the lever inside the drainpipe. Push down on the pushrod and the lever lifts the drain plug. Pull up on the pushrod and the lever pulls the drain plug down, sealing the gasket into the drain flange. Simple and elegant until something doesn’t work.
What Can Go Wrong?
Any moving set of parts can break. Expose those metal parts to water and you make the possibility even greater. Bathroom sink drain plugs are no different. Some manufacturers are moving away from metal components in favor of plastics. Plastics solve the corrosion part but are not as durable as metal.
Any connection in the linkages can break or slip. Bolts, screws, and nuts can come loose. Corrosion can rust weld parts together if left unused long enough. Metal or plastic breaks where stress is greatest in the linkage. Understanding this can lead us to the most common places in the assembly where problems can occur.
Corroded Pushrods
The pushrod above the faucet must pass through a hole in the faucet down under the sink. Naturally, this position exposes the pushrod to a lot of water. If the pushrod isn’t operated regularly, such as in a guest bathroom, the pushrod can corrode. Corrosion can jam the pushrod in the passage through the faucet.
Sometimes you can work a jammed pushrod free by gently moving it around or twisting it slightly back and forth. Don’t get too carried away with twisting unless you first disconnect the pushrod from the lever under the sink.
Some people suggest using a lime removing product to loosen the corrosion. Lime removers may seem like a good idea, but in fact, they may only make matters worse. The corrosive action of the lime removing chemical may damage the faucet beyond repair or may cause more corrosion that makes the jam worse.
Bad Connections – When Things that Shouldn’t Move Do
There are two vital connections in a bathroom sink plug assembly. These connections must work for the assembly to move the drain plug up and down in the drain. If a connection is loose or a part breaks, t plug stuck in the open or closed position results.
The pushrod connects to the lever using pair of holes with a thumbscrew that tightens against the pushrod. This arrangement allows you to adjust the movement of the lever up and down. Using the thumbscrew, you can adjust the drain plug to sit firmly in the drain flange. When properly adjusted, the drain plug opens wide enough to allow a clean flow of water into the drain.
Several issues with this connection can cause a bathroom sink drain plug to fail to operate properly.
- The thumbscrew may become loose and allow the connection to slip
- The lever may corrode and break.
- The pushrod may break
In any case, this connection must be tight to allow the drain plug assembly to operate properly. Familiarize yourself with the 36 parts of a sink.
Inside the Drain – Making Another Connection
The drain plug must engage the lever inside the drain to operate properly. Figuring out how this connection works can be a challenge short of disassembling the entire drain. The most common connections between the sink stopper and the lever include:
- A hole in the bottom of the tailpiece on the stopper through which the lever slips.
- A hook on the tailpiece which engages a ring on the lever
- A ball and capture joint between the lever and the tailpiece
Figuring out which type of joint is in the drainpipe is the key to disengaging the drain plug from the lever. If this joint is broken or corroded, the drain plug assembly may only operate in one direction. You may be able to close the drain but not open it again and vice versa.
Another Drain Option – The Spring-Loaded Popup Drain
Some new sink faucet kits come with a spring-loaded drain plug kit that doesn’t have a pushrod to activate the plug. These drain plugs are closed by pushing down on the drain plug. Opening the drain is accomplished by pushing on the drain plug again. A second push disengages the plug. A spring pushes the plug upwards, opening the drain.
When the Spring Doesn’t Spring
Almost all problems with the push/push style of bathroom sink drain plug involve something interfering with the spring. Hair, foreign objects, corrosion, or anything else that gets down the drain can eventually cause the bathroom sink stopper to either fail to close or fail to open.
Getting to the Problem
Most of these bathroom drain plugs come apart by unscrewing the drain plug. Turn the plug counterclockwise until it is free of the mount in the drain flange. You may need to hold the flange with a pair of pliers as you unscrew the plug in some cases.
With the plug out of the drain opening, you can repair or replace the drain plug spring and get your bathroom sink drain operating.
Doing a Bit of Extra Maintenance
If you are disassembling your drain to service the drain plug mechanism, you might consider giving the entire drain a good cleaning. You have already cleaned out under the sink. Now is a good time to clean the P-trap and the flange area to ensure that your drain runs freely.
If you are replacing the bathroom sink drain plug, it is often a good idea to replace the drain tailpiece through which the drain lever passes. Often, the threads and the opening where the seal allows the lever to pass has corrosion or are worn and won’t reseal. Installing a new tailpiece is inexpensive and can prevent problems soon.
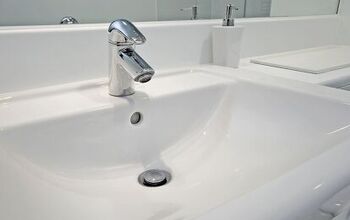
A dual mount bathroom sink is a low maintenance option.
Do You Need to Hire a Plumber?
Get free, zero-commitment quotes from pro contractors near you.
A Working Bathroom Sink Drain
Keeping your bathroom sink drain working is a minor repair that can keep you from suffering major frustrations. For the most part, the repairs are simple. You don’t need a lot of tools to accomplish this task. Most homeowners perform a bathroom sink drain repair in less than an hour.
We hope that this article helps you accomplish your bathroom drain plug repair as easily. Remember to work safely. Good luck with your project.
Related Articles

Dennis is a retired firefighter with an extensive background in construction, home improvement, and remodeling. He worked in the trades part-time while serving as an active firefighter. On his retirement, he started a remodeling and home repair business, which he ran for several years.
More by Dennis Howard