When Should You Replace The Exterior Caulk?

Caulking the exterior of your home is not meant only to keep the outside of your home appealing to the eye but also to keep water and pests at bay. However, most people forget that caulking needs to be part of your regular home maintenance. So, when should you replace your home’s exterior caulk?
Replace the exterior caulking job on your home whenever you see the first signs of wear and tear. Signs of wear and tear include flaking, powdered material on the surface of the caulk, peeling, and cracking. Upon seeing these signs, remove the old caulk and replace it with new.
Below, we will take you through how exterior caulking works on your home and tell you the best way to apply it! That way, you don’t have to hire a professional! Let’s get to it.
How Does Exterior Caulking Work?
A structure, such as a house or building, is protected from water and vermin with the use of exterior caulk, a moldable polymer.
Small gaps and flaws in the framework are patched up with caulking before they become significant issues. For instance, it can prevent dampness and water from entering a house and causing harm.
Even the smallest cracks can allow water to enter, leading to problems like rot, mold, and mildew. This may potentially result in structural damage as well as health issues.
By preventing wind or air from entering tiny cracks and crevices in the house, this kind of caulking can also increase a home’s energy efficiency, resulting in significant utility bill savings.
It may also aid in keeping insects outside. Small insects frequently reside in crevices that caulking fills to prevent them from entering the home, where they may cause significant damage that would require expensive repairs.
How Long Does Exterior Caulking Last?
Exterior caulk must endure years of exposure to extreme weather events, so it’s crucial to check for any symptoms of damage or deterioration and replace it as soon as possible to maintain continued protection.
Thanks to the high-quality caulk’s exceptional adherence and flexibility, it will continue to be airtight and watertight. These characteristics must be maintained throughout time for caulking to remain effective, otherwise, it runs the risk of peeling away from the surface.
After the first year in a new residence, experts advise checking and replacing the caulking because a lot of settling takes place during this time. As a house lowers, caulk frequently separates from wall connections, but this is simple to fix.
A checkup every few years should be adequate to prevent issues since homeowners in established homes need to repair their caulking around every five years. A home inspection is a smart idea, though, if it’s in a region with harsh weather or has recently seen heavy rains.
What Are The Signs Your Home Needs New Exterior Caulk?
Walking around the house and completing a visual check can determine whether your property needs new outside caulk in one of the finest methods possible.
Exterior caulking is not permanent, thus, it is important to check all of the current caulking for symptoms of wear and tear, such as:
- Flaking
- Powdered surfaces
- Shrinkage of the beads
- Losing the ability to adhere
If you see any of these signs or the start of these signs, that means that your caulk needs to be replaced. Below, we dive into some more of these issues.
You Have Cracks Around The Windows
Rain or snowmelt could seep into cracks around windows and descend into walls. This moisture may eventually penetrate the flooring and travel along the frame, permeating the wood and resulting in rot.
This could lead to an issue that can be very costly to solve and provides the ideal conditions for mold to grow.
Additionally, it is a good idea to look around chimneys and skylights. Homeowners who are unsure about their ability to carefully inspect the caulking in these places may seek an expert’s assistance.
Signs Of Deterioration
The area where the paneling touches the foundation should be checked first, since damage there could let water into the structure, necessitating expensive repairs.
Another frequent trouble site is where windows and door frames meet any paneling on the house, although it’s crucial to check any place where two pieces of construction connect outside the house.
How Will I Know It’s Time to Replace Caulking?
Every year, you should check your caulking and redo it if you find any cracks forming or if it starts to pull from the window. If you have drafts in your home, it’s usually a sign that the caulking needs to be replaced.
You might also notice a sudden increase in heating expenditures as heat leaves through the gap that aged caulk creates. During the summer, you can find more little bugs in your home than normal, particularly at night when they’re drawn to the light.
Because the window caulk maintains the glass windows in place and acts as a cushion, you could hear your windows rattle in extreme circumstances.
The window will start to rattle on chilly days if the caulk has seriously degraded. As a result of the rain getting into the windowpane without caulking, you can also observe bent wood and chipped paint.
If left to stand, the wood will absorb the moisture and might bend, and the swelling might cause the paint to fracture.
How Do I Replace Caulk?
You cannot add fresh caulk over old if the caulk surrounding your windows is beginning to degrade since the old caulk will continue to decay more quickly than the new. The best course of action is to completely remove the old sealant before replacing it.
Below are a couple of steps that you need to take.
Removing Old Caulking
Although it is not difficult, peeling the old caulking will take some time and patience. Follow the steps below to remove the old caulk:
- Apply caulk remover. Your old caulk can be softened and made easier to remove by applying caulk remover, a liquid in a spray bottle. The caulk will become softer the longer you let it sit. Effective caulk remover is available from brands like Goo Gone and De-Solv-It.
- Use a tool to finish peeling the caulk. You may purchase this tool online or at the majority of hardware stores for a very low price. You can also scrape it off with a razor blade or a utility knife, but take care not to take any wood with it. The caulking can also be removed with the aid of an old toothbrush and a putty knife.
- Apply a heat gun. This is to help soften any caulking that is still stiff and challenging to remove. You must exercise particular caution since is easy to cause damage when using a heat gun to clean the window. A hairdryer could also be used.
- Wipe the surface. A moist towel can be used to wipe and scrub the surface after the caulking has been removed. If you notice fungus on the exterior, immerse a towel in bleach to destroy the mold so the caulking can adhere more successfully.
Apply New Caulk
Select an unscented, paintable latex type for the interior and an ultraviolet light-resistant exterior caulk brand for the outside.
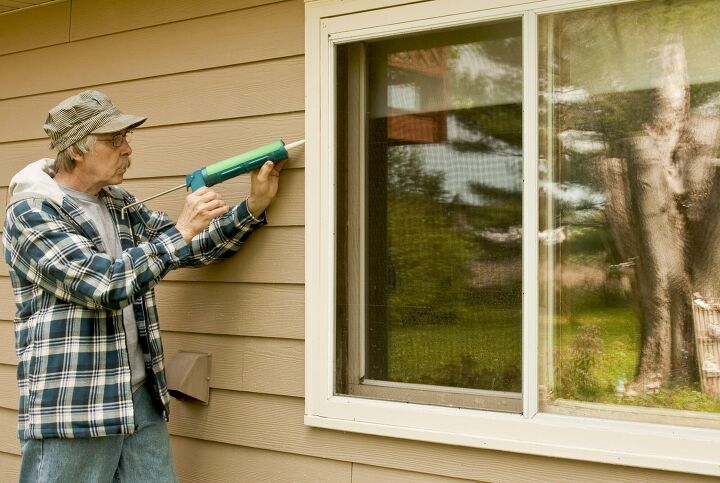
To avoid making a mess, use a caulk gun with a finger release to ensure that the caulk begins to ooze as soon as you pull the trigger.
Follow the steps below to apply the new caulk:
- Trim the tip. When trimming the tip, remember that you may always trim more to make the hole bigger, but if you trim too much off, there is no going back. Begin as near the top as possible because only a few are marked, and the majority are not.
- Apply from the side to the middle. Use your hands to hold the pistol and manage the bead when you go from side to middle along the window. You can maintain a straight angle by merely moving at the elbows, which will help you make an even bead.
- Continue throughout the rest of the window. From the corner to the middle, stop. To make a continuous seal, proceed from the right edge to the center once more. By working in this manner, irregular beads in the corner will be avoided. Additionally, fixing the connecting point is simpler. Because the glass is smoother and will produce an even bead, move the tip along the window rather than the wood pane.
- Smooth the bead out. When you’re done, use a damp finger to smooth out the bead. Work slowly and in small parts until the entire bead is smooth.
- Fill in any gaps. Before applying window caulking, fill any gaps greater than 14 inches with a backer rod. Attempting to caulk a wide area can result in swelling that looks terrible and produces a subpar seal that will quickly wear away. To fill in these spaces, the backer rod, a tiny, dense foam, is available in various diameters.
Wrapping It UP
Your exterior caulking job should last for around 5 years if you use a decent, high-quality caulking brand before you’ll need to reapply it. However, inclement weather can hasten degradation, particularly on the east and west sides of the structure.
We advise a yearly checkup in the early spring to check for peeling and cracks so you can repair it while the weather is beautiful.
Some homeowners like to conduct yearly checks in the early fall to ensure their windows are properly sealed for the winter. Either approach will be effective as long as you are consistent.
Related Guides:

Heather is a passionate writer who loves anything DIY. Growing up, she learned everything from home repairs to design, and wants to share her tips with you. When she's not writing, she's usually hiking or searching for her next DIY project.
More by Heather Robbins






![How Much Weight Can a 4×4 Support Horizontally? [It Depends!]](https://cdn-fastly.upgradedhome.com/media/2023/07/31/9070333/how-much-weight-can-a-44-support-horizontally-it-depends.jpg?size=350x220)





![Standard Dining Room Table Dimensions [for 4, 6, 8, 10 and 12 People]](https://cdn-fastly.upgradedhome.com/media/2023/07/31/9074335/standard-dining-room-table-dimensions-for-4-6-8-10-and-12-people.jpg?size=350x220)


