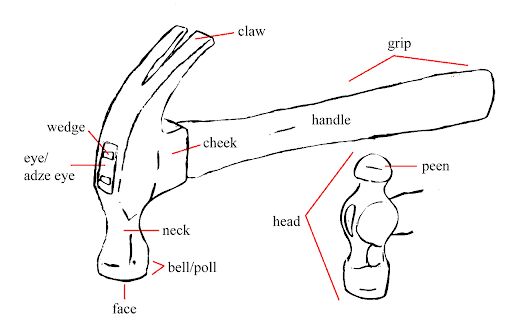
What Are The Parts Of A Hammer? (With Diagram)
Although technology has drastically changed tools throughout the years, one of the greatest has remained the same: the hammer.
One of the oldest tools out there, the hammer has evolved to fulfill a wide range of roles beyond basic construction. Today, there are more than forty different types of hammers on the market, each with unique features. While some are highly specialized, others are very versatile and can be beneficial for any at-home workshop.
The different parts of a hammer include:
- Grip
- Handle
- Head
- Face
- Cheek
- Claw or Peen
- Neck
- Throat
- Eye
There are different types of handles, faces, balls, and peens. The type you use will depend on what you need the hammer for. Make sure the hammer chosen has the parts you need.
Although the hammer may appear very simple on the surface, there is much more than meets the eye to this helpful tool.
What Are The Parts Of A Hammer?
Hammers come in many shapes and sizes, each constructed to complete their unique tasks. Because of this, many aspects of a hammer differ and choosing the right one can prove difficult.
Let’s explore each of the parts of a hammer individually to gain a better understanding of how this tool functions.
1. Grip
Beginning at the bottom of the hammer is the grip. The grip’s purpose is to offer comfort and prevent the hammer from slipping out of your hand while it is in use.
Rubber grips are generally the most popular type, as they provide the most comfort and least risk of slippage. They are especially beneficial for the shock absorption needed when handling fiberglass and steel handles.
The grip helps to ease the impact on the user during each strip of a steel hammer. However, hammers constructed of wood usually do not feature a grip due to the natural shock-absorbing capability of wood.
2. Handle
Arguably the most important part of the hammer, the handle is what you grip onto when utilizing it for whatever task you require. Whether you need to drive tent stakes, hammer in nails, or remove staples, you will hold the hammer by its handle.
This part of a hammer is often overlooked but choosing a cheap hammer could mean sacrificing the quality of the material at the handle, which is never ideal.
Your hammer must be able to withstand the impact of multiple strikes in a row. Handles that are poorly crafted could result in the hammer weakening or breaking entirely.
Types Of Hammer Handles
- Long: The length of the handle determines how much force is needed to operate the handle face. As a result, the longer the handle the lower the accuracy of the strike. This is precisely why sledgehammers are much longer than ball-peen hammers. However, the long handle on a sledgehammer offers more power with greater swings.
- Wooden: Wood is the most common material used for hammer handles. While they are durable and have great shock absorption, wooden handles will break over time. Since they are made of wood, they are susceptible to rot and warping. Though, so long as you take good care of it, you should expect to get plenty of years out of your wooden hammer.
- Fiberglass: Both wood and fiberglass are currently dominating the hammer handle market. Fiberglass handles are stronger than wood and much lighter than their metal counterparts. Although they are more expensive, they have a much longer lifespan.
- Steel: Being constructed of metal, steel handles guarantee durability. While they will certainly be much heavier than wood or fiberglass handles, their sturdy construction will withstand the test of time.
- Titanium: Titanium handles are incredibly strong, with 97% of their force being delivered into the nail. In contrast, steel hammers deliver only 70%. Titanium hammers are also 45% lighter than their steel counterparts, meaning less recoil and more efficient use. The only downside to hammers with titanium handles is the price.
In addition to the length and the material, the shape of the hammer handle will also vary. For instance, a chasing hammer handle is thin at the hammerhead and gradually gets thicker as it goes down. This provides excellent balance for the user.
3. Head
The head sometimes referred to as the anvil, is the part of a hammer that does the majority of the work. It is the weighted piece that rests atop the hammer’s handle.
As you swing the hammer, the head is what delivers the impact. The weight, shape, and size of the head vary significantly based on the type of hammer.
When it comes to the hammer’s head, the major factor to consider is the weight. A hammer with a bulky head will add a significant amount of weight to the entire tool. While this can be very helpful for striking heavier blows, it is not ideal for delicate or precise tasks.
4. Face
On a standard hammer, the face is the component of the hammer that physically makes contact with nails and other materials.
As a result, it sees the most punishment of all the parts of a hammer. Although limited, there are some options that you have for hammer faces that will make a major difference in performance.
Different Hammer Faces
- Shape: Most hammers have a minor convex face, which is adequate for the majority of users. However, the alternate option is a milled or “waffle” faced hammer. This offers slightly more grip when striking nails and is the ideal choice for users with little experience. It’s worth noting, though, that milled-faced hammers will leave an imprint on the material surfaces you are striking.
- Texture: Similar to milled-faced hammers, but slightly less abrasive, textured faces let you add a unique look to the surface of metals and woods. Some texture options include crosshatch, wide stripes, and inverted dimples. To create even more unique patterns, the textures can be overlapped.
- Diameter: Hammers that are intended for more heavy-duty tasks tend to have a larger face. On the other hand, hammers designed for more delicate tasks have been faced with small diameters.
If you’re having difficulty deciding on the right hammer face, consider replaceable faces. This allows you to easily switch out the faces once they’ve worn out or if you want to prevent surfaces from becoming dented.
5. Cheek
Put simply, the cheek is the side of the hammerhead and holds everything together. This part of the hammer experiences the most stress and is often the point of weakness in subpar hammers. The cheek is much more important on wooden hammers than in hammers made of any other material.
6. Claw Or Peen
When purchasing a hammer, the claw is one of the most important factors to consider. Although not all hammers feature a claw, they serve a very specific function.
The claw can be used to rip wood, pull nails, and function as a pry bar to tear things apart. In hammers that have one, the claw can be found opposite the hammer face.
Claw
- Curved Claw: This is most likely the type of claw you are familiar with. Curved claws consist of two curved heads that function as the perfect device for removing or prying away nails.
- Straight Claw: Straight claw hammers are generally much heavier than their curved counterparts. Their main purpose is to dismantle materials such as plastic and wood.
Peen
Instead of being outfitted with a claw, some hammers consist of a ‘peen.’ Put simply, the peen is essentially an additional hammer that is commonly used in metalwork. Here are the different distinctions:
- Ball Peen: Although the head of a ball-peen hammer may be flat, the peen itself is rounded.
- Straight Peen: Peens on a straight peen hammer are wedge-shaped and are positioned parallel to the handle.
- Cross Peen: Cross peens are the same shape as straight peens, except they run perpendicular to the handle, instead of parallel.
7. Neck
The neck is the portion of the hammerhead that attaches to the handle and provides balance for the tool. Depending on the type of hammer you have, the length and diameter of the neck will vary.
8. Throat
The throat, on the other hand, can be found opposite the neck and is what connects the neck to the face of the hammer.
Some hammers, such as a sledgehammer and its variants, do not feature a throat. Whereas, other hammers like an electrician’s hammer or tack hammer have a more pronounced throat.
9. Eye
Last, but certainly not least, is the eye of a hammer. Located at the base of the hammer’s head, the eye allows the head to slip over the top of the handle with ease. It is the small space or hole between the handle and the head of the hammer.
This component is most prominent in wooden hammers, and occasionally rubber-handled hammers. Metal hammers, such as steel and titanium, do not have an eye since they are generally constructed of one continuous piece of material. As a result, they simply do not have an eye as a part of their anatomy.

Jessica considers herself a home improvement and design enthusiast. She grew up surrounded by constant home improvement projects and owes most of what she knows to helping her dad renovate her childhood home. Being a Los Angeles resident, Jessica spends a lot of her time looking for her next DIY project and sharing her love for home design.
More by Jessica Stone