How To Install Crown Molding On Full Overlay Cabinets
Crown moldings have always been a popular final touch for kitchen cabinets of all kinds. The trouble is that most people don’t know how to go about installing them, and that’s why they try to save up and get a professional to do it for them instead.
Here’s how the experts do it: add an extra piece of wood at the top of the cabinetry and nail the crown to it. This hides the wood and lets the crown molding shine in all its glory.
If you are handy with a hammer and have an eye for design, installing crown molding on cabinets can be a fantastic DIY project for the weekend. The only problem here is that when you are working with a full overlay door style, there isn’t enough space at the front of the cabinet to nail the crown molding.
There is a simple solution. But it won’t be an easy fix as any kitchen designer would tell you.
Read on our guide to learn how easily you can install the crown molding on full overlay cabinets.
Do You Need Interior Trim or Decorative Molding Installation?
Get free, zero-commitment quotes from pro contractors near you.

Choose The Perfect Crown For Your Cabinets
Cabinet makers usually have their unique styles of crown molding that go with their products, but the installation is almost always the same.
So before you get started, pick a crown molding design for your cabinets. If you want to cover the space between cabinet and ceiling, make sure the crown you choose is of adequate height. Otherwise, if you only want the cabinets to have a finished look, choose what you like!
Then, glue a 3/4 inch thick strip of poplar to the molding’s upper edge. For best results, make sure that the upper side of the molding and poplar board’s front side is flush. Once the glue sets, sand the joint to make it invisible. You can also paint it the same color as the molding.
Secure The Nailing Blocks To The Cabinet
Kitchen cabinets with overlay doors have no frames whatsoever… not even hidden face frames.
So you’ll need a nailing block (usually rabbeted filler pieces) behind the crown to secure it to your cabinets. A thin wood piece of 1” x 1” will do just fine to secure the top of the face frame and support the molding as now it has something to hold on to.
Make sure you secure the woodblock to the cabinet first and then nail the crown molding to that. As you mount the wood to the top of the cabinet, make sure it sits flush with the door. These filler wood pieces should be held with screws on the top of the cabinets. The side fillers sit inside while the flush sits with the sides of the cabinet frame.
That was a quick intro to what you need to do. Here is the process in detail:
Steps To Crown Molding Installation On Full Overlay Cabinets
Here’s a step-by-step guide to installing crown molding on full overlay cabinets:
Step 1: Cut the Wood Filler Pieces
For starters, cut strips of the 5/4 inch wood from length and width as per the size of your kitchen overlay cabinets. These strips will act as your nailing blocks. Make rabbet cuts into these pieces to ensure that they fit snugly on top of your cabinet.
Step 2: Spray Paint The Fillers
When you’re done with rabbit cuts, spray paint the filler wood to make sure that it’s the same color as your kitchen cabinets.
In case you are still unsure about the color and need more help, here’s a quick guide to deciding whether your cabinets should be lighter or darker than the walls around them.
Step 3: Fix The Filler Pieces
Mount each filler piece to the top of the cabinet. To make sure you do it carefully, use super glue to hold filler pieces in place on the cabinet. You can also use wood glue that’s specially made to foster a permanent bond between fillers and cabinet.
Now you’ll see the kitchen come together nicely as it will give the entire space a nice elegant touch. Once the wood fillers are nicely glued to the cabinets, ensure that they never come off by nailing from the sides of the cabinet.
For the front filler piece, drill it from the insides of the overlay cabinet and secure the wood screws.
Step 4: Cut The Crown Molding
Hold the crown molding on the sides of the overlay cabinet and make sure the filler pieces are fit tightly against the wall. Now use your pencil to mark the dimensions from the inside to cut the molding. Draw an arrow while keeping correct measurements to help you identify the angle for the miter cut.
Hold crown molding inside out and backward to ensure it presses up safe against the miter saw. You can use polyurethane glue, and small wood pieces on the base of the miter saw to keep the crown from slipping. Now, turn the miter saw to precisely 45 degrees and cut the crown molding.
If you want a sister-cut on the other side of the piece of crown molding, turn 45 degrees on the other side and cut it.
Step 5: Mount The Crown Molding
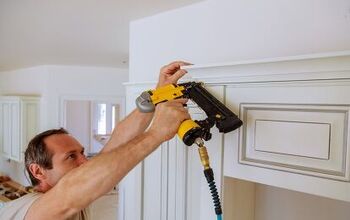
Once you’re finished cutting the pieces of crown molding, it’s time to nail them to the wood filler already attached to the top of your cabinets Grab your nail gun and fix both of them together. Repeat this process for all other overlay cabinets with outside corners.
While for cabinets with inside corners, you’ll have to cut the miters with the accurate opposite 45-degree angle to make sure they cut into themselves.
Step 6: Caulking And Filling
Once you’re done with all the above steps for installing crown molding, fill every nail hole with wood putty. Also, caulk around the crown molding where it’s attached with the ceiling to for a finished look.
Do You Need Interior Trim or Decorative Molding Installation?
Get free, zero-commitment quotes from pro contractors near you.
Related Questions
How Do You Bridge The Gap Between Cabinets And Ceiling?
Bridge the gap with trim! If the space between the top overlay cabinets and the ceiling isn’t large enough, you can bridge this gap with trim that goes along the top of your overlay cabinets. This way, you’ll get a cohesive, built-in appearance, and less potential to gather dust.Another popular option is to add a toe kick behind your crown molding. You’ll take the same approach, but add toe kicks to the nailing blocks and then secure the crown to the blocks. It will help hide imperfect ceilings and also make your crown molding look bigger and better.
Is It Necessary For Crown Molding To Match Kitchen Overlay Cabinets?
Crown moldings can help draw the eyes from the overlay cabinet, walls, and ceilings. There is no hard and fast design rule about their colors, in any case.While some experts will advise you to match the color of crown molding to the walls, ceiling, and overlay cabinets, others will tell you to paint it in a different color to mark it as a transitory element in your kitchen.
Does Crown Molding Add Value To Kitchen’s Overlay Cabinets?
Anything that provides your kitchen, in particular, and house, in general, a more elegant, stylish look will add to its value.Simple, easy-to-do, and cost-effective additions such as crown molding in the kitchen overlay cabinets add value to your home and leave onlookers in awe of your design chops. But you should remember that crown molding only adds value if done appropriately and gracefully.

We are a team of passionate homeowners, home improvement pros, and DIY enthusiasts who enjoy sharing home improvement, housekeeping, decorating, and more with other homeowners! Whether you're looking for a step-by-step guide on fixing an appliance or the cost of installing a fence, we've here to help.
More by Upgraded Home Team