


How To Tie Into Existing Roof Shingles
Roofing work is no easy task, but some projects, such as tying into existing roof shingles is easier than it sounds. It is an easy project if you take safety precautions and install trusses that meet at the eave of your roof. Whether it be the tools for the job, working time, or costs involved, let’s take a look at how you can tie into existing roof shingles.
If you are considering replacing your roof, get a quote from local contractors in your area here.
An addition can provide extra livable space to a home and add serious extra value to a home as well. However, there are many factors to consider to ensure that the addition blends seamlessly into your existing structure. The most important thing when installing an addition is to tie the structure into your existing roof.
To tie into existing roof shingles use a cut valley. Install trusses to meet the eave of the house and nail 2 valley boards into place, securing with roofing cement. Frame and sheathe the addition roof, and snap a line on the existing shingles 2 inches above the valley. Cut through the underlayment and shingles, lay the new shingles, then re-lay the shingles you removed before.
Undoubtedly, an addition can have lasting impacts on a home in positive and measurable ways. After determining that the trusses of your home are able to stand up to the additional weight, it is time to go to work.
Why the Tie-in?
The idea behind tying in the addition’s roof with your existing roofing is to minimize any possible openings and opportunities for leaking. If the new addition is installed improperly, it can create the chance for air and moisture to get in, potentially causing serious structural damage, mildew and mold growth, and more.
By tying in the addition properly, you can ensure that there is a watertight seal. This will prevent the aforementioned issues with water damage and all that they can encompass.
Step 1: Building the New Roof
The very first step is to set up the trusses or rafters of the addition’s walls so that they are up to the point of the eave of the house. When you have set up the structural support for the new addition, you will want to snap the chalk lines on the shingles. This is to mark the center of what will be the new roofing valley.
The nice thing is that you can either strip off the shingles or you can leave them there, framing over them later. It is up to you. Just keep in mind that if there are any existing issues with the current shingles, those will transfer to the new roof.
Step 2: Install the Valley Board
The next step in the process is to install a valley board over the old shingles. The purpose of the valley board is to give yourself a solid surface for nailing when you go to install the jack rafters. Without that even surface, you could wind up putting in nails unevenly that don’t properly secure.
When you have the two valley boards completely nailed down, it is time to use roofing cement on the nails as well as the outside edge in order to provide leak prevention. It is during this step where proper water sealing can take place.
Step 3: Tie-in the Shingles
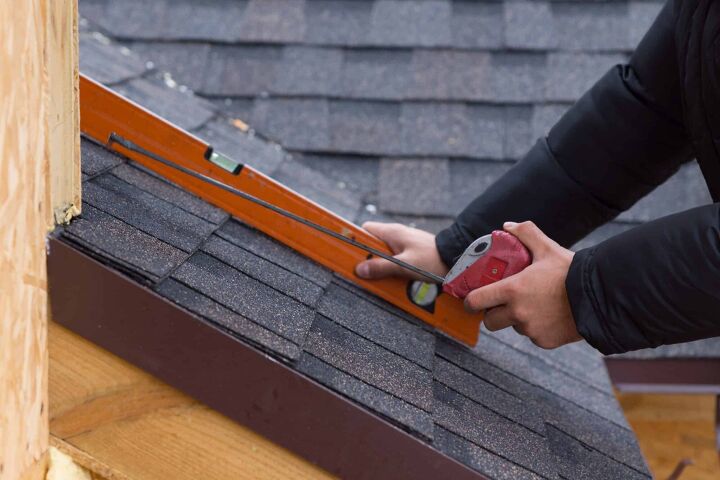
Now it is time to use a cut valley in order to tie the new shingles in with the old roofing system. After framing and sheathing the new addition’s roof, snap a line over the existing roof shingles. You want to be about two inches above the very center of the valley itself.
From here, cut through both the underlayment and the shingles. You will then unseal the shingle tabs before popping the nails out of the overlying course.
Next, remove two of the shingles on each side of your new valleys and continue doing so until you get to the bottom. Make sure that you save and number these since they will be getting replaced later on down the line.
Step 4: Laying the Waterproof Shingle Underlayment
After lifting the underlayment out of your way, it is time to lay down the waterproof shingle rule underlayment. You will be laying it down over the valley, then shingling the addition to the roof. Make sure that you give the new shingles the room to fold through the center of the valley as well as onto the old roof deck; you’ll need around 12 inches or so.
Lastly, you will want to re-lay those shingles that you removed and numbered earlier. Make sure to bed the end of every shingle using a 2-inch ribbon of roofing cement. Place that ribbon about four inches up from the center of the valley and that’s all there is to it!
Other Things to Know About Laying New Roofing Over an Old One
While you can install a new roofing system over an old one, there are some things to know. Yes, you can install new shingles over top of the old one. You can’t, however, do it with slate or wood. A good rule of thumb is to never mix your materials (ie: laying down asphalt shingles over top of cedar shakes).
It is also imperative that the underlying roof be in good condition. Covering up the old roof with the new one is an aesthetic fix; it won’t help to solve any underlying issues.
If you have damaged portions of the roof, particularly ones that lead to leaks, they will carry over to the new setup. Even worse, they’ll be difficult to get to after the new roofing system has been installed.
Can You Increase the Pitch of a Structure by Building a Roof Over an Existing Roof?
Yes, you can do this as well. The cheapest option is to simply leave the old roof as it is and place new rafters over the existing roof. The pitch of the roof is just how much it slants. This is measured in the number of inches for every 12 inches of roof. If you’re installing a new roof, going with a steeper pitch than the old roof is ideal.
The easiest project possible is to choose a simple trussed roof or to go with an addition that has a pair of angled planes. Also, make sure that you do all of this in dry weather and have an engineer verify that the structural integrity has not been compromised.
You can also use premade roofing trusses. This will take less time and be easier to install. The trusses are meant to form the bones of the new roof that will be installed over the top of the old one. Just make sure that the pitch of your new trusses are the exact pitch that you want for the new roof.
Should Old Shingles be Removed?
If the old shingles are secure and show no signs of damage, they can remain in place when installing the new roof. If there are areas that have been severely damaged or there is noticeable pulling of shingles, they should be removed. In cases where the damage is extensive, removing the old roofing shingles completely is advisable.
Should you decide to go with the old roof and do end up removing any of the old shingles, make sure that you apply a layer of 30-pound roofing felt before you begin laying any new shingles. This will provide additional structural support in the areas where the damages have taken place.
Potential Warranty Issues
Keep in mind that there are a few downsides to simply putting down a new layer of shingles. Generally speaking, most shingle warranties will not cover additional layers. If you still have a warranty on your current roof, keep that in mind before simply laying down a new roof over the top of the old one.
Another thing to keep in mind is that two layers of shingles will trap more heat than usual. This can damage the shingles over time and actually shorten their lifespan. The additional weight, if not verified beforehand, could compromise the structural integrity of your roof.
Related Questions
Nails or screws for roofing?
Nails are often the preferred choice for performing structural joining. This includes installing hardwood floors, framing walls, attaching siding, and installing roofing. However, this does not mean that screws cannot be used. In fact, screws may add greater withdrawal strength to your roof but must be appropriately sized by a professional.
Can you tie a metal roof into a shingle roof?
In short, yes, you can join a metal roof to a shingle roof. The point where the two meet is known as the transition. To protect against water intrusion, you’ll need to install transition flashing along the line where these two roofs connect. Then, sections of shingles are removed and the final pieces of metal roofing are installed before the flashing is put in place.The final step is to replace the shingles across the transition point. So long as you use special care in removing the shingles initially, you will greatly reduce the amount of labor and materials needed to perform the job successfully.
Can you connect a flat roof to a shingle roof?
Many folks performing renovation projects on their homes nowadays are opting for flat roof construction. This choice is an excellent, economical way to add onto a home. A flat roof can be easily connected to the slop of an existing shingle roof, offering a contemporary look to the new addition.Although a flat roof may appear flat, it does have a slight slope. It’s minor, but a slope is needed for water to be able to drain from the roof. Keep in mind though, that roofs with slopes less than 9.5 degrees cannot support shingles. Instead, your contractor will connect the flat roof to your existing shingle roof and finish the flat area with a modified bituminous membrane.
UpgradedHome participates in affiliate programs. When you purchase through our links, we may earn a commission.

Ryan Womeldorf has more than a decade of experience writing. He loves to blog about construction, plumbing, and other home topics. Ryan also loves hockey and a lifelong Buffalo sports fan.
More by Ryan Womeldorf


![Cost To Drill A Well [Pricing Per Foot & Cost By State]](https://cdn-fastly.upgradedhome.com/media/2023/07/31/9074980/cost-to-drill-a-well-pricing-per-foot-cost-by-state.jpg?size=350x220)


