How To Paint Kitchen Cabinets Without Sanding

Painting kitchen cabinets is a fantastic way to breathe new life into your kitchen. You will be amazed at what a difference a quality and careful paint job on those cabinets can make. They can go from run-down looking to passing for brand new if you take your time.
But painting kitchen cabinets is an involved process that takes many steps. So, as you start to plan out this process, you might wonder if you can cut out certain steps, like sanding the kitchen cabinets before you paint them.
It is possible in many circumstances to skip the sanding step when painting your kitchen cabinets. If, however, you have chipped or peeling surfaces, cracked or otherwise damaged cabinets, then they may require sanding.
Using a quality deglosser, liquid sander or mineral spirits with a rough brush are all possible alternatives to sanding your kitchen cabinets before painting them.
As you start to organize yourself and your kitchen cabinets for a new paint job, you should get your ducks in a row. Read our step-by-step guide below so you can make sure you have thought of everything you need for this project. Next, take a really close look at your existing kitchen cabinets, as their current condition will dictate whether or not you can paint them without sanding them first.
Can You Paint Your Kitchen Cabinets Without Sanding Them
You might have been told that you absolutely must sand surfaces before you paint them. But in reality, if you don’t have the energy to sand all the intricate nooks and crannies within your kitchen cabinets, you might be able to skip the step.
Sanding is helpful because it gives a bit of grip for the new coat of paint. It also smooths out the existing surfaces and removes possible uneven surfaces and even grime. So sure, sanding is definitely a step we always recommend, but there are often ways around it.
Take a look at your cabinets. If they are in good condition, without dents or damage, that is a good sign. Next, take a look at the paint job. Are the surfaces even? Has the paint or bare surface stood the test of time?
If you are painting over metal, are the cabinets free of rust? If you answered yes to all of these questions, then the odds are you can skip the sanding step.
Keep in mind, however, that while you might skip the sanding step, you should never skip the cleaning step. Always make sure you wipe down the surfaces and allow ample drying time.
This helps your new paint and primer stick, which becomes all the more critical when you skip the sanding step.
Instances Where You Must Sand Cabinets Before Painting
In many cases it is perfectly acceptable to skip the sanding step as long as you take the appropriate steps to ensure a quality paint job. There are, however, several circumstances where you can’t really skip the sanding step.
This is because if you do skip that step, you will end up with a sloppy and short-lived paint job. Below are common circumstances that occur on cabinet surfaces that require sanding before they are painted.
Chipped Or Peeling Paint
Painting over old paint is fine if it is completely intact. If the paint is chipped or peeling, however, you should definitely sand down the surfaces. If you paint over peeling or chipped paint, you are basically just putting a band-aid over your problem.
The chipped and peeling paint will likely continue to peel and chip over time. This will drastically reduce the longevity of your cabinet paint job.
Even if you use quality primer and paint, you will still notice the uneven layers. The chipped paint will most likely show through. So in these cases, take the time to give the cabinets a good sanding.
Unfinished Or Rough Surfaces
There are some surfaces that need to be smoothed out, and others that need to be touched up. Certain smooth and shiny surfaces, including metal and vinyl-finished surfaces, might need some roughing up.
This is because without some grit, the primer and paint might struggle to stick. In turn, this reduces the longevity of the paint, and can cause premature peeling and chipping.
If you have wooden surfaces that are not properly treated or are raw, they might need some sanding. Otherwise they might be a bit too rough and prone to pesky splinters.
This is rare, but may occur if you have specialty built (or inexpensive) unpainted wooden cabinetry.
Damaged Surfaces
Another reason you might need to sand is if the surfaces are damaged or cracked. Cracked and damaged cabinets need to be caulked and sealed. Neglecting this will only worsen the problem and cause a larger issue.
When you fill these holes and cracks, however, they need to be sanded down to create a seamless surface. There really is no alternative to sanding in this circumstance, unless you are incredibly careful when caulking.
Effective Alternatives To Sanding Your Cabinets
Buy A Cabinet Painting Kit With A Deglosser
If you are not the most experienced painter but want to make sure your cabinets look top-notch once you finish them, consider purchasing a cabinet painting kit.
Most of these painting kits have step-by-step instructions with all the materials you require for this job. This often includes a deglosser.
De-glosser, which is also sometimes called “liquid sandpaper”, is a liquid that, when applied, effectively removes top layers of paint and/or gloss from your cabinets. One of the best things about this is it is easy to apply, and requires much less elbow grease and time than sanding.
Keep in mind, however, that deglosser does not even out surfaces, meaning it will not smooth out imperfections in the material itself, but instead only works to remove a top layer of paint. In many cases though, this is all you need. This makes having a paint kit all the more practical.
Use A Rough Sponge And Mineral Spirits
If you need to rough up the surfaces a bit to ensure the paint sticks, you might think you need to sand the surfaces. While sanding is definitely one solution, there is a fast and effective alternative.
You can try using a rough sponge with some mineral spirits to achieve the same effect.
Dampen the rough sponge with mineral spirits, and then give the cabinets a firm wipe. The mineral spirits will assist the rough sponge in penetrating the surface, roughing it up just enough for your primer to stick all that much better.
Keep in mind that mineral spirits have a lot of fumes, and are a harsh chemical. Make sure you use all the necessary protective equipment when using mineral spirits.
Perform A Deep Clean And Use Effective Primer
If your surfaces are in good condition, you might be able to skip the sanding and roughing up phase altogether. Instead you can focus more intently on the following steps: cleaning and priming.
Since you won’t sand the surfaces, cleaning and priming becomes all that much more important.
Clean cabinet surfaces help the primer stick. Make sure you use a reliable and effective primer that will bond strongly with your cabinets surfaces. If you do, then you should be able to skip the sanding step without suffering any consequences.
Make sure as you search for the right primer, you are taking the surface and the paint into consideration. You need a primer that will bond well with both (not all of them will).
Step-By-Step Guide To Painting Cabinets Without Sanding
Step One: Prepare Surfaces, Walls
Apply painters tape, drop clothes and cover any glass areas of the cabinets. Empty shelves and surrounding areas. Make sure you have all the materials you need for the job. Turn on a fan and open windows for ample ventilation.
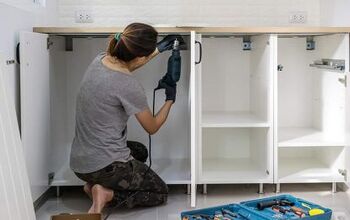
Step Two: Remove Cabinet Doors And Shelves For Painting
It is significantly easier to paint cabinets when they are removed. It makes the hard-to-reach areas simple to paint. Make sure you label the cabinet doors and shelves to make it easy to re-install them once you finish.
Step Three: Clean Cabinets
Take your time cleaning all the surfaces. You can use a microfiber cloth and alcohol. Alcohol cleans and also evaporates, and microfiber does not leave traces behind. You can also use soapy water, but if you do, make sure you allow ample drying time.
Step Four: Apply Deglosser, Rough Sponge And Mineral Spirits or Other
Depending on which method you have selected, you might use a Deglosser or “liquid sander” or other method. If you are confident your surfaces are in good shape, you might also skip this step.
Step Five: Apply Appropriate Primer For The Paint And Surface Type
Once surfaces are fully dry, you can apply the primer layer. Make sure the primer you are using is appropriate for the surface and also the paint type. A strong bonding primer is critical when you are not sanding your cabinets before painting them.
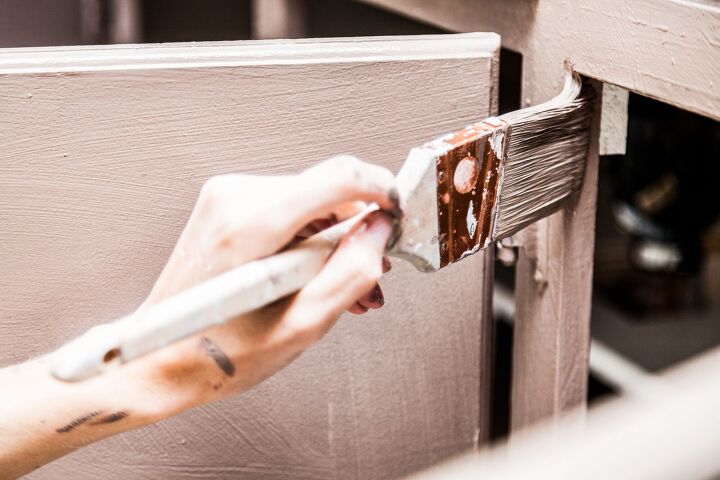
Step Six: Paint Your Cabinets
Once the primer layer has had ample time to dry (check the label for timing guidelines) you are ready to paint. Do not have too much paint on the brush. For best results, paint with thin layers. Apply a second coat if needed.
Step Seven: Inspect And Re-Install Cabinets
Once you complete the painting step, make sure you inspect all the cabinets. Apply touch-ups as needed. Once all surfaces are dry, using the labels, re-install the cabinets and shelving in the proper locations.
Wrapping Up Painting Kitchen Cabinets Without Sanding
It is acceptable to paint your kitchen cabinets without sanding them first in most circumstances, as long as you carefully follow other steps. It is essential you inspect and clean the surfaces.
Don’t skip the primer layer. In fact, you might want to consider buying a cabinet painting kit, as they have complete kits that often include a deglosser or other sanding alternative. If, however, your cabinets are cracked of peeling paint, you should sand them before painting them.
Related Guides:
Tom Gaffey is an expert writer who currently resides in Washington D.C. Tom has a passion for real estate and home improvement writing, as well as travel and lifestyle writing. He lived the last twelve years in Hawaii where he worked closely with luxury resorts and event planners, mastering his knowledge of aesthetics and luxury products. This is where he found his passion for home improvement and a keen interest in DIY projects. Currently, Tom resides in Washington D.C, and also working on his debut fiction novel.
More by Tom Gaffey