


How To Build An Awning Frame From Wood (For a Door or Window)
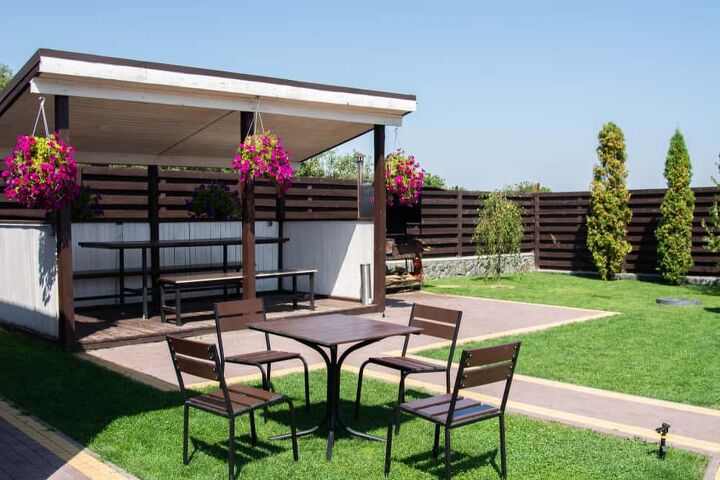
If you would like to give your home some dimension and added curb appeal, putting a few awnings up over your windows and doors would do the job. But if you make them yourself, they will be even better. Custom awnings that fit your home like a glove will make your home unique as well as beautiful.
Building the wood frame is as easy as cutting and nailing a bunch of lumber together and then covering it with some kind of material. You can use just about anything to cover it such as fabric like canvas, shingles, corrugated metal, or even vinyl.
Do You Need a Deck or Porch Contractor?
Get free, zero-commitment quotes from pro contractors near you.

How to Build a Door Awning Frame from Wood
To build an awning with a wood frame, you will need to make the measurements, cut the wood, build the frame, and then cover it with the material of your choice. Whether you want an awning for your windows, over your door, or over a garage or shed, these can all be done easily with a few pieces of wood and some carpentry tools.
- First, you need to gather the tools and materials you are going to need. You may need different sized wood depending on the size awning you are building. This is for a front door canopy. The materials and tools include:
- Three pieces of 4×4 lumber sized six, eight, and ten feet long
- One piece of 2×2 lumber sized six feet long
- Three pieces of 2×4 lumber sized eight feet long
- Several sized screws (1 ¼ inch, 1 5/8 inch, 2 ½ inch, 3 ½ inch, and 4 ½ inch, and 7 inch)
- Wood filler and sandpaper
- Hammer, tape measure, drill, screwdriver
- Framing square, level
- Miter saw, staple gun, staples
- Ladder
- Cut your lumber at the sizes you need. For this, you will need:
- Four pieces of 4×4 lumber at 28 ½ inches long
- Two pieces of 4×4 lumber at 23 ½ inches long
- Two pieces of 4×4 lumber at 4 inches long
- Two pieces of 2×2 lumber at 13 inches long
- One piece of 2×2 lumber at 23 inches long
- Six pieces of 2×4 lumber at 38 inches long
- Use the 28 ½-inch 4×4 lumber for the back support and the 23 ½ inch for the top support of the corbels.
- Drill some pocket holes into the top support on both faces. Align the edges and use 2 ½ inch screws to assemble the corbel frame.
- Use the 4×4 27 ½ inch lumber for the braces by making 45-degree cuts at both ends. Make a curved cut on the brace to fit it into the corbel. Drill the pilot holes into the brace and insert the 4 ½ inch screws to hold them together.
- Secure the side supports to the house and use a spirit level to plumb the corbels. Drill pilot holes into the back supports and use 7-inch screws to attach them to the house framing.
- Use the 2×2 lumber to build the ridge beam and secure it all with pilot holes and 2 ½ inch screws.
- Use the 2x4s for the rafters and make 30-degree cuts on each end. Notch the rafters so they fit tightly in place. Use 3 ½ inch screws to secure the rafters.
- With the 2×2 lumber, make the trim by using a miter saw to angle each end. Attach with 2 ½ inch screws.
- Fill all the holes with wood putty and sand it smooth with sandpaper.
- Paint or stain as desired.
Making a Window Awning with Wood and Fabric
To make an awning with wood and fabric, you can use canvas, polyester, marine vinyl, nylon, oilcloth, or any other kind of outdoor fabric. No matter what you use, just make sure it is safe for all-weather, especially if you happen to live in an area with extreme temperatures or a lot of sunlight. Here are the easy steps for building an awning frame from wood and fabric.
- Gather the materials and tools you will need, first. This plan is for a window awning. You will need:
- Several 1x6s about six feet long
- Metal elbow joints and brackets
- Nails, hammer, screws, screwdriver
- Measuring tape and drill
- Table saw
- The fabric of your choice
- Build two 2-dimensional square frames of equal sizes to share a middle spine.
- Build two 2-dimensional right triangle frames and attach them to the square frame to make a 3-dimensional right triangle frame.
- Attach a board perpendicular from the middle spine to attach to the house.
- Fix metal elbow joints on each angle and three metal brackets on the interior side of the frame to attach it to the house.
- Cover the top with the fabric of your choice and attach it with roofing nails.
- Affix the awning to the house over the window by marking the holes and drilling them into the house. Then attach it to the house with screws.
How to Build an Awning with Wood and Shingles
Rather than using fabric for your awning, how about using some shingles? These make a nice touch if you have a shingled roof. Try to match the same shingles for the awning as you have on the roof.
- This plan is for a window awning so if you need one for the door, your lumber sizes may differ. First, you need to get some tools and materials together for the project. You will need:
- Two six-foot-long 1x6s
- Felt
- Shingles
- Measuring tape
- Table saw
- Hammer and nails
- Screws and drill
- Two metal elbow joints and three metal brackets
- For the middle spine, make two 2-dimensional square frames of the same size.
- Build two 2-dimensional right triangle frames.
- Attach the triangles to the square frame to make a 3-dimensional triangle frame.
- To attach the frame to the house, affix a board from the middle spine.
- Attach one metal elbow joint on each angle and the three metal brackets on the inner side of the frame to attach it to the house.
- Nail plywood to the top of the frame and cover it with felt paper for the shingles.
- Apply the shingles starting from the bottom and working your way up. Cut the shingles for the roof cap.
Building an Awning from Wood and Corrugated Metal
Another fantastic way to build an awning is to use the same wood frame used for the other two but adding corrugated metal rather than shingles. Corrugated metal will typically last longer and you will not have to worry about losing any shingles in a storm.
- Although this plan is for a window, you can make a larger one for a doorway or porch pergola by just changing the sizes of the lumber. Get the tools and materials you need, which include:
- Two 1×6 pieces of lumber, six feet long
- Corrugated metal
- Saw, tape measure, and drill
- Drill and screws
- Nails and hammer
- Three metal brackets and two metal elbow joints
- Build two 2-dimensional square frames of the same size for the middle spine and two 2-dimensional right triangles.
- Make a 3D frame by attaching the triangles to the square frame
- Attach three metal brackets on the inner side of the frame to attach it to the house and one metal elbow joint on each angle.
- Affix a board from the middle spine to secure the frame to the house.
- Secure the corrugated metal on the top of the frame with metal screws.
Do You Need a Deck or Porch Contractor?
Get free, zero-commitment quotes from pro contractors near you.
Related Questions
Can I use acrylic or acrylic coated fabrics for the shade?
Both acrylic and acrylic coated synthetic fabrics are great for use on these awnings. In fact, this type of material holds up better than canvas or polyester. Uncoated polyester will fade and does not hold up well. Uncoated materials are also subject to mold. Vinyl is another great coating for materials that lasts longer and resists UV light and mildew.
What about fiberglass?
Fiberglass awnings are a good choice since it is lighter than aluminum or steel. You can get it molded and tinted to match the house or leave it clear. However, the clear or translucent awnings let in a lot of light, so they do not provide as much shade.

I am a DIYer who loves writing about anything home-related. When I am not writing, you can find me studying for my PhD in Psychology, photographing nature, and swimming at the lake with my grandkids.
More by Patricia Oelze


![10 Best Electric Lawn Mowers - [2022 Reviews & Top Rated Models]](https://cdn-fastly.upgradedhome.com/media/2023/07/31/9070486/10-best-electric-lawn-mowers-2022-reviews-top-rated-models.jpg?size=350x220)


![How To Reset A Whirlpool Cabrio Washer [In 5 Easy Steps!]](https://cdn-fastly.upgradedhome.com/media/2023/07/31/9076531/how-to-reset-a-whirlpool-cabrio-washer-in-5-easy-steps.jpg?size=350x220)


![10 Most Dangerous Neighborhoods in Baltimore [Updated]](https://cdn-fastly.upgradedhome.com/media/2023/07/31/9075655/10-most-dangerous-neighborhoods-in-baltimore-updated.jpg?size=350x220)

