How To Build A Wood Fence Gate With Metal Posts (Do This!)


In search of a way to improve your home, don’t overlook how beneficial adding a wooden fence can be. Wooden fences improve your home security and they also add a familiar element of design that is very appealing. You can improve that wooden fence even further by adding a wooden gate.
Wooden gates make it easier to navigate your fencing and they also help you do more things with your yard. You can reinforce that addition to your yard by adding some metal posts. Adding a wooden gate with metal posts is certainly worth your time and effort.
Start building by first finding a good spot for the gate and seeing if there’s enough room there. You can then set the metal posts and follow that by using wooden planks to form the gate. Finish up by attaching all the hardware and ensuring that the fence gate opens and closes properly.
Adding a gate to your wooden fence can really change up the look of your yard. Learn more about how to build one of your own by reading on.
Do You Need Fence Installation or Repair Services?
Get free, zero-commitment quotes from pro contractors near you.

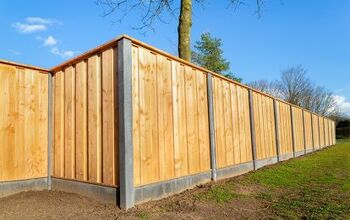
Why Use Metal Posts for Your Fences
Posts are needed to help keep your fencing in position. You will also need them to hold the new gate you’re planning to build. But why should you choose metal posts over other options? There are some reasons that clearly indicate why using metal posts is the right move.
For instance, metal posts feature greater longevity than their wooden counterparts. Wooden posts are susceptible to rotting. That comes as no surprise given that they have to be constantly exposed to the elements.
Metal posts will be affected by the forces of nature, but they won’t wear down as quickly as the wooden posts. They make a lot of sense to use if you’re investing a significant amount of money in your fencing already.
You should also consider using metal posts because they give you more versatility when it comes to designing your yard. If you like the appearance of the metal, you can keep it exposed. You can also conceal them if you prefer to feature a more uniform look throughout your yard.
Using wooden posts can help you save money, but don’t overlook what metal posts can do for your fencing. They can be crucial to keeping your yard in great condition for many years to come.
Building the Fence Gate and Establishing the Metal Posts
Let’s now get to the process of building the fence gate and establishing the metal posts. This is going to be a big project so pay close attention to the steps to avoid making any critical mistakes.
Step 1: Gather the Materials and Tools
When it comes to tools, you’ll need a drill, a saw, a shovel, a tape measure, a wrench, and some screws. Some metal posts are sold together with the hardware needed for attaching gates to them. You can purchase those metal post kits or prepare your own j-bolt hook straps and strap hinges.
You should also prepare some wooden boards. The sizes of the wooden boards you’ll need will depend on what kind of fence you have. At the very least, you’ll need about six planks to span the length of the gate. Three more planks will likely be needed to support those horizontal planks.
Gravel and concrete will also be required. They will be used for installing the metal posts.
Step 2: Figure Out Where to Position the Gate
Look around your yard and determine where the ideal spot for the gate should be. You should also remember that the gate needs to be big enough to pass through comfortably.
Typically, posts that are positioned six to eight feet apart provide enough clearance. See if there’s a spot in your yard where you can create that kind of opening. You may also have to remove a section of your fencing to accommodate the gate you’re adding.
Step 3: Dig the Holes for the Metal Posts
After finding the spot for the gate, you can now start putting the posts in place. Grab your shovel and start digging holes where the posts should be. Each hole should cover about a third of each post. A hole that’s two feet deep should be enough to accommodate most metal posts. Also, remember to make the hole wide enough by carving out a space that’s four inches wide on all sides.
The holes for the metal posts need to be deep because they won’t be able to offer adequate support otherwise. You’ll probably open and close the gate very often so the posts need as much support as they can get.
Step 4: Get the Metal Posts in Position
Place the metal posts in the holes you created and then line them with the gravel. Don’t fill up the holes completely with just the gravel though. Just fill the holes a third of the way with them.
You will use the concrete to fill in the rest of the opening. Make sure to save room for the concrete’s expansion by leaving an inch of space near the top of the hole. You can then let the concrete dry for as long as it’s supposed to.
Step 5: Install the Gate Hardware
Go get the drill next and burrow a hole about six inches deep from the top of one of the posts. You can then slide the j-bolt hook and the strap hinge into the hole before securing them. You’ll have to do that twice to get two hinges in position.
Step 6: Build the Gate
Use your tape measure to determine the correct dimensions of the gate. Take note of those measurements and use them when cutting out the wooden plans.
You’ll want to prepare wooden planks that will be positioned horizontally and others that will hold them in place. Prepare as many wooden planks as you need to get to the gate you’re looking for. After cutting out the wooden planks, drill a pair of holes into each of them. Finish up by connecting the planks using some screws.
Step 7: Connect the Gate to the Metal Posts
Pick up your completed gate and place it between the metal posts now. Line it up in such a way that it matches with the hinges.
You can now use your drill to create some holes through the hardware. Follow that by using more screws to get the gate into the right position. With the gate now connected to the metal posts, you can go ahead and add the locking mechanism. Latches are typically used with fence gates so feel free to use them.
Do You Need Fence Installation or Repair Services?
Get free, zero-commitment quotes from pro contractors near you.
Related Questions
Can You Cover the Metal Posts?
Let’s say that you want to take advantage of the durability provided by metal posts, but don’t like their appearance. Is there something you can do about that? The answer is yes.You can now purchase brackets that are specifically designed to conceal metal posts. The brackets themselves won’t be the items that will cover up the posts. Instead, you can use the brackets to add some wooden pieces that will be visible over the metal.Concealing the metal posts this way will require you to cut out more planks. You will likely need some small caps to cover the posts from above. It’s additional work from that standpoint. On the other hand, since the wood covering the posts will only be decorative, you can have more fun them. You can make them more intricate to add some visual intrigue to your home’s fencing.
Can You Install the Metal Posts without Using Concrete?
The quality of your yard’s soil will determine whether concrete will be required when you install the metal posts. Generally speaking, a loose kind of soil will struggle with holding the posts you want to install. You need to help them out by adding some concrete.The tighter and more compact kinds of soil can hold metal posts along with help from some gravel. Still, it’s better to use concrete if you can to stabilize the gate. It’s better to set the gate properly the first time rather than repairing it so soon after installation.
Gary Evans is passionate about home improvement. He loves finding out how to make improvements in the easiest, most practical, and most affordable ways. Upgrading his home kitchen is one of his ongoing hobbies. Gary is also a long-time content creator and enjoys spending his free time tending to his hydroponic vegetable garden.
More by Gary Evans