How To Winterize Your Grill


It’s hard to say goodbye to your grill once it becomes too cold to enjoy it. However, it becomes easier if you prepare your grill for the winter and know that it’s waiting for you in the spring. Understandably, you may wonder how to winterize your grill.
The best way to winterize your grill is to crank the heat and burn away the remaining grease and residue. Next, you must clean the outside and inside with warm water and dish soap or a special grill degreaser. Remove the propane tank, inspect your grill for cracks, cover it, and move it under your deck or into a shed or garage.
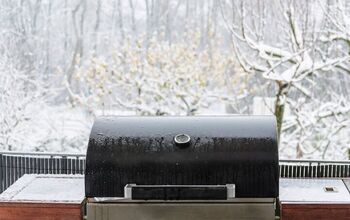
The key to winterizing a grill is to protect it from the rain and snow. Otherwise, it will quickly become rusty. Follow along as we explore how to winterize your grill.
How To Prepare Your Grill For The Winter
1. Start Before It’s Too Late
Many homeowners understandably wait as long as possible to quit grilling for the year. After all, they most likely want to get the most out of their grill. However, a grill can be damaged if you wait too long to winterize it.
That’s especially true if you live in an area that gets cold, rainy, and snowy quickly, like the Midwest or East Coast. It’s a great idea to check the local forecast and see when the first frost of the year is supposed to hit. This often occurs in mid-to-late-October, but it can happen as late as November in some climates.
The last thing you want to do is let your grill get cold and soaked before you have the chance to winterize it. That’s why you must be proactive and anticipate cold weather before it’s too late. All it takes is a few simple steps to winterize your grill and protect it from cold weather.
2. Turn It On
It may sound counterintuitive, but it’s a great idea to turn your grill on before you winterize it. Granted, this is only a good idea if you have a gas grill. This makes it easier to clean your grill later on, as it will burn off a lot of stubborn residue.
Turn your grill on and set it between medium and high. Carefully watch it and keep the burners on until there is no more smoke. That indicates that the grease and charred residue is at least mostly gone, and it’ll be easier to clean.
3. Deep Clean It
The inside of a grill is often full of gross residue and grease that is hard to remove without using a grill degreaser product. However, you may be able to get by with soap and water if you already burned off a lot of the residue with the previous step. Start with the outside of the grill and wash the top, bottom, stand, and knobs with soap and water.
Pat the outside of the grill dry with a dry towel or rag to make sure it doesn’t rust or freeze. Remove the top of the grill and use a degreaser or warm water with soap to clean the inside of the lid. This can be difficult, as the inside of the lid is often coated with soot, so you must remain patient.
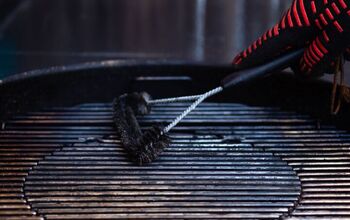
Now it’s time to wash the burners or bottom of the grill if you have a charcoal grill. Make sure the grill is cool before you wash the burners. Use a clean brush and rag to thoroughly scrub the burners. Pay attention and make sure there isn’t any food residue at the bottom, such as barbecue sauce and pieces of meat.
4. Disconnect The Fuel Source
Next, you must disconnect the fuel source if you have a gas grill. Keep in mind that you must skip this step if you have a traditional charcoal grill. Switch the gas valve to the “off” position, disconnect the hose, and remove the propane tank.
Ideally, you should place the tank in a covered spot outdoors during the winter. For example, you can store your propane tank under a deck so that it’s out of the sunlight. It’s unsafe to store propane tanks inside your home, shed, or garage during the winter, especially if it’s near a water heater or furnace.
Propane is highly flammable, even if your tank has a reliable relief valve. Once you store your propane tank, you must use a towel or rag to dry the inside of your grill.
5. Inspect Your Grill
Now that your grill is clean and dry, it will be easy to inspect it for damage and rust. It helps to shine a flashlight at each surface of your grill and look for cracks. Cracks can eventually become worse and spread, and that makes it dangerous to use your grill.
Keep in mind that a high-end gas grill can last up to 15 years. That said, a gas grill can suffer damage and rust long before then. Some homeowners replace their gas grills in as little as 5 to 10 years.
Winterizing your grill is a great time to assess whether or not it’s time to replace it. It’s better to replace a grill during the winter when they are often discounted. Winter is often the off-season for grilling in most parts of the United States, so you can find great deals.
6. Brush It With Olive Oil
Olive oil isn’t just delicious and healthy, but it can also protect your grill from rust. Many homeowners brush a thin layer of olive oil on the interior of their grills. However, it’s important to be conservative with how much olive oil you apply to your grill.
Olive oil goes bad over time, and the last thing you want is for your grill to smell rancid. Make sure to clean your grill again after the winter to remove the olive oil. This won’t be a problem, as grills are less prone to rust when it’s warm — if you keep them covered.
7. Cover And Move Your Grill
Make sure that your grill is dry, then cover it with a durable cover. Check the cover for holes and cracks to ensure that no moisture can get into it. Carefully cover your grill and leave no room for cold air, rain, or snow to enter it.
Ideally, you should move your grill to a covered area where it’s safe from the elements. For example, you can place your grill beneath a deck. You can also put your grill in a garage or shed, but only if you’ve removed the gas source.
Summing It Up
To winterize a grill, you must first turn it on to burn away residue and grease. Next, you must clean it with a degreaser or a mixture of warm water and dish soap. Disconnect the fuel source, store the propane outside, inspect your grill, cover it, and move it somewhere it won’t get wet.
Related Guides:
Nick Durante is a professional writer with a primary focus on home improvement. When he is not writing about home improvement or taking on projects around the house, he likes to read and create art. He is always looking towards the newest trends in home improvement.
More by Nick Durante