How Much Does Tuckpointing and Repointing Cost?

The brick walls that line your home, your garden, and other parts of your property are remarkably durable. They can be left constantly exposed to the elements and they will remain sturdy. Choosing brick walls to line your property is a decision you will not regret.
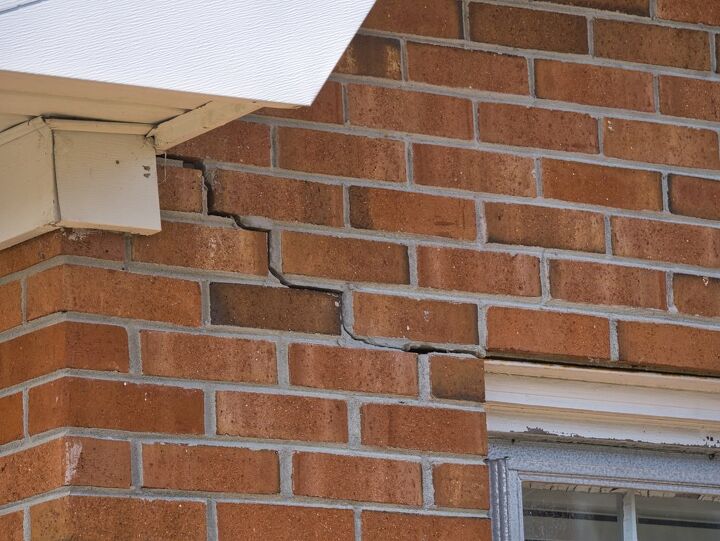
Of course, those brick walls remain susceptible to some forms of damage and they may need repairs from time to time. More specifically, the mortar used between the bricks can get damaged and you will need to do something about that. Tuckpointing and repointing are options to consider if you’re trying to repair the mortar used in your brick walls.
Tuckpointing costs $15 per square foot and it is the more expensive choice between the two procedures. The cost of tuckpointing will change based on factors such as the mortar used and your weatherproofing needs. Meanwhile, repointing costs an average of $11 per square foot. The specific method of repointing used will help determine the cost of the procedure.
Brick walls can protect your property for a long time, but they will still need repairs eventually. Tuckpointing and repointing are procedures that can rehabilitate your brick walls. Find out how much tuckpointing and repointing cost by reading the rest of this article.
Don't want to do it yourself?
Get free, zero-commitment quotes from pro contractors near you.

Cost of Tuckpointing
| Estimate Type | Cost Per Square Foot |
| Low-End Estimate | $5 |
| Mid-Range Estimate | $15 |
| High-End Estimate | $25 |
Do you need to repair the grout or mortar used between the layers of your home’s brick walls or chimneys? If so, you should consider hiring a professional mason to tuckpoint those elements of your home. The average cost of tuckpointing is $15 per square foot.
For those who may be unfamiliar with tuckpointing, it starts with an inch of mortar being removed from the brick wall. The mason will then lay in a new mortar to replace the material that was removed. Notably, the mortar used for tuckpointing must match the color of the brick wall.
After the new mortar is set in place, the mason will make a small cut in it. The mason will fill in that small opening with differently-colored mortar to create some visual contrast. Therein lies the big difference between tuckpointing and repointing.
Repointing is focused solely on repairing the mortar you used for your brick walls. On the other hand, tuckpointing introduces a new element of design.
You can go with either procedure if your goal is simply to improve the condition of your brick walls. Tuckpointing just does more for them from a design standpoint.
Cost of Tuckpointing by Mortar Type
| Mortar Type | Cost Per 80-Pound Bag |
| M | $7.50 |
| N | $12.50 |
| O | $35 |
| S | $8 |
The type of mortar you’re using for tuckpointing will significantly affect the cost of the entire project. Your choice of mortar may also impact the longevity of your walls.
Highlighted in this section are the different types of mortar that can be used for tuckpointing. Evaluate them carefully so you can pick the right choice for your project.
Type M Mortar
First off, you have Type M mortar. It’s the cheapest option you can use at $7.50 per 80-pound bag.
Aside from being affordable, Type M mortar is also incredibly strong. That makes it a good choice to use for load-bearing walls.
The problem with Type M mortar is that it can be a bad adhesive. If there’s movement between the bricks, Type M mortar will likely not stop that.
Type N Mortar
Type N mortar is next. You can get an 80-pound bag of Type N mortar for $12.50.
When it comes to strength, Type N mortar does not match its Type M counterpart. Thankfully, it makes up for that in other ways.
Type N mortar is a better adhesive than Type M and it also resists the elements quite well. Using Type N mortar for exterior brick walls is a good idea.
Type O Mortar
The most expensive type of mortar is Type O mortar. An 80-pound bag of Type O mortar costs $35.
Type O mortar is typically used for decorative purposes. It works well for interior walls, but it will wear down quickly if it’s exposed to the elements.
Type S Mortar
Finally, we have Type S mortar. Homeowners can purchase an 80-pound bag of Type S mortar for $8.
Type S mortar is highly resistant to the elements. That’s the main reason why you should use Type S mortar.
You should also know that Type S mortar can damage the brick. If you’re seeking a type of mortar that can stand up to the elements, Type N could be your best option.
Cost Factors for Tuckpointing
The cost of tuckpointing your brick walls is subject to change. It can change based on a variety of important factors. Let’s detail what those cost factors are in this section of the article.
Location of Tuckpointing
The location of the brick wall plays a significant role in determining the cost of tuckpointing. It’s an important factor because it affects how difficult and safe the job will be for the masons you hired.
Tuckpointing exterior walls lining your garden is fairly easy. The walls themselves are easy to access and the masons should be able to proceed with tuckpointing without issue.
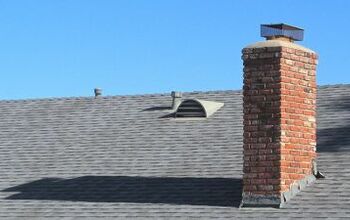
Professional masons may charge more if you’re asking them to tuckpoint low retaining or load-bearing walls. You can also ask them to hike up their charges if they have to tuckpoint your chimney.
They may even have to set up some scaffolding first before they can start working. It’s easy to see why they’re charging extra.
Time of Year
Planning for tuckpointing ahead of time is wise because doing so can save you some money. The cost of tuckpointing will change depending on the time of year.
Usually, professional masons charge the most for tuckpointing during the winter. The cold temperatures make it harder for them to work so they will ask for more money.
Summer is also not a good time for tuckpoint because of how it is outside. Working on your chimney, in particular, can be difficult during the summer.
Get tuckpointing done during the spring or fall. Labor charges are lower during those seasons.
Required Repairs
While inspecting your brick walls, the mason may notice that they are significantly damaged. Before they can start tuckpointing, they must first do something about your walls. They may also have to administer repairs on your chimney before they can repair it.
Tuckpointing will not be of much help if the brick surface is already in bad shape. The underlying issue must be addressed first for tuckpointing to be effective.
Weatherproofing
Certain types of mortar offer better resistance against the elements. Type N and Type S are the variants you should use if you know your brick walls will be exposed to a lot of moisture. Beyond using the right type of mortar, there are other measures you can take to protect those walls better.
Weatherproofing will prep your walls better for rain or snow. You can ask the mason to handle the weatherproofing while they’re also doing the tuckpointing. Just know that they will charge extra to provide that service.
You can handle the weatherproofing yourself if you have the time. However, weatherproofing and tuckpointing your walls simultaneously is better for their longevity. That’s why entrusting both tasks to the mason is smart.
Decorative Work
Tuckpointing provides both functional and aesthetic benefits. The procedure can effectively strengthen the bonds within your brick wall. At the same time, it can also improve the appearance of the brick surface.
We already know that tuckpointing gives you a chance to change the color of your brick walls. On top of that, the mason can also introduce more intricate designs while laying the new mortar.
They can add patterns that will allow the brick surface to stand out more. You’re paying more for those decorative flourishes, but they will also make your home more beautiful.
Cost of Repointing
| Estimate Type | Cost Per Square Foot |
| Low-End Estimate | $8 |
| Mid-Range Estimate | $11 |
| High-End Estimate | $15 |
Tuckpointing is not your only option if you want to reinforce your brick walls. Repointing is another option that warrants serious consideration. You can save more money by opting for repointing since it only costs an average of $11 per square foot.
So, how does repointing differ from tuckpointing? Apart from cost, the two processes differ in terms of the work involved.
Earlier, we mentioned that tuckpointing involves removing old mortar so the new, color-matched mortar can be set in place. On top of that, the new mortar will be opened up so more mortar with a contrasting color can be added.
All of that additional work is no longer required for repointing. Repointing only involves removing the old mortar and replacing it with some new material.
You should opt for repointing if the brick surface to be rehabilitated is located in a secluded area. No one’s going to see the brick surface anyway so paying for decorative flourishes is unnecessary. Repointing makes a lot of sense for the chimney since the brick surface will be difficult to see unless someone climbs up there.
Homeowners should also opt for repointing if they need the work done quickly. Get it done ahead of the rainy season so your brick walls don’t sustain too much damage.
Cost of Repointing by Method
| Method Used | Cost Per Square Foot |
| Chiseling | $20 |
| Using an Electric Grinder | $4 |
Two methods are commonly used to repoint brick surfaces. Those methods involve using an electric grinder or chiseling the mortar away manually.
Which repointing method will work better for your brick walls? Let’s examine both methods closely so we can come up with an answer to that question.
Chiseling
Chiseling is the more expensive option. Professional masons will charge $20 per square foot if you’re asking them to use a hammer and chisel for repointing.
It makes sense that repointing by chiseling is more expensive because it takes more work. Carefully chipping away at the old mortar requires plenty of focus and precision. One mistake with the placement of the chisel can lead to the brick surface getting damaged.
You should only request repointing by chiseling if you need the mortar replaced for a small area. Otherwise, this process would get too expensive and it would also take too long.
Using an Electric Grinder
Masons can also use an electric grinder for repointing. The cost of repointing done with an electric grinder is $4 per square foot.
This method is cheaper because it’s easier for the mason to use. Going through the old mortar can be done faster with the help of an electric grinder. The mason can also work through more mortar by utilizing this method.
The electric grinder method is highly recommended if you need a large surface repointed. Make sure the mason you’re hiring offers this option so you don’t have to pay more than what is necessary.
Steps to Take before Tuckpointing or Repointing
Tuckpointing or repointing will eventually become necessary if you have brick walls on your property. Do note however that there are some steps you should take to prep your home for either procedure.
Let’s use this section to highlight the steps you should take before tuckpointing or repointing. Keep them in mind so you can reduce your expenses later on.
Perform a Thorough Inspection of the Brick Surfaces
Are you certain that tuckpointing or repointing is already required? You can confirm that by performing a thorough inspection of the brick walls and surfaces on your property.
Inspect the gaps between the bricks to see if there are spots where new mortar should be applied. You should also check to see if the layers of brick are level. Uneven layers could mean that additional mortar needs to be added.
Repair the Brick Surfaces
While inspecting the brick surfaces, you may have noticed that they are damaged. The bricks may already be cracked and chipped. You cannot leave that matter unaddressed.
You should take this opportunity to repair the brick wall. The benefits of tuckpointing or repointing will last longer if the bricks are in good condition. Consider hiring someone to repair the brick wall or take on the project yourself.
Douse the Brick Surfaces with Water
Dousing the brick wall with water is another step that can help before tuckpointing or repointing. By dousing the brick surface, you make it easier for the new mortar to set within the created gaps. The mason may also prefer to do this so ask them ahead of time.
Don't want to do it yourself?
Get free, zero-commitment quotes from pro contractors near you.
Related Questions
Does Tuckpointing Add Value to Your Home?
Tuckpointing is a procedure that can strengthen your brick walls and improve their appearance. It will also increase your home’s value.The exact increase in value is difficult to pin down. However, you can attract more buyers by adding a trendy design to your walls.
How Do I Know if I Need Tuckpointing?
The appearance of your brick walls will tell you if tuckpointing is required. If you find holes in the mortar, you should take that as an indicator that you need to pay for tuckpointing.After looking at the mortar, you may also find that it appears whiter than normal. That’s a sign that the mortar is badly weathered. You should replace it at that point.
How Often Should a House Be Tuckpointed?
You don’t have to pay for tuckpointing every year. Tuckpointing is only required after every 25 years. Once you get tuckpointing done, you won’t have to worry about it again for a long time.
Gary Evans is passionate about home improvement. He loves finding out how to make improvements in the easiest, most practical, and most affordable ways. Upgrading his home kitchen is one of his ongoing hobbies. Gary is also a long-time content creator and enjoys spending his free time tending to his hydroponic vegetable garden.
More by Gary Evans