Nespresso Milk Frother Not Working? (Possible Causes & Fixes)

If you’re like me, you probably look forward to your morning latte– it’s less a habit and more a ritual. When your Nespresso milk frother isn’t working, it can be earth-shattering, to say the least.
Your Nespresso milk frother not working is likely due to damaged electrical parts or improper placement of the whisk. Sometimes there’s a tripped outlet, or you chose a type of milk unsuitable for frothing. Use no more than 8 oz of milk and opt for oat or whole milk for the best frothing results.
In this article, we’ll discuss why your Nespresso milk frother isn’t working and what to do about it!
Do You Need Appliance Repair Services?
Get free, zero-commitment quotes from pro contractors near you.

Why Is My Nespresso Milk Frother Not Working?
There are a few simple reasons why your Nespresso milk frother (also known as an Aeroccino) may not be functioning correctly. If foamy milk is a vital component of your cup of joe, check out the following info to troubleshoot each issue.
Possibilities include:
- The magnetic whisk is improperly placed.
- The type of milk isn’t suitable for frothing.
- Liquid damaged the electrical components.
- Too much milk was used.
- The outlet is tripped.
Most of these aren’t the end of the world and can be solved without purchasing a new frother.
Video: Diagnosing Your Frother & Fixing It
Reasons Why Your Milk Frother Isn’t Working
Reason #1: The Magnetic Whisk Is Improperly Placed
The magnetic whisk is the component of your milk frother that does the actual whipping. There are a few different reasons why this piece may be improperly placed, but most boil down to user error.
If you’re unfamiliar, here’s what the whisk looks like:
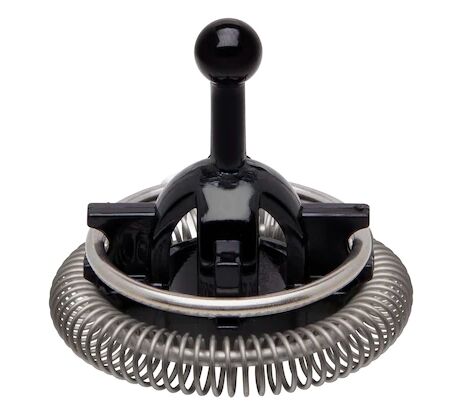
Because it has a magnet inside, it can attach to any part of the inside of the frother. This can be challenging because there’s only one place it belongs for the machine to work.
The Solution
Make sure your whisk is attached directly to the nipple on the bottom of your frother, pictured below:
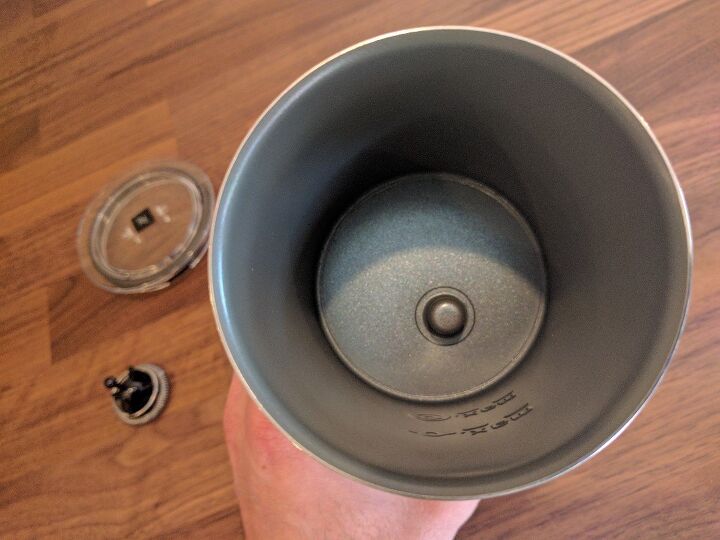
If the circular light on the front of the machine is lit red, but the milk isn’t spinning inside- an improperly placed whisk is your problem.
Simply dump the milk into a cup, readjust the whisk, pour the milk back in, and you’re good to go!
Reason #2: The Type of Milk Isn’t Suitable for Frothing
While all types of dairy can be used, not all types of dairy should be used by your Nespresso milk frother.
Over the years, I’ve found that milks that are unsweetened, lower in fat, or are more watery usually don’t froth as well.
The worst milks for a Nespresso milk frother include:
- Almond milk
- Cow’s milk (2% or lower)
- Coconut milk
- Macadamia nut milk
- Soy milk
Almond, coconut, and low-fat cow’s milk are way too watered down to froth. The Nespresso milk frother heats them but won’t create any foam.
Soy milk was slightly better but still didn’t generate much froth.
Macadamia nut milk is probably the best in this category- depending on the brand, you can get some frothiness. However, it’s still not substantial enough for a latte.
Note: Stay away from milks that contain gum or additives- this usually makes them harder to whisk.
The Solution
There’s an easy solution for this- know your milks and choose wisely.
Typically milks that have a higher fat content, are less watery, and have a little bit of sugar perform the best.
The best milks for a Nespresso milk frother include:
- Oat milk (low-fat, regular, and full-fat)
- Cashew milk (full-fat)
- Goat milk
- Lactaid (dairy milk with added lactase)
- Whole milk
Oat milk, even in its lowest-fat form, is still surprisingly great at frothing. The thickness and creamy flavor make it a wonderful option.
Cashew and goat milk have to be full-fat to produce the best results. Additionally, whole milk is always a great performer; however, Lactaid isn’t far behind.
Using any of the above milks will drastically improve your Nespresso Milk frother’s results. Up your milk game before deciding your Aerrocino is broken!
Reason #3: Liquid Damaged the Electrical Components
A lot of people don’t realize that you can’t wash a Nespresso milk frother. If you get the bottom of the machine (where the electrical parts are) wet, it will stop working.
Even just setting the frother down in the sink can ruin the mechanics. A Nespresso frother comes in 4 parts:
- The lid
- The magnetic whisk
- The frother itself
- The power station
You can fully immerse the magnetic whisk or lid (and even put them in the dishwasher); however, you have to take care to rinse the frother itself out without getting the bottom wet.
Additionally, keep the power station away from any liquids to avoid damage.
The Solution
Unfortunately, if your milk frother stops working after liquid damage, it’s time to purchase a new one.
A new Nespresso Aeroccino can be found on Amazon for just under $100. You can also purchase the parts separately if need be.
By taking care of your frother, you will avoid having to replace it. The result: it will last for years!
Reason #4: Too Much Milk Was Used
While frothing with your Nespresso Aeroccino, you have to be careful about how much milk you use. Overfilling the pitcher will prevent the machine from frothing at all.
It is recommended to use cold, fresh milk. There are two indicator lines on the inside of the Aeroccino- 8 oz is the maximum capacity to yield hot milk; 4 oz is the maximum capacity to yield hot froth.
If you don’t adhere to those guidelines, you risk non-optimal results or having the frother overflow. Remember that heat expands.
The Solution
To avoid this troublesome situation, it’s pretty simple.
Never exceed 8 oz of liquid inside of your frother. If your pitcher doesn’t have an indicator, the general rule of thumb is to fill the milk to the top of the magnetic whisker. This will produce the perfect amount of foam.
Reason #5: The Outlet Is Tripped
Occasionally, your Nespresso milk frother is not working because your outlet has experienced a power surge.
This can result from just about anything. Sometimes there are too many electronics plugged into the same outlet or even the same area of the house. Usually, you can just press the ‘Reset’ button on that particular outlet to solve the problem.
Otherwise, there are other steps you can take to remedy the situation.
The Solution
For the time being, find a working outlet and plug your frother in there.
You may have to reset the circuit breaker or move some of your other appliances around to prevent further power tripping.
Why Is My Nespresso Milk Frother Blinking Red?
If your Nespresso milk frother’s power button is blinking red, don’t panic.
Typically it does this when the machine is overheating. The main cause of that is milk residue.
Make sure to clean your frother out immediately after use to prevent milk from drying and caking on the inside. Use cold water and avoid the electrical components!
Related Questions
Nespresso vs. Keurig- which is better?
This really boils down to personal preference- however, as a coffee-lover myself, I prefer the Nespresso.Frankly, a Nespresso machine offers much more versatility than a Keurig. It’s great for a multi-person household as you can make both coffee and espresso from one device. There are so many options for seasonal coffee and espresso flavors, as well as customer-favorite staples!However, the one benefit of a Keurig is that they have partnered with many of your favorite coffee shops to offer brand-specific Keurig K-cups (like Dunkin’ Donuts or Café Bustelo). Additionally, they also offer tea!A Keurig costs around $150, and a Nespresso is about $180- so take your pick depending on what your preferences are!
Where can I get Nespresso milk frother replacement parts?
If one or more of your Nespresso milk frother parts are broken, it’s easy to purchase a replacement part in lieu of an entirely new machine.You can purchase both the lid and the magnetic frother separately on Amazon. The lid is about $16, and the whisk can be replaced for around $15.
How do I descale my Nespresso machine?
Descaling your Nespresso coffee machine is essential for prolonging its lifespan. You will know that it’s time to descale your device when the top button is half green/half red. Once this happens, only a few more cups can be made before the machine stops working (indicated by a completely red top button).To start the descaling process, purchase the descaling solution found on Nespresso.com. This activity will take about 20 minutes to complete.Step 1: Press the top button.Step 2: Release the used pod by pushing the lever up. Then push the lever back down.Step 3: Hold the lever down for 3 seconds.Step 4: Remove the pod-catching container and cup-holding tray.Step 5: Add one unit of descaling solution to the water tank, and fill the rest with water.Step 6: Hold the level and top button down for 3 seconds.Step 7: Once the top button is glowing orange, press the lever down once to enter ‘Descaling’ mode.Step 8: Place a large pot underneath the machine’s spicket.Step 9: Press the top button once more to start the process. When this is finished, the machine will stop automatically (watch the pot underneath to ensure it doesn’t overfill).Step 10: Once this is done, refill the water tank, replace the pot, and press the top button. The machine will now perform a rinsing cycle.Step 11: After the rinsing cycle is complete, the orange button will blink in 2-second intervals. Hold the lever and top button down for 3 seconds to exit ‘Descaling’ mode.Step 12: Allow the Nespresso machine to cool for 10 minutes (the top button should now be green). Replace the water tank and other parts, and you’re ready to make a cup of joe!
Do You Need Appliance Repair Services?
Get free, zero-commitment quotes from pro contractors near you.
To Sum It Up
If you’ve found that your Nespresso milk frother isn’t working, it may be due to a misplaced whisk or damaged electrical parts.
To ensure the best results, make sure a tripped outlet is not causing interference and use no more than 8 ounces of milk for frothing. Whole, oat, or cashew milk will provide the most optimal foam consistency if you’re looking for a delicious coffee drink with some extra texture!
Emily is a copywriter with over five years of experience in crafting content for the home renovation and remodeling industry. She loves house projects, whether it be painting a room or tweaking small design elements to transform a space. Her favorite aesthetic is french modern because of its clean lines and airy feeling! When not writing, Emily loves to travel and check out architectural details all over the world.
More by Emily Carr