How To Cut Baseboard Corners Without A Miter Saw (Do This!)
Miter saws are the tool of choice when cutting inside or outside corners for baseboards. However, trim carpenters were cutting tightly mitered corners long before power miter saws. You can cut baseboard corners without a miter saw in several different ways. A few simple steps can guide you to making corners like a pro.
There are different methods of creating corners on baseboards without using a miter saw. You can use a miter box, or you can create a coped corner. Trim carpenters used these methods long before power miter saws were available.
Each of these methods can create beautifully fitted baseboard corners. There is some skill involved, but most woodworkers delight in relearning what are rapidly becoming lost methods. The steps below will lead you to understand how to create baseboard corners without using a power miter saw.
Do You Need Interior Trim or Decorative Molding Installation?
Get free, zero-commitment quotes from pro contractors near you.

The Miter Box and Backsaw – The Mechanical Equivalent of a Power Miter Saw
The miter box and backsaw are the precursors to the modern power miter saw. These tools were for many years the centerpiece of a trim carpenters setup. The miter box is a jig designed to hold the trim material securely. The slots on the jig guide the backsaw to ensure accurate and clean mitered joints.
Miter boxes and backsaws are available in most hardware and home improvement centers. Modern cheap miter boxes made of plastic give poor results. We suggest you avoid these cheaper versions. A stout miter box made of metal combined with a high-quality backsaw can be as precise and accurate as any power miter saw on the market.
Using a miter box and backsaw is not complicated and within the skills of any woodworker. These steps will help you get started.
Step 1: Get Prepared Gather your Tools and Materials
Prepare your workspace and gather the tools you will need. We suggest that you have the following tools on hand.
- Miter box and Backsaw
- Tape measure or carpenters rule
- Pencil or sharp scribe
- Safety equipment
- Adjustable material rests
Step 2: Mounting your Miter Box
Mount your miter box to the front edge of a stout workbench. You will be sawing on this surface. The workbench must be solid enough not to wobble or move as you are sawing. A strong workbench with no movement will ensure the best and most accurate cuts.
Place your workbench to allow plenty of room on either side for your material. If you are working with ten-foot pieces of trim, you should allow at least twelve feet on either side of your miter box. Follow your miter box manufacturer’s recommendations for attaching your miter box to the workbench. Use the proper size and number of screws.
Step 3: Prepare your Backsaw
The key to clean and accurate cuts is a clean and sharp backsaw. The sharper your saw, the easier the cuts are made without struggling or forcing the saw. Keep the blade free of any buildup on the blade so that it moves freely through your trim material.
Step 4: Measure and Mark Your Trim
Take the measurements for the length of the baseboard you are cutting. Remember that if you are cutting to inside corners, the measurement is the space’s actual length. If you are cutting to an outside corner, allow additional length for the outside miter cut angle.
Mark your time for the length of the cut. Many carpenters use a pencil to make their markings. Pencil marks are easy to remove from the material with light sanding. More traditional carpenters will use a sharp scribe to make their marks. You shouldn’t cut into the wood but make the lightest and cleanest line possible on the material’s surface.
Step 5: Secure the Material in the Miter Box
Lay the material in the miter box and align it with the slots you intend to use to make your cut. If you are cutting long material, use material supports that are the same height as your miter box floor. Set these supports far enough out to hold the material securely and at the same level as the miter box.
Many novice miter box users will try to hold their material in place with their free hand as they use the backsaw to make their cut. Experienced trim carpenters will use a clamp to secure the material to the miter box. Using clamps frees both hands to use and guide the saw in the miter box.
Step 6: Align the Material in the Miter Box
Carefully adjust your material in the miter box to align with the saw blade. Take note of the side of the cut mark on which you are cutting. The blade of the saw should ride on the waste material side of your cut line. If you get on the wrong side of the cutline, your material will be short by the blade’s width and your miter joint will not be tight.
Step 7: Making the Cut
Begin your but by carefully drawing the backsaw toward you through the slots in the miter box. Pulling backward allows the saw blade to make the initial starting cut accurately without being too aggressive.
When you have the cut started, being to saw using regular strokes. One hand should be on the saw’s grip and the other resting lightly on the reinforced back of the saw. Don’t press down on the saw blade. Let the saw do the work as you concentrate on guiding the saw through the material.
Step 8: Test the Fit of your Baseboard and then Repeat
With both ends of your baseboard cut, test your baseboard’s fit before going any further. If the baseboard is a bit too long, many traditional trim carpenters use a small plane to trim off any excess.
When the trim fits your satisfaction, you can take the next piece of baseboard measurements and repeat the steps above.
Using a power miter saw is certainly faster than a traditional miter box and backsaw. However, installing trim using traditional methods and hand tools to create tight finished joints in your woodwork is an accomplishment.
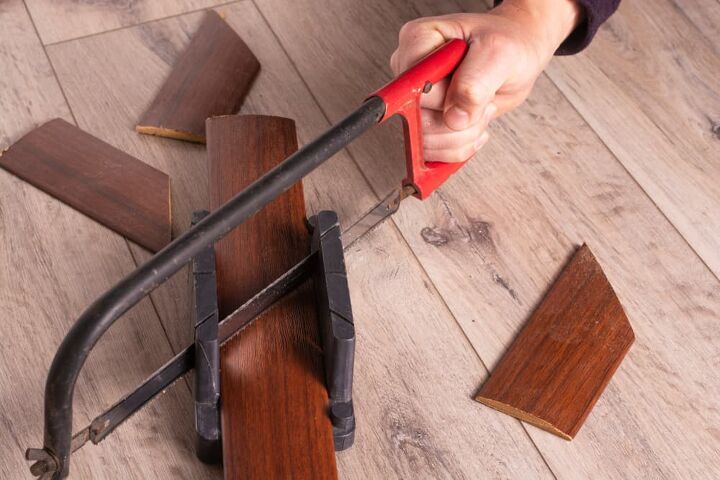
Coped Corners – Complex Molding and Tight Joints
If your baseboard profile is complex, cutting tight miter joints in a miter box may be a problem. You may need to resort to a process called coping to make tight joints with complex trim profiles.
Coping is a method of fitting joints together using a back cut that follows the trim’s profile. On inside corners, cut one piece of the trim to fit flush with the wall. The second piece is miter cut to length. The edge is coped or cutaway following the edge profile using a coping saw. Coping sounds complicated, but a few steps can have you making coped joints like a pro.
Step 1: The Tools You Need
To make good, coped joints, you will need a few tools.
- A miter box
- A backsaw
- A coping saw
- A tape measure or carpenters rule
- A pencil or scribe
- A round file
Step 2: Measure the Space for the Baseboard
If you are filling in between two walls with two inside corners, cut the baseboard’s length to the width between the walls. Don’t cut the length to fit between the two pieces of baseboard already installed.
Step 3: Cut the Miters on the Ends of the Trim
Using your miter box and backsaw, make the miter cuts on each end of your baseboard material. Be sure to cut to the correct side of your marks and that the miters are going in the right direction.
Step 4: Coping the Miter
Coping is the tricky part and may take some practice. We suggest that you make some trial coping cuts on scrap trim before trying the real thing.
Use your coping saw to follow the profile of the trim along the edge. Go slow and work carefully at this point. There are some tips you should remember to make this process easier
- Rest the coping saw blade on your thumbnail to make the first cuts.
- Make relief cuts at any tight corners or angles
- Be careful when cutting sharp or exposed tips or points to avoid breaking
- Keep the coping saw angled backward at a 30-degree angle
- It is better to leave a bit of wood at the edge than to cut into the profile. You can always sand any excess away for a tight fit.
Step 5: Adjust and Clean the Coped Cut
No coped cut is perfect. A bit of sandpaper and your round file are the tools for adjusting and perfecting your coped joint. Work carefully and test the fit of your trim often.
Do You Need Interior Trim or Decorative Molding Installation?
Get free, zero-commitment quotes from pro contractors near you.
Making the Perfect Joint Without a Power Miter Saw
A look at the woodwork in antique homes reveals the carpenters’ mastery who installed the trim work. The complex joints and corners were crafted without the convenience of modern power tools using only hand tools and skill.
Rediscovering these techniques is often a delight for modern woodworkers. You can make perfect mitered joints in your baseboards using a few hand tools and a bit of practice. The satisfaction you receive from your work is beyond measure.
I hope that this article’s information has inspired you to try your hand at some traditional woodworking skills. Trim carpentry is challenging but also rewarding. Good luck and work safely.

Dennis is a retired firefighter with an extensive background in construction, home improvement, and remodeling. He worked in the trades part-time while serving as an active firefighter. On his retirement, he started a remodeling and home repair business, which he ran for several years.
More by Dennis Howard


![How Much Weight Can a 4×4 Support Horizontally? [It Depends!]](https://cdn-fastly.upgradedhome.com/media/2023/07/31/9070333/how-much-weight-can-a-44-support-horizontally-it-depends.jpg?size=350x220)