Is A Copper Pipe Union Leaking? (We Have A Fix)

When plumbers are trying to take a pipe apart in a faster manner, there will typically install a union. A union is generally a coupling made of copper or brass and works best when joining copper pipes together.
But what happens when spring a leak?
When a copper union pipe starts leaking, the best course of action is to disconnect the union and heat the leaking joint to melt or scape the solder away. Shut off the water first, locate the central nut of the union to unscrew it. Inspect for solder on the threads and either scrape it away or heat it with a torch to melt it.
With that said, let’s take a deeper look at why copper unions leak and what you should do when they are.
Do You Need to Hire a Plumber?
Get free, zero-commitment quotes from pro contractors near you.

Why Does a Copper Union Leak?
The good news is that copper unions are pretty durable, so the problem is not that the component wears down or stops working. There are two halves of the fitting and they seat onto a washer, which creates the seal.
When that seal is broken and the union leaks, it actually comes down to the pipes and their alignment. When you see leaking at your copper union, it is because the pipes that are being joined are offset slightly. That means needing to get the union off and resetting the alignment.
How Do You Fix a Leaking Copper Union?
The good news is that a leak is not the end of the world. The bad news is that it takes a little bit of time to get the two halves of the fitting to sit properly. When that is done, you then need to re-tighten the copper union to seal the connection.
Follow these steps and you should be able to fix the issue of leaking in your copper union.
Step 1: Turn Off the Water
Always start by turning the water off. There should be a shutoff valve somewhere in the line where water flow can be cut off but that may not be the case depending on the design and age of your house.
If there is no shutoff valve, then look for the main water supply and turn the valve there. A few turns clockwise should be enough to stop the flow of water from happening, allowing you to implement your repairs.
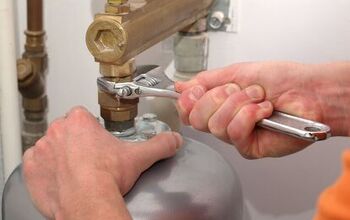
Step 2: The Central Nut
The joint on a copper union has a nut at the central portion. The next thing to do is to unscrew that central nut by turning it counterclockwise. To do this, you will need a pipe wrench as the connection is screwed on tightly.
Should you have difficulty turning the nut, you might have to grab a pair of adjustable pliers to grab one of the connecting ends.
Step 3: Look for Solder
With the central nut removed, it is time to look for any solder that may have gotten into the threads of the union. When solder gets into the thread, it can compromise the seal and eventually lead to the leak that you are seeing.
You can typically scrape away any of that loose solder with a file. That said, some of it may be a bit more stubborn. When that happens, you can heat the union up with a torch in order to melt the solder and remove it that way.
Step 4: Check the Alignment
Take the two halves of the union and hold them together without connecting them. Check their alignment since misaligned pipes are typically the reason for the leaks in the first place. Even the slightest offset can be enough to prevent the union from properly seating when you go to tighten it.
There is a bit more play in solder joints. If you wanted, you may be able to straighten out the union by taking one of the joints and re-soldering it. This part can take a little bit of time to get things properly lined up.
Step 5: Heating the Reset Joint
Take the joint that you are going to reset and heat it up with a torch. It may sound obvious, but don’t hold that joint with your hand. Use some adjustable pliers as the joint can get extremely hot in short order.
As soon as the solder melts, slip off the union. Give both the union and the pipe a chance to cool; 20 minutes or so should be enough. If you aren’t certain whether it is cool enough to touch, just give it a quick tap to gauge the temperature.
Step 6: Connect the Two Halves
Now that the solder has been cleared away, it is time to connect our two halves back together once again. Tighten the nut back into place using your wrench and make certain that it is snug on the connection.
Take flux and spread it on the inside portion of the union slip connection as well as on the outside of the pipe. Then, take the union and slide it back over the pipe. Finally, solder everything back into place using lead-free solder.
How Do You Install a Copper Union?
The typical way to attach fittings to copper piping is by sweating them. That means using a lead-free solder to solder them together. Those connections are permanent which means that you have to install a union to disconnect them.
The union, which has two threaded halves that are joined together by a central nut, can be installed to make that disconnection all the easier.
Step 1: Cutting the Pipe
Start by cutting the copper piping. You will need to do so with a pipe cutter if you plan to install the union in the middle of a line that already exists. Just make sure to turn the water off first. You can do so at your main water line if there are no nearby options.
Unscrew the cutter drive and fit the cutter around your piece of pipe. Tighten it until the blade comes into contact with the metal and then rotate the tool, tightening on the drive with every rotation. Eventually, the pipe will separate and you will need to let the water drain out.
Step 2: Prepare the Ends
Depending on the type of cutter that you use, you may have to not only clean it but deburr the ends. Use a wire brush to get rid of any oxidation on the piping. A clean pipe means a better bonding surface for the solder.
You can get a pipe cutter that comes with an attached brush for just this reason. Just ensure that the pipe is ready for fitting before moving on.
Step 3: Spread Flux and Heat
Take your copper union and separate it by unscrewing and then removing the central nut. Take some flux and spread it over the inside slip fittings. Those slip fittings are located on both halves of the union. Make sure to spread flux on both ends of the pipes that you will be joining together as well.
When there is enough flux on all the pertinent areas, you can join them. Slide both halves of the union onto the corresponding ends of the piping. With the connections in place, heat one of them using a propane torch.
Hold the flame about six inches from the connection. The flux should liquify, turn black, and then eventually start to bubble. When the bubbling happens, remove the flame from the connection point.
Step 4: Soldering
Immediately touch the end of your lead-free solder to the joint. The solder should melt and quickly disappear into the joint. There it will eventually fuse the pipe to the fitting as it starts to cool down and set.
Make sure to move the tip of the solder around the entirety of the pipe. You want to ensure that the solder gets into all of the spaces between the pipe and the fitting. However, you solder one half, follow suit for the other half. Just make sure you give the metal anywhere from 10 to 20 minutes to properly cool.
Step 5: Bring the Pipes Together
Now is the time to screw the nut onto one side of the union. With the nut in place, you can bring both pipes together and continue to screw in that same direction. The other side of the union actually has reverse threads so that it will tighten the nut on both sides even if you are tightening on one side.
Tighten the nut by hand as far as it will go. Grab your pipe wrench and finish the job, ensuring that the nut is snug and securely in place. You can then turn the water on to check for any leaks. More often than not, a leak is indicative of a loose nut or a misaligned pipe. Check your work to ensure that these are both as they should be.
Do You Need to Hire a Plumber?
Get free, zero-commitment quotes from pro contractors near you.
A Final Tip
You can also join copper to pipes of galvanized steel using a union, but there must be insulation to keep the different metals from coming into contact with one another. This kind of union is known as a dielectric union.
Should the pipes have water in them, do not solder. The heat from soldering will vaporize the water which will keep the pipes from being able to get hot enough to sufficiently melt the solder.
Related Articles

Ryan Womeldorf has more than a decade of experience writing. He loves to blog about construction, plumbing, and other home topics. Ryan also loves hockey and a lifelong Buffalo sports fan.
More by Ryan Womeldorf


![How To Reset A Whirlpool Cabrio Washer [In 5 Easy Steps!]](https://cdn-fastly.upgradedhome.com/media/2023/07/31/9076531/how-to-reset-a-whirlpool-cabrio-washer-in-5-easy-steps.jpg?size=350x220)

![Cost To Drill A Well [Pricing Per Foot & Cost By State]](https://cdn-fastly.upgradedhome.com/media/2023/07/31/9074980/cost-to-drill-a-well-pricing-per-foot-cost-by-state.jpg?size=350x220)