Water Heater Pressure Relief Valve Leaking? (We Have a Fix!)
Finding water under or around your water heater is never a good sign. The immediate reaction is usually a bit of panic. Is your water heater about to flood your home? Is there a major problem with the plumbing? Fortunately, in many instances, the source of the water is a leaking pressure relief valve.
Pressure relief valves can begin to leak for a variety of reasons. Fortunately, in most cases, replacing the pressure relief valve solves the problem quickly and inexpensively. Most pressure relief valves for water heaters can be purchased for around $15. Removing the old valve and installing the new valve is a relatively simple process.
You can, of course, call a plumber to make the repair, but most homeowners can easily replace a leaking pressure relief valve in a few simple steps. However, you may need to consider other possibilities if the pressure relief is not faulty but is doing its intended job. Understanding why your water heater has a pressure relief valve and how it works is the key to making good decisions in this case.
Do You Need Water Heater Repair Services?
Get free, zero-commitment quotes from pro contractors near you.

Why Does Your Water Heater Have a Pressure Relief Valve?
The number one reason is for your safety and protection. The pressure relief valve allows steam and hot water to escape safely from your water heater. Water heaters are designed to operate within a safe margin of temperatures and pressures. Should one of the internal safety features fail the pressure relief valve operates to keep your home and family safe.
A failed thermostat could create a serious explosion hazard unless a pressure relief valve is installed on the water heater. Water, when turned to steam, expands by a factor of 1,200. A water heater without a pressure relief valve is a bomb waiting to explode. Water around your water heater or water dripping from the pressure relief valve is a sign of trouble.
You should never ignore water leaking from the pressure relief valve. Two possibilities exist if water is coming from the pressure relief valve. Either the valve is faulty and needs to be replaced, or the valve is operating correctly. In the latter instance, immediate attention to the situation is required for the safety of your home and family.
What Could Cause My Pressure Relief Valve to Leak?
Several problems could cause your pressure relief valve to leak. Understanding the causes of pressure relief valve leaks is important to diagnose the problem. In most cases, the solution to the problem is easy. To solve the pressure relief valve problem, replacing the faulty pressure relief valve is usually the answer.
In general, a leaking pressure relief valve is usually due to one of these reasons.
Too Much Water Pressure
If the water pressure on the supply side of the water heater is too high, the pressure relief valve may open slightly and allow water to escape. This is an unusual situation and not often found. You can test the water pressure in your water supply system yourself. Pressure test gauges with the correct fittings are available at most home improvement stores.
Most pressure test gauges come with adapters for various outlet fittings. The easiest place to perform a test is usually at an outside faucet. Follow the directions on the gauge to perform a test and learn the pressure in the pipes in your home.
Normal water system pressures are between 40 and 8-0 pounds per square inch. If the water pressure in your system approaches or exceeds 150 pounds per square inch, you have a problem. High water pressure can be caused by several problems.
- You have a closed water system, and the water heater is causing the pressure to rise in the system. The pressure relief valve is opening as it should and releasing the excess pressure. You should consult with a licensed plumber to correct this problem.
- If you are on a domestic water well, the pressure sensor on your pump and pressure tank may need to be adjusted. This may be as easy as adjusting the pressure sensor on your domestic well system. If you are unsure about this procedure, contact a qualified well-service technician for help.
- Too much pressure from a municipal water system is not usually a problem but can occur. If your water utility company is delivering very high pressure, you should call them about the problem. Installing a pressure reducer at your water meter is not uncommon in these situations.
Over-pressurizing your home’s water system is a serious situation. Typical home plumbing systems can suffer damage from high pressure that can lead to catastrophic losses. A burst pipe or a failed valve can do immense damage to your home if undiscovered for even a short time.
High Water Tank Temperatures
Most people don’t know that the pressure relief valve on their water heater will also open if the temperature inside the water tank becomes too high. It is an unusual situation for a relief valve to open because of high water temperatures. Most relief valves are set to open when the water temperature approaches 210 degrees Fahrenheit.
In any case, checking the temperature of the water in your system is easy. A meat thermometer from the kitchen is the right tool. Open the hot water faucet in your kitchen sink and let it run for a few minutes to ensure that you are getting water directly from the water heater. Check the temperature of the water with the meat thermometer.
If the water temperature from your water heater at the faucet is above 120 degrees Fahrenheit, you could have a problem. In general, you should adjust the thermostat on your water heater to lower the temperature.
Hot water from the faucet above 120 degrees is a danger to your family. Water above 120 degrees can burn or scald tender skin. If the water temperature approaches 200 degrees, your water heater may be malfunctioning and needs the attention of a licensed plumber.
A Wrong or Faulty Pressure Relief Valve
In some cases, the pressure relief valve on your water heater may simply fail. There are several reasons that pressure relief valves fail and begin to leak. Usually, this kind of leak problem is minor, perhaps only a few drops every few minutes. However, even a minor leak should not be dismissed.
There are three common problems with relief valves that lead to minor leaks. These three problems almost always require the pressure relief valve to be replaced to solve the problem.
Failure From Lack of Operation
Surprisingly, many pressure relief valves begin to leak because the valves have never operated. This problem may arise after the pressure relief valve is operated, or it may just happen due to corrosion or sediment build-up. In any case, the pressure relief valve should be replaced.
Pressure relief valves have mechanical parts, including springs and seats, that can deteriorate over time. The constant exposure to hot water and the minerals in the water can cause these parts to weaken or become brittle.
Leaks of this nature are usually small and don’t pose much of a problem themselves. The larger problem is a pressure relief valve that may not function properly if it is needed. The valve may fail completely in some rare cases and unleash a flood of water into your home.
The Pressure Relief Valve Doesn’t Match your Water Heater
If the pressure relief valve on your water heater has been replaced in the past, you may have a problem. There are different relief valves available for different applications. Domestic water heater relief valves are much different from relief valves meant for boilers or other applications. These valves may look the same, but their pressure ratings and temperature ratings are much different.
A typical water heater pressure relief valve will not release until the tank pressure reaches 150 pounds per square inch or the temperature inside the tank is 210 degrees Fahrenheit. A boiler pressure relief valve can be rated as low as 30 pounds per square inch.
Pressure relief valves have metal labels around the top of the valve body that show the pressure and temperature ratings. Your water heater should include information about the correct ratings for the pressure relief valve. Make sure that the two match.
How Hard is it To Replace a Pressure Relief Valve on My Water Heater?
Replacing a pressure relief valve on a water heater is not a difficult project. If you have relatively easy access to the pressure relief valve and a few tools, the replacement may take as little as fifteen minutes. Following our simple steps should have your relief valve replaced and operating correctly quickly and easily.
Step 1: Get A New Relief Valve
Check the information for your water heater and make sure you know the temperature and pressure ratings for the relief valve. Most home improvement centers sell water heater pressure relief valves and a modest cost. Usually, the cost is around $15. While you are at the home improvement center, pick up a roll of Teflon plumbers tape and some plumbers pipe dope as well.
Step 2: Gather Your Tools and Supplies
Before you start, it is important to have the correct tools and all your supplies on hand. This prevents frustration and time lost during the project. To replace a bad pressure relief valve on your water heater, you will need the following:
- The appropriate size adjustable wrench or pipe wrench
- A flathead and Phillips screwdriver
- A roll of Teflon plumbers tape
- A can of plumbers pipe dope
- A bucket or other container to catch water
- A garden hose to drain the water heater
- Rags or paper towels
Step 3: Work Safe – Shot down the Power Supply or Gas Supply
Before you go any further, protect yourself by turning off the power or gas supply to your water heater. Water heaters come in two varieties, gas-fired and electrically heated.
If your water heater is electric, find the breakers on the circuit breaker panel that protect the electrical circuit. Most water heaters require 220-volt electrical service and will have circuit breakers. Make sure both are in the off position.
If your water heater is gas-fired, you can safely work on the pressure relief valve by turning the control knob on the gas valve to the off position. This will prevent the water heater from firing the burners while working on the relief valve replacement.
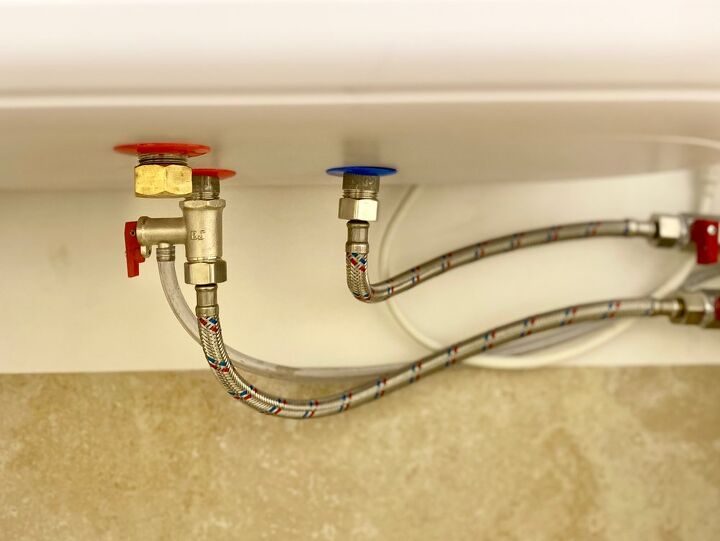
Step 4: Close the Cold Water Supply Valve
There are two water pipes connected to the water heater. One supplies cold water to the water heater. The other is the hot water outflow pipe that serves the hot water connections in your home. The cold water supply pipe should have a valve that will shut off the water supply to the water heater. Close this valve fully.
Open a hot water faucet close to the water heater and ensure that the water flow into the water heater tank is shut off. Some residual water may flow from the faucet at first, especially if you have a two-story home.
However, the water flow should soon come to a stop. If water continues to flow from the hot water tap after a few minutes, the cold water shut-off valve is not operating properly. You may need a plumber to repair or change the valve.
Step 5: Partially Drain the Water Heater
Connect the garden hose to the drain at the bottom of the water heater. Run the garden hose outside and then turn on the valve on the water heater drain. Open a tap on a nearby faucet to allow air to enter the system so the tank will drain.
Place your bucket under the pressure relief valve discharge pipe and open the valve. A bit of water should flow out into the bucket. As the water heater drains, the water level will fall below the pressure relief valve opening. The water flow from the discharge will quit.
There is no need to drain the water heater tank any further. Shut off the drain valve and carefully disconnect the garden hose. Drain the garden hose by walking it to the other end.
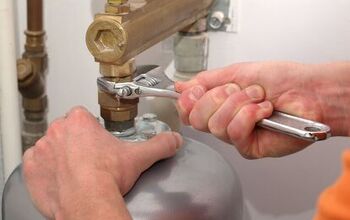
Step 6: Remove the Faulty Pressure Relief Valve
You need to remove the discharge pipe from the faulty pressure relief valve. Take care when you are removing the discharge pipe, as you will need to reinstall it later.
With the discharge pipe removed, use your pipe wrench or adjustable wrench to unscrew the pressure relief valve from the water tank. Getting the old valve out may be the hardest part of this project. Removing the old valve may take considerable effort at the first few turns.
When you have the old pressure relief valve removed, check the threads on the water tank for any damage. Clean the threads to remove any old plumbers’ pipe dope or Teflon tape that may be in the threads.
Step 7: Install the New Pressure Relief Valve
When the threads on the water tanks are clean, you are ready to install your new pressure relief valve. Wrap Teflon plumbers tape around the threads on the new pressure relief valve. The Teflon tape should be applied in a clockwise direction. Some people apply a thin coat of plumbers pipe dope to the threads as well.
Carefully screw the new pressure relief valve into the water tank. Make sure you don’t accidentally cross-thread the pressure relief valve. Hand tighten the valve as far as possible, then use your wrench to make the last few turns. Be sure that the opening in the pressure relief valve points down.
Step 8: Reinstall the Discharge Pipe
Replace the discharge pipe on the pressure relief valve. In some cases, this is easily accomplished by simply threading the discharge pipe onto the valve. However, if the discharge pipe is PVC or some other material, you may need to replace the entire discharge pipe assembly.
Most home improvement stores sell pre-assembled discharge pipes with the proper fittings for your relief valve. If you decide to build your own PVC discharge pipe, make sure you use PVC pipe and pipe weld solvent rated for the temperatures on the water heater.
Step 9: Turn on the Cold Water Valve
Open the cold water supply valve to refill your water heater tank when you have the pressure relief valve installed and the drain valve off. Leave a hot water faucet open nearby to allow any air in the water heater tank to escape as it fills.
When air no longer escapes from the faucet, turn off the faucet and check all your connections and the relief valve for leaks.
Step 10: Turn on the Power or Gas
If you are satisfied that there are no leaks, it is time to make hot water again. Turn on the gas valve and relight the pilot light if necessary. Some water heaters have pilotless ignition systems. Make sure the burners light properly and that all the covers are installed correctly.
If your water heater is electric, turn on the breakers at the circuit breaker panel to put the water heater back into operation.
It is a good idea to check your work periodically as the water heats. As the temperature rises, the pressure inside the tank also rises. Checking for leaks periodically will prevent any surprises.
Do You Need Water Heater Repair Services?
Get free, zero-commitment quotes from pro contractors near you.
Pressure Relief Valve Leaks – A Problem You Shouldn’t Ignore
A leaking pressure relief valve is more than just a nuisance. A faulty pressure relief valve can be a safety issue that affects your home and family. Pressure relief valves are an important part of your hot water system. Prompt attention to a leaking pressure relief valve ensures that your home and family are protected.

Dennis is a retired firefighter with an extensive background in construction, home improvement, and remodeling. He worked in the trades part-time while serving as an active firefighter. On his retirement, he started a remodeling and home repair business, which he ran for several years.
More by Dennis Howard