Why Is The Fridge Not Cold But The Freezer Is? (Find Out Now!)


Diagnosing refrigerator issues isn’t fun. While some people may enjoy the challenge, watching your fridge stay at room temperature while your freezer is working can be pretty frustrating. Because of this issue, we’ve composed some troubleshooting steps around the most common problems.
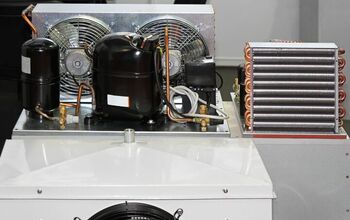
Remove the freezer panel to inspect the evaporator coils and defrost assembly for damage and replace them if necessary. Clean the evaporator fan motor with a brush to remove debris and properly cool the fridge. You can also remove excess items in your fridge that keep it from cooling off if it’s overstuffed.
Below, we will go through more common issues that can cause your freezer to keep frozen while your fridge is only warm. We will also provide some simple repair tips to help you fix these problems if possible.
Do You Need Appliance Repair Services?
Get free, zero-commitment quotes from pro contractors near you.

Fridge Not Cooling, But Freezer Is – Troubleshooting Steps
- Your fridge may be too full
- Check your evaporator coils
- Check (and clean) your evaporator fan
- Look at your damper control
- Check your thermistor
- Look at your control boards
With any cleaning or repair process, always be sure to turn off your fridge before beginning. If your fridge is making clicking noises, we have a separate guide for that.
Step One: An Overstuffed Fridge
How much room do you have in your fridge? If the answer is almost none, your airflow may not be good enough to cool the entire fridge. Without ample airflow, your fridge may be just as warm as the outside.
Signs of this come from the top half of the fridge being the coldest section. You may have some frozen items on the top in this case. Go through your fridge to remove anything spoiled. If you don’t have any spoiled items, it might be time for a leftovers night.
Step Two: Check Your Evaporator Coils
Your evaporator coils are behind your freezer panel. These coils exist in all refrigerators and can ice over if your defrost system is going out. You can find your defrost assembly near your evaporator coils. To test your defroster, connect it up to a multimeter to be sure it is receiving an ample charge.
Your defrost assembly is also connected to a timer that informs the defroster when to activate. To test if this is the culprit, make the defrost timer start ASAP. If your defroster is nonresponsive, it might be the timer. To replace it, you will need to remove the entire back panel of the fridge. You will also need to use your owner’s manual to confirm the location of your defroster.
Once you can do this, remove it from the wires and take off any mounting, which varies depending upon your fridge model. Connect the new defroster, put the panel back on, and run a test. Before you restart it, it would be wise to defrost the coils manually. You can do this by waiting for the rings to melt.
Step Three: Check (And Clean) The Evaporator Fan Motor
Your evaporator fan is what moves the cold air from your coils to your fridge. If the fan isn’t working, the cooling will slowly become more ineffective. You can initially find this out by placing your hands near the damper control. If you feel any airflow, the fan is likely okay.
To address this, you will first want to look at your fan to find any obstructions. Start by cleaning all of the dust and gunk in the area. After this, test to see if your fan is blowing better with no obstacles. You can also test this by unplugging the fridge and trying to move the fan manually. If there is any resistance, that likely means your motor is going out.
You can also take this opportunity to check the wires, which may be corroded due to old age. Replace the wire if needed. If your fridge is still under warranty, check your documents to see if that warranty applies to the fan motor. Performing any DIY repairs may void your warranty.
Otherwise, follow these instructions to remove the fan motor:
- Remove the cover from the back of the freezer.
- Remove any screws or locking tabs holding the motor in
- Replace it with the exact motor using the model number
Remove The Cover From the Back Of The Freezer
Unplug and defrost the freezer to give you ample access to the back. Once the defrosting is complete, you should be able to see any screws you need to remove. These are typically Phillips and flathead screws. You will also need to disconnect the wire harness and note any wires and how they plug back in.
Once you remove the screws, place the cover so that it is facing down, and you can see the motor and fan. The engine Is on the upper side or center of the surface. Its location varies slightly depending upon the model.
Remove Any Screws Or Locking Tabs Holding The Motor In
The motor is typically held in with a series of screws or locking tabs. Using your owner’s manual as a guide, remove these until you can easily slide the motor out. You will also need to remove the fan from where it is mounted, so pay attention to the order of things as you are making these removals.
Replace It With The Exact Same Motor
Using the model number of your fridge as a guide, you can easily hunt for a replacement part. You can typically find these replacements pretty easy on the company website. Otherwise, call around at local hardware stores. These motors can cost anywhere between $150 to $300. That number will depend on the amount of power behind the fan, which varies from model to model.
Pay attention to where things were prior. You may take pictures of how it was before to be sure you are installing it correctly. After reinstalling everything and placing the wire harness back on, be ready to test it. You should be able to hear the fan running by listening carefully.
Step Four: Look At Your Damper Control
The damper control is a small vent-like object located in the rear of the freezer and fridge. It is between the two, providing an easy escape for the freezer air to enter the fridge air. The damper control looks like a small vent, which means that it is easy to obstruct. Check to see if any freezer items are on top of it, preventing cold air from entering the fridge.
Your damper control may also be stuck, which you can test by trying to open it with your fingers. If it is stuck, you likely need to clean it out. If it still isn’t working, you are going to need to pull it out. Given that dampers listen to signals sent from the control panel, you are going to end up tearing a big chunk of the fridge out.
If you aren’t comfortable with doing this, you need to call an NVAC technician. If you have a warranty, check it before beginning any of this process. This process requires you to remove the control panel, which means it is an excellent time to check on wires and control boards’ condition.
The control panel is on the top-center of the fridge. You can remove it with a couple of screws and the disconnection of a wire harness. Be sure to mark any wires you disconnect so that they return to their original areas. It is also an excellent time to check your thermistor.
Step Five: Look At The Thermistor
The thermistor is a small white object inside of your control panel. It is connected to a single set of wires, and you can check it using an ohmmeter and a glass of ice water. Dunk the thermistor in the ice water as you are testing the device. If the ohms come back above twenty thousand, your thermistor is likely working.
Given that every model is a bit different check your required ohms using the owner’s manual. Keep in mind that the numbers will be completely different if you check the ohms at room temperature. If you need to replace it, use the model number, and look up the part on your fridge company’s website.
Do You Need Appliance Repair Services?
Get free, zero-commitment quotes from pro contractors near you.
Step Six: Look At Your Control Boards
The control boards are underneath your control panel. Given that steps four, five, and six are all around the same area, you can conduct them all at once. You should be checking for damage within the control boards. Anything that looks burnt of askew is a sign that you need to make a replacement.
Again, check to see if you are still under warranty before making any replacement. Otherwise, be extra careful to make a note of any wires as you remove the old board. Making a mistake here can cause shorts and significant issues. As long as you note the wires and use the owner’s manual for details, your board replacement will go fine.
I'm a guy who becomes the expert of whatever I stumble upon, writing-wise. I've written tons about cool home products, home improvement, and smart technology in the home. I'm also the proud father of a kiddo born on new years, making my holidays very busy.
More by Eli Smith