


Why Does My Ceiling Look Patchy After Painting?
One of the joys of completing home improvement projects is finishing them. There is something satisfying about checking it off the to-do list, and enjoying the updates. Joy associated with the job is diminished when small flaws show up. Most projects end well. But one recurring problem is ceilings that look patchy after painting.
Your ceiling can look patchy after painting if there is surface debris or you didn’t use enough paint. Painting without using primer can also make your ceiling look patchy when you paint it. Applying coats of paint over an area that is not dry can also make your ceiling appear patchy.
Professionals and do-it-yourself homeowners agree that getting a ceiling to look good can be a challenge. Ceilings are a challenging home improvement project because of their location. Therefore, the job begins at a disadvantage.
Do You Need to Hire a Paint Contractor?
Get free, zero-commitment quotes from pro contractors near you.

Challenges Associated with Painting Ceilings
Ceilings can look patchy after painting for multiple reasons. Our discussion will help you determine what went wrong, how it can be fixed, and how to prevent patchy ceilings on future projects. We don’t spend a lot of time looking at the ceiling. But when we do, the mistakes become glaringly obvious.
So, let’s get started at the beginning of our painting job and work our way through to the end of what could go wrong.
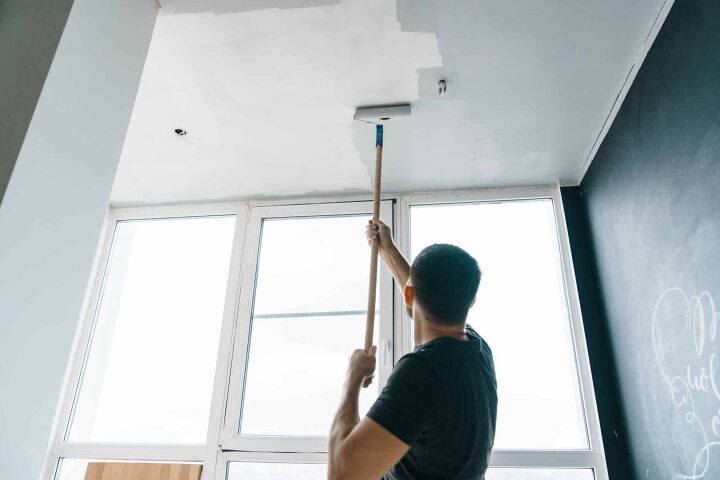
1. Failure to Prepare the Surface
You can set your ceiling up to look patchy before you even begin. Surfaces must be clean and smooth for a good painting job. Dirt, cobwebs, or other debris will look patchy after you paint if you don’t prepare the surface first. If you have a popcorn ceiling, you need to smooth the surface completely before you begin painting.
Preparing the surface for painting is fairly simple. Clean all debris off the ceiling. If needed, sand down rough areas and then use a clean, damp cloth to prepare the surface Make sure that the ceiling is level and allow it to fully dry before you start painting.
Before you paint your ceiling, it is vital that you wash the surface thoroughly and then rinse to remove any soap residue. Left-over grease will result in a patchy finish, just like a surface that is washed with soap and not properly rinsed and dried.
2. Equipment Issues
Did you purchase a new paint roller or use an old one? Did you use a brush or pad in some areas and a roller in others? An older roller that was not properly cleaned can cause the patchy look on ceilings, especially if there was lingering dried paint on the roller. Another problem is using different types of painting equipment or variations in brands.
Choose your equipment carefully and clean it well. Professionals recommend 12-inch microfiber rollers for use on ceilings. Paint pads and brushes should only use these to start the edge. Using them for the entire surface creates a patchy look.
3. No Primer or Wrong Primer
Let’s face it; painting a ceiling can be awkward and uncomfortable. Cutting corners by skipping primer will create a patchy ceiling. Another issue is mixing your paint types, or applying oil paint over latex.
Invest the time to do the job correctly from the start. The quality of your paint matters too. Different ceilings require different primers and/or a sealer. The ceiling of an older house may need a sealer. Make sure that whatever you purchase was intended for a ceiling.
If you did use a primer or sealer, it is quite possible that you used one that was not designed to go over old paint. Always check your product carefully before you begin and buy high-quality brands to ensure best results.
4. Time Lapse
Most ceilings require multiple coats. The first coat needs adequate time to dry, or cure, before the second coat is applied. Rushing the process and applying additional coats before the recommended drying time is up can result in a patchy finish.
The number of hours you wait in between coats depends on the type of paint, humidity, and ventilation in the room. Check the label on your paint and the previous coat before beginning the second coat.
Latex paints need about four hours to cure. Oil based paints needs at least 24 hours. Factor in humidity and ventilation in your room.
5. Too Much or Too Little Paint
Too much or too little paint can make the ceiling look patchy. If you apply the paint too thickly it settles in certain areas giving the patchy look. Paint can build up on the edges of your roller and this makes areas look patchy.
Conversely, when you apply too little the paint is thin and also has the patchy look. It’s possible that you purchased a cheap grade of ceiling paint or maybe you used paint from a previously opened can that was watered down. In either case, the paint will be very difficult to apply and achieve an even finish.
Therefore, invest in quality equipment and paint. Then, make sure to spread the paint evenly across the entire ceiling.
6. Improper Application
Some paints say that you can apply one coat and be done. This is often a gimmick, especially if you are painting over something or not starting with quality paint.
Painters that are tired or uncomfortable often get sloppy. Poor lighting can affect how you see the ceiling, leading to patchy areas when you over or under-paint a section.
Spend the time and money to get the job done correctly the first time. Otherwise, you’ll end up spending more time to fix it later.
Those with less experience rolling a ceiling may not keep a wet edge, leaving roller marks that look patchy. Use a small, portable lamp shining up at the ceiling to ensure adequate lighting.
10 Tips to Ensure a Smooth Ceiling
Considering everything that can go wrong with a paint job can make the upcoming ceiling seem challenging. To sum it up, we recommend following these steps to ensure that your ceiling comes out looking smooth.
- Purchase the paint and equipment you need. Have everything on hand before you begin. Read the labels and instructions. Invest in quality paint and equipment.
- Prepare the surface properly. Sand, clean, rinse, dry and tape the ceiling prior to starting painting.
- Read the labels again to ensure that you are following the manufacturer’s recommendations to the tee.
- Add lighting to the room. This will help you ensure that you have ample lighting to achieve the proper finish.
- Give yourself enough time to complete the project. Don’t rush the process. Painting a ceiling can be especially challenging and you should take all of the time that you need.
- Apply a primer, if needed.
- Roll half the ceiling and keep a wet edge. Keep your rolling consistent and quick.
- Continue on with the second half of the ceiling. During the painting process, it is crucial that you keep enough paint on the roller pad. Then, spread it evenly throughout the entire ceiling.
- Never go back over an area that you’ve already painted.
- Let the first coat or primer cure for an adequate amount of time. Consult the instructions from the manufacturer to ensure that you are allowing enough time for the product to dry before proceeding.
Get it Right
Painting ceilings doesn’t have to rank high on your list of favorite jobs in order to do it well. It doesn’t take long if you have the right paint and equipment. Although most people don’t spend a lot of time staring at the ceiling, they will notice a streaked or patchy paint job.
Many issues can be fixed with the necessary preparation work. This includes sanding down any old paint, cleaning the surface, especially one that was sanded, and applying a quality primer.
Follow the manufacturer’s guidelines on the amount of time that primer and paint need to cure. Work quickly yet carefully to ensure that wet and dry paint areas aren’t mixed. Always paint the ceilings before the walls.
Related Questions
How do you fix blotchy paint?
If the damage is already done, there are steps you can take to correct the patchy paint job. For especially thick areas of patchiness, you may need to do some sanding to even out the surface prior to painting. If the patchiness only occurs in a few areas, you may only need to perform a touch-up job. This is especially true if the ceiling was recently painted. However, if it’s been awhile, you should apply a fresh coat over the entire room, as a simple spot paint job will stand out.
How long does my ceiling paint last?
A job done correctly will last about 10 years. Start with quality products and keep your home clean and well maintained for best results.
How long does it take to paint a ceiling?
It should take 30 minutes per coat in a standard-sized, 12 by 12 room, not including prep time. Remember to let each coat cure.
Should I paint back and forth or in one direction?
Always paint in one direction. It improves the quality of your paint job.
Where do I start painting a ceiling?
Start your ceiling in a corner. Use a trim brush to paint a two-inch edge and then move to a roller.
Do You Need to Hire a Paint Contractor?
Get free, zero-commitment quotes from pro contractors near you.
What We Learned
Hire a professional if you are a do-it-yourselfer that feels overwhelmed by getting the ceiling painted right. Your time and frustration level could be worth more than the expense of paying someone.
Details matter when you’re painting a ceiling. If you pay attention to the details it’s easy to avoid a patchy look. If you can avoid these common problems your ceiling job should leave you feeling proud and satisfied.
Related Guides

We are a team of passionate homeowners, home improvement pros, and DIY enthusiasts who enjoy sharing home improvement, housekeeping, decorating, and more with other homeowners! Whether you're looking for a step-by-step guide on fixing an appliance or the cost of installing a fence, we've here to help.
More by Upgraded Home Team


![10 Most Dangerous Neighborhoods in Baltimore [Updated]](https://cdn-fastly.upgradedhome.com/media/2023/07/31/9075655/10-most-dangerous-neighborhoods-in-baltimore-updated.jpg?size=350x220)

![Cost To Drill A Well [Pricing Per Foot & Cost By State]](https://cdn-fastly.upgradedhome.com/media/2023/07/31/9074980/cost-to-drill-a-well-pricing-per-foot-cost-by-state.jpg?size=350x220)
