What Size Trowel To Use For 3″x6" Subway Tile?
Thoughtful interior design makes a house feel much more like home. Tile is a popular option for beautiful flooring and walls. Subway tile looks especially nice in many homes, with a variety of colors and finishes to choose from.
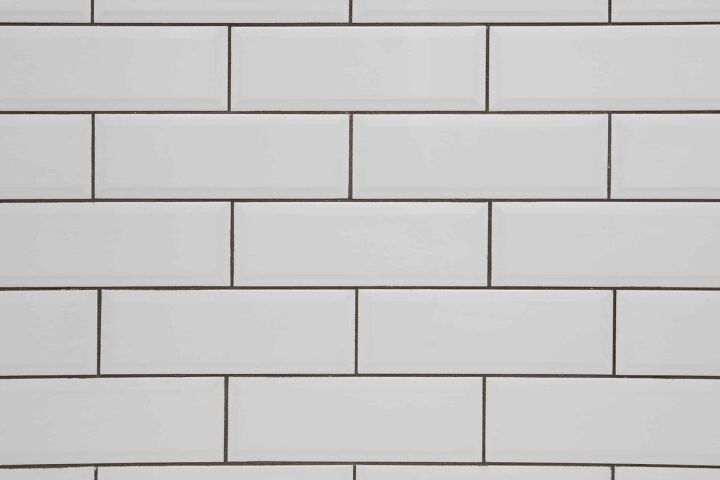
When laying subway tiles, it’s important to use the right-sized trowel. A trowel is a handheld tool with a flat, slightly pointed blade used to install tiles with just enough mortar. The proper trowel size for 3”x6” subway tile is a 1/4 inch square notch tile trowel.
There are several different subway tile and trowel sizes and designs available. However, 3” x 6” subway tile is one of the most common. It needs to be installed with the right trowel to ensure a clean, straight look.
Without a decent trowel technique, you could have a mediocre tile job that needs to be redone.
Tile Trowel Basics
Trowels are used across a variety of home improvement projects and materials, including bricks, concrete, synthetic flooring, and swimming pools. A tile trowel has a handle and a flat steel blade used to level, spread and shape mortar onto tiles.
Once you spread just enough mortar on the tile with the trowel, you can place the tile in position. Whether it’s for the wall or floor, a trowel is a go-to tool for any tiling project.
The ¼ inch square notch trowel is most widely used across the tiling industry. This size works best for small mosaic and ceramic tiles such as 3” x 6” subway tile. The key purpose of a trowel is to produce a smooth, tidy surface for tile installation.
Factors to Keep in Mind When Selecting a Trowel
When preparing for a home tile project, there are several steps you should take to select the right trowel. This includes:
- Confirm your tile size. 3” x 6” subway tile is one of the easiest to work with and likely widely available from tile providers.
- Understand trowel measurements. Trowel measurements are based on the length and depth as well as space between notches or teeth.
- Think about notches. The ¼ inch square notch is preferred for 3” x 6” subway tile. However, there are also U and V notches, although they aren’t used as much for tile.
- Consider versatility. One of the best things about buying a ¼ inch square is that it can be used for many projects. This square notch trowel is a trusted solution for cement flooring boards and home heating membranes.
Video: Selecting the Right Trowel
Additional Trowel Sizes
If your project involves more than one size of subway tile, you may want to think about other trowel sizes. This is true if you are redoing both tile floors and walls. Sometimes having more than one trowel on hand is helpful.
Here are some of the other trowel sizes to put on your radar in addition to the 1/4’’ x 1/4’’ square notch.
- 1/4’’ x 1/4’’ U notch – ideal for uncoupling membrane used to minimize stress between tile and substrate.
- 1/8’’ x 1/8’’ notch – this is used more for installing thin protective membranes rather than tile. Anything smaller than this is used for glues instead of mortar.
- 1/4’’ x 3/8’’ square notch – this is a slightly larger version for bigger subway tiles and square floor tiles. 4” x 12” subway tiles can be installed with this size trowel.
- 1/4’’ x 1/2’’ square notch – this trowel can be used for 12” x 12” up to 16” x 16” tiles.
- 1/2’’ x 1/2’’ square notch – this is a good choice for even larger tiles like 24” x 24”.
Along with all these measurements, remember that there are also Euro and slant notches. These are not as common but may work well for more comprehensive coverage and minimal air pockets.
Planning for Your Tile Project
It’s important to be on the mark with all your measurements for your next tile project. Properly measuring the space for tiling and troweling is a good place to start. Here are some other steps you should take before beginning work on your new tile project.
- Evaluate the size and thickness of your chosen tile.
- Examine the grooves on the back of the tile to see how big and deep they are.
- Consider what surface you’re putting the tile over, whether it be cement, plywood, or a different substrate.
- Check the consistency of the mortar you plan to use.
By thinking about all of these things, you can ensure you have the right tools. This means you will be ready to go and all set up to achieve the ideal mortar to tile ratio. You want enough mortar to keep the tiles in place without overdoing it with unsightly mortar buildup.
Tips for Using the Best Trowel and Mortar
The efficient use of a trowel ensures an even layer of mortar for smooth and stylish tile installation. Tiling is much easier with a level surface. Mortar bonds to the tile and the substrate to support the tiling job for years to come.
To make the most of your trowel and tile, don’t forget these helpful hints:
- Make sure you evenly spread mortar all the way to the layout line. Failure to do so could lead to tile troubles in the future.
- Trowel left to right. Place the tile in the mortar and move back and forth at a right angle to the ridges. This eliminates voids in the mortar for optimal tile support.
- Check the chalk lines between tiles for any missing mortar. Take your time and double-check to get the most complete trowel job possible.
- If you have any doubts about your tile or trowel products, ask the supplier. Most tiles come with instructions on troweling and mortar that should help you get the best results.
The Verdict for 3” x 6” Subway Tile
Recent studies show an average home value increase of 56% of remodeling costs. You can get the most out of your remodel project by making smart and sustainable style choices. Subway tile is certainly no exception.
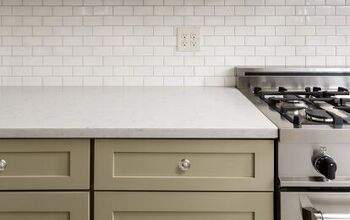
What’s great about subway tile is the array of colors and finishes to choose from. While white subway tile is widely recognized, you can find it in all your favorite colors.
If you’re looking for a bright pop of green, blue, red, or grey, subway tile works nicely. Glass subway tiles are popular too.
Your kitchen, bathroom, or living area is bound to look gorgeous with stylish 3” x 6” subway tile. Just make sure you get the right size trowel before beginning.
A 1/4’’ x 1/4’’ square notch will work best for 3” x 6” subway tile. With a solid troweling technique, you can expect a flat, even surface for prime tiling conditions.
Related Questions
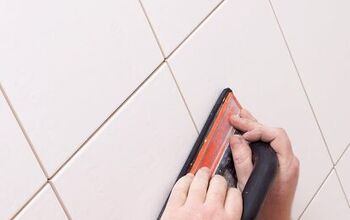
What grout line size do you need for 3” x 6” subway tile?
Choosing the right grout line size is always important for your subway tile project. A 1/16” grout line is most commonly used for 3” x 6” subway tile, particularly when covering walls. You can also use 1/8” for a slightly thicker grout line. Keep in mind that thinner grout lines work better with unsanded grout, especially for delicate glass and ceramic tiles.
Where can you use subway tile?
The interior design possibilities are well and truly endless with a classic choice like subway tile. Named for the famous underground city subway system, these tiles are a welcome choice for kitchen and bathroom backsplash corners. Subway tiles are also used for shower walls, fireplaces, and accent features.
Related Guides

We are a team of passionate homeowners, home improvement pros, and DIY enthusiasts who enjoy sharing home improvement, housekeeping, decorating, and more with other homeowners! Whether you're looking for a step-by-step guide on fixing an appliance or the cost of installing a fence, we've here to help.
More by Upgraded Home Team


![10 Best Electric Pressure Washers – [2022 Reviews & Guide]](https://cdn-fastly.upgradedhome.com/media/2023/07/31/9070600/10-best-electric-pressure-washers-2022-reviews-guide.jpg?size=350x220)