What Size Trowel For 6×24 Tiles? (Here Are the Details)

You are ready to tackle that tile job. It may be the floor of the laundry room or the tub surround in a bathroom. You have selected the tile and everything is ready. There remains one small issue. What size trowel should you use for the 6×24 inch tile you have chosen?
What size trowel is appropriate for a 6×24 inch tile? In general, the industry recommendation is to use a ¼” by ¼” U or square notched trowel for any tile larger than 16”. Both the tile manufacturer and the thin-set manufacturer may have recommendations on the size of the trowel. Read both for the best advice.
Many other considerations affect the size of the trowel to use when laying any tile. Some of these include:
- Warpage or cupping of the tile
- The substrate
- The thin-set you chose
- You personal preference
Understanding these factors is key to choosing the proper trowel size for any tile job. Familiarity with the concepts of tile and thin-set is also useful for judging which trowel size works better for you.
The Goal – Level and Tight Tile
The goal of any tile job is to have a tight and level surface at the end of the project. Part of achieving this goal is achieved by
- Using the proper tool
- Apply the right thin-set
- Using the proper amount of thin-set
It shouldn’t surprise you that choosing the right tool makes applying the right amount of thin-set much easier. Choosing the proper tool involves understanding how trowels work and who thin-set behaves.
For more information about other tools you may need to complete your project, follow this link.
Trowels – V-shape, U-shape, or Notched?
Thins-set mortar trowels come in three common configurations. The first decision is which shape of the trowel is best for your tile application. There is no set or standard criteria. For the most part, the trowel style is a personal choice.
V-Shaped Trowels – The Sawtooth Selection
V-notch trowels do look like a saw blade. A v-notch trowel by design delivers less thin-set to the surface than any of the other styles of trowels. A smaller amount of mortar makes the v-notch trowel an excellent choice of laying or hanging small tiles.
If you are installing tile less than 2 inches square or are creating a mosaic pattern, a v-notched trowel is a great choice. V-notch trowel sizing measures the distance between each of the pointed tips of the v-shape notch.
U-Shaped Notches – Bigger Tile and More Thin-Set
When tile sizes go over four inches square, it is time to move to a U-notch or square notch trowel. Many home DIY-ers prefer a U-notched trowel for several reasons
- It is easier to control the squeeze out of thin-set into grout lines with a u-notch trowel
- U-notched trowels typically have more space between the notches than square notched trowels
- A u-shaped thin-set ridge tends to spread out rather than fold over when placing a tile
Square Notched Tile – The Vertical Solution
If your project involves hanging tile vertically on a wall or other surface, a square notched trowel is a better selection. By selecting a wider and shallower trowel notch, you can maintain a good standing ridge on a vertical surface.
The shorter but wider thin-set ridge will remain standing yet still provide the proper depth of thin-set behind the tile for good adhesion. The smaller and wider ridges help solve the problem with squeeze out between the tiles into the grout lines as well.
Thin-set and Tile – Getting the Proper Coverage
When setting tile on a floor or vertically, the key is having the right thin-set coverage between the substrate and the tile. Thin-set should be applied so that:
- For floors some wall installations, there must be at least 80% coverage of the contact area of the tile and substrate.
- For bathtub surrounds and shower enclosures, the coverage should be at least 95%
- In any case, the corners of the tiles should be supported fully by thin-set (ANSI A 108.5 3.3.2)
Getting the proper coverage between the tile and the substrate may take a bit of trial and error. Your method and skill at applying the thin-set can be a big factor in how your coverage works.
Thin-Set Depth, How Deep Should the Notches Be?
In general, you should have 3/32nds of an inch of thin-set between the back of the tile and the substrate. Three-thirty-seconds is the minimum depth. In some cases, a deeper, thin-set layer makes sense.
Warpage – When Things Don’t Line Up
Some types of tile are prone to warpage or cuppage. Warpage occurs while firing the tile. Some warpage doesn’t necessarily make the tile un-useable. It does, however, mean you should allow for these variations in the thickness of your thin-set.
Placing a sampling of your tiles back to back is a quick way to check for warpage. If the tiles meet up neatly when placed back to back, the warpage is not a factor. If there are noticeable gaps between the tiles, you must allow for this when applying your thin-set.
If you notice the warpage, measure the gap between the tiles and divide that distance in half. If the gap is ¼’, then you will need to allow an additional 1/8” to the depth of your thin-set to compensate for the warpage.
Setting a Proper Thin-Set Bed
It is vital to have a proper thin-set bond between your tile and substrate. A proper thin-set layer involves several steps.
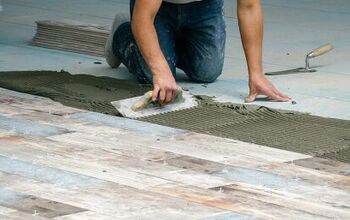
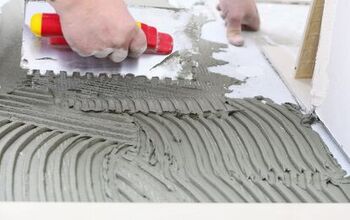
Step 1 – Key in the Thin-Set
Keying-in your thin-set by using the flat or straight side of your trowel to spread a thin layer of thin-set over the substrate. The goal is to force the thin-set into the surface of the substrate creating a tight bond.
Step 2 – Add More Thin-Set and Comb the Surface
Add enough more thin-set to your work area to create the depth of the thin-set you want under your tile. Comb the thin-set in straight lines, following your chalk lines and running the thin-set to the edge. You should pay particular attention to the corners to ensure a tight bond in these areas.
Step 3 – The Direction Matters
If you are laying rectangular tile, especially plank-style tiles, your ridgelines should run across the narrow dimension of the tile. This orientation allows air to escape more easily and helps prevent bubbles and voids in the contact area.
Step 4 – Watch the Edges and Corners
More problems occur along the edges and the corners than anywhere else on the tile. Many DIY’ers skimp along the edges and in the corners to minimize grout getting into the grout joints. Skimping in the thin-set along the edges and corners can leave voids and gaps in the thin-set, leading to collapsed or broken tile.
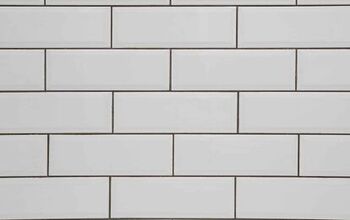
Choosing the Right Trowel For Your 6×24 Inch Tile
Following a few simple guidelines can get you much closer to your goal of a tight, level tile floor or wall. In most cases, a ¼” by ¼” square notch tile is suitable for laying or hanging your 6×24 inch tile. In all cases, follow the tile and thin-set manufacturer’s recommendations. These tips and tricks should make the job go smoothly.
Related Guides

Dennis is a retired firefighter with an extensive background in construction, home improvement, and remodeling. He worked in the trades part-time while serving as an active firefighter. On his retirement, he started a remodeling and home repair business, which he ran for several years.
More by Dennis Howard