What Is A Split Jamb Door Frame? (Find Out Now!)

Homeowners have numerous options to choose from when it comes to installing new doors. You can select a new door based on your design or material preferences. Even the type of hardware that goes along with the door can factor into your decision-making process.
The split jamb doors stand out precisely because they have a more unconventional design. It’s not novelty just for novelty’s sake, however. There are real reasons why a split jamb door could be a more sensible addition to your home.
Split jamb doors are split in half lengthwise, but they can fit together during installation thanks to the tongue-in-groove joint. The unconventional design of the split jamb door makes it easier to install along walls that may feature unusual qualities. The split jamb doors may also offer more stability compared to more conventional doors when installed along certain spots.
Installing a door can turn into a more manageable project especially if you pick the right type of door. Learn more about split jamb doors in this article and see if it could be the exact addition you need.
You can also learn more about the different parts of a door frame by referring to 23+ Parts of a Door Frame.
What Makes a Split Jamb Door Different?
We want to make our tasks as easy as possible. Whether they are tasks related to our job or to improve our home, we want them to be very manageable. A big part of the reason why pre-hung doors have become so popular is because of how convenient they are. So much of the work that goes into the installation is handled ahead of time if you’re using a pre-hung door.
Now, when browsing through the selection of pre-hung doors, you will have a choice to make. You can either go with the more conventional pre-hung doors or pick out a split jamb door. Think carefully about the decision you’re making here because it can make a real difference during installation.
The split jamb door is designed differently from the standard pre-hung door options. As its name suggests, the jamb on the aforementioned item is split evenly lengthwise prior to installation. For those who may be unaware, the jamb refers to the sides of the door frame. They include the vertical portions of the frame as well as the horizontal piece that connects the two sides together.
Most pre-hung doors have one solid jamb. You slide that jamb into your doorway, get it into position, and install it later on. Split jamb doors are different because the frame is divided into two pieces.
Homeowners will have to rely on a tongue-in-groove joint to put the split jamb door together. Don’t worry about that joint though. As long as the door is well designed, sliding the two ends of the joint together won’t be an issue.
Benefits of Using a Split Jamb Door
Why should you choose a split jamb door over a typical pre-hung door? Allow us to highlight some of the top benefits of doing so below.
Split Jamb Doors Are More Versatile
Versatility is probably the main reason why people prefer split jamb doors. Not all types of pre-hung doors may fit over the open doorway you have at home. That is likely going to be the case if the open doorway is thicker or slimmer than usual.
Split jamb doors are preferable in that regard because they are able to fit on top of more doorways. You can adjust them in ways that will make them thicker or thinner depending on what you need.
Split Jamb Doors Can Be Installed Faster
Since there are two jamb pieces to manage, you may have assumed that split jamb doors take longer to install. It’s easy to understand why someone would make that assumption, but that’s not the case. If anything, the split jamb design actually speeds up the installation process.
Whether it’s lining up the door or placing shims, those things take faster with split jamb doors. It turns out that splitting the frame into two pieces can make the door easier to work with.
Split Jamb Doors Are More Accessible for DIYers
When installing conventional pre-hung doors, homeowners typically have to add some casing to finish the job. Adding that casing is easy for carpenters and experienced hobbyists. However, that is harder to pull off if you’re still new to this kind of project.
Split jamb doors don’t require you to put in that added work. Because of how they are designed, manufacturers can add casing to both sides of the split jamb. Once the split jamb door is in the right position, you don’t have to add anything else to it.
Disadvantages of Using a Split Jamb Door
There are also some disadvantages to installing a split jamb door in your home. Check them out to see if they could be potential deal-breakers for you.
Split Jamb Doors Don’t Always Produce a Flush Finish
This is probably the biggest complaint homeowners have about split jamb doors. Once you’re done installing the door, you may notice that it is jutting out slightly. That slight misalignment is often a byproduct of its design.
The misalignment is not always noticeable and it may not even appear at times. If you don’t think something like that will be an issue, go ahead and install the split jamb door.
Parts of the Split Jamb Door Are More Susceptible to Damage
More parts of the split jamb door are exposed. That is not necessarily a bad thing. Still, it does leave more elements of the door susceptible to damage. Split jamb doors are very durable in general. Even so, a freak accident could cause more structural issues if you’re using a split jamb door.
How to Install a Split Jamb Door
Installing the split jamb door is a task many homeowners can handle on their own. Follow the steps detailed below to ensure that the installation of your new split jamb door goes smoothly.
Step 1: Take the Required Measurements
Before you focus on installing your new split jamb door, you will first have to take some measurements. This is easier to do if an old door is still in place. Simply reference the measurements of that existing door while shopping for a replacement.
If the old door has already been removed, you need to use other measurements instead. Measure the jamb width and the rough opening to ensure your new door will fit. Remember to remove the interior trim before measuring the rough opening since you’re using a pre-hung door.
Step 2: Prepare Your Tools
For this job, you will need a level, a nail gun, a claw hammer, a screwdriver, a hacksaw, and shims. Also, prepare some nails and screws that are two and a half inches in size. You’ll need them to secure the split jamb door later on.
Step 3: Examine How Level the Floor of the Doorway Is
Grab the level and use it to examine the floor of the doorway. Hopefully, the tool you used will reveal that the ground is perfectly level. In that case, you can proceed to the next step.
If the ground is not level, you’ll have to make alterations to your split jamb door. Trim the longer side of the door so it sits level with the ground. You can use a circular saw to cut the split jamb door down to size.
Step 4: Check How the Split Jamb Door Fits the Opening
Take the side of the split jamb door with the hinges and line that up along the doorway. Make sure the hinges are in the right spot when doing so. Keep tweaking the positioning of the door until it gets to the right spot.
Step 5: Nail the Door and One of the Jambs in Place
Once you’re satisfied with how the door and jamb line up with the doorway, you can nail it in place. Look for the nail or other fastener the manufacturer used to connect the door and the jamb. Remove the fastener in question by using the appropriate tool.
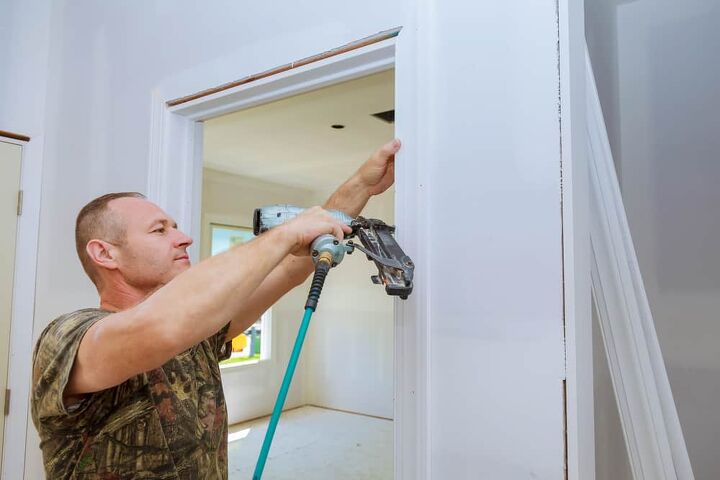
Get your nail gun after that. Drive a nail into where the fastener used to be to put the door in place.
Step 6: Connect the Casing to the Door
You can now proceed to connect the casing to the door. Use the nail gun again to put the casing, the jamb, and the door together.
Step 7: Cut the Door Free
Go to the spot where the doorknob should be and look for the nail there. Pick up your hacksaw next and start cutting through the nail. You can start swinging the door open after the nail is removed.
Step 8: Use Shims to Prepare for the Other Part of the Split Jamb
It’s not always necessary, but using shims can help you add the other part of the split door later on. The shims are only really needed to keep the jamb in the same position. If you are going to use shims, keep them away from the grooves. They could block the other part of the split door if you locate them poorly.
Step 9: Finish by Adding the Other Half of the Split Door
All that’s left to do now is to add the other half of the split door. Line it up with a jamb already in place and start nailing it in. Don’t forget to screw through the hinges as well to secure the connections.
Related Questions
Should You Use a Split or Flat Jamb Door for Your Doorway?
The type of doorway you have should dictate which type of pre-hung door to use. Flat jamb doors work for conventionally shaped doorways. Meanwhile, split jamb doors are best suited for irregularly shaped openings.Do note though that split jamb doors pretty much work on any kind of doorway. You can err on the side caution by going with a split jamb door.
How Do You Fill Excess Nail Holes Left Behind after Installing the Split Jamb Door?
You may find some extra nail holes present after installing the split jamb door. There’s no need to add nails if the setup is already secure. Simply fill those extra holes in with putty and paint over them to keep them concealed.
More Related Guides

Gary Evans is passionate about home improvement. He loves finding out how to make improvements in the easiest, most practical, and most affordable ways. Upgrading his home kitchen is one of his ongoing hobbies. Gary is also a long-time content creator and enjoys spending his free time tending to his hydroponic vegetable garden.
More by Gary Evans








![12 Washing Machine Brands to Avoid [with Recall Data]](https://cdn-fastly.upgradedhome.com/media/2023/07/31/9075781/12-washing-machine-brands-to-avoid-with-recall-data.jpg?size=350x220)




![How To Reset A Whirlpool Cabrio Washer [In 5 Easy Steps!]](https://cdn-fastly.upgradedhome.com/media/2023/07/31/9076531/how-to-reset-a-whirlpool-cabrio-washer-in-5-easy-steps.jpg?size=350x220)

