7+ Different Types of Drywall (with Photos)
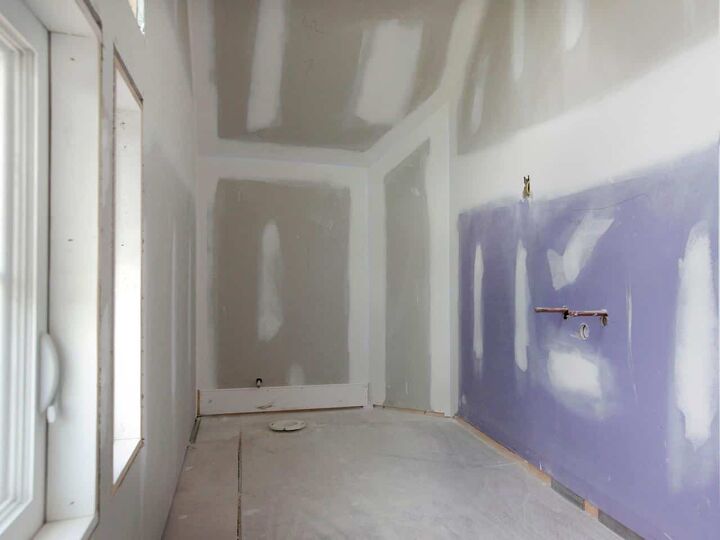
We are surrounded by drywall every day. It is in our homes, offices, and each store we visit on a daily basis. In fact, no interior construction job is complete without drywall. Frequently referred to as Sheetrock, plasterboard, wallboard, gyp board, or gypsum board, this lightweight building material is available in panels and fastens easily to studs, creating walls or ceilings
Drywall is basically the modern alternative to hand-applied wall plaster and has replaced plaster almost completely in new home construction. When looking for a material to cover the framing on your interior walls and ceilings, nothing quite beats the relatively low cost and DIY-friendly nature of drywall.
Depending on the placement and application, there are many different types of drywall to choose from. Aside from regular drywall, or whiteboard, some other variations include moisture-resistant drywall, mold-resistant drywall, fire-resistant drywall, soundproof drywall, and eco-friendly drywall. Continue reading for our comprehensive guide on types of drywall, including drywall sizes, thicknesses, and more.
Do You Need to Hire Drywall Installers?
Get free, zero-commitment quotes from pro contractors near you.

What is Drywall?
In short, drywall is a building material that is used to create interior walls and ceilings in construction. Though, it can also be used to craft a range of design features including arches, eaves, and other architectural elements. One of the major benefits of drywall is that it is simple to install and can be done pretty quickly. It’s also known for being incredibly durable, requiring only very simple repairs when damage occurs.
Drywall comes in flat panels made from gypsum plaster that is sandwiched between two thick sheets of paper. It can be adhered to wood or metal studs using screws or nails. In commercial construction, drywall is used for wrapping columns to hide steel beams. It also serves as a cheap and easy way to top off masonry walls above ceilings.
When you choose a specific type of drywall, the material can be used to add fire resistance to walls and ceilings. This will help to contain the spread of fire so that occupants can safely exit in case of an emergency. For hundreds of years prior to when drywall became widely used, structure interiors were made using plaster. However, the installation process of plaster is incredibly labor-intensive, time-consuming, and requires skilled craftsmen, which is why drywall has become a universally favored construction material.
Sheetrock is a particular brand of drywall sheets. Though, the terms Sheetrock and drywall are typically used interchangeably.
How is Drywall Made?
Plaster (and plaster of Paris) and drywall have the same primary ingredient: gypsum. Gypsum is a natural, harmless mineral, mined in approximately 86 countries across the globe, including the United States. Chemically, the mineral is made up of water, calcium, and sulfur bound to oxygen. After they are mined, gypsum crystals are crushed into a fine, white powder that, when mixed with water, forms a solid mass.
Aside from mined natural gypsum, drywall may also be made out of “synthetic” gypsum. The synthetic variety derives from flue-gas desulfurization (FGD), the practice of cleaning smokestacks in coal-burning power plants.
A singular panel of drywall is comprised of a gypsum core that is wrapped in several layers of thick paper, usually recycled. The manufacturing process involves a slurry of condensed liquid gypsum being poured onto uninterrupted sheets of paper. Then, a layer of aerated gypsum makes up the center, while another dense layer of liquid gypsum is placed over top. Finally, more thick paper sandwiches all of the layers together.
The drywall sheets are extruded to yield identical thickness and also to form a taper on all the long edges. Whereas, the short edges are cut according to the specified lengths of the panels. The face paper refers to the front sheet on the panel and it is typically white. The back paper, on the other hand, is most often a light brown shade, similar to butcher paper.
Drywall Terminology
Before we proceed with describing the various types of drywall available, it’s important to understand some of the terminology associated with this building material. Like many other construction products, drywall goes by many other names. Arguably the most well-known in the bunch is Sheetrock, a brand name for drywall that is made by the United States Gypsum Company (USG).
Other popular generic names for drywall that you may come across include wallboard, plasterboard, and, more officially, gypsum panels and gypsum board. In the various building trades, the term “drywall” is used as both a verb and a noun. The tapered edges on drywall panels are known as the “factory” edges, while the squared-off ends are referred to as “butt” edges.”
Finally, drywall joint compound, an essential material you’ll need to install drywall panels is called “drywall mud” or just “mud.” This compound is used to cover the joints between panels, creating a seamless appearance.
Types of Drywall
Although regular drywall may work well for most applications, there are many different types that are better suited for specific circumstances. In fact, if you want your drywall to last many years, it’s important that you choose the right type for your particular project. Generally speaking, there are about seven main types of drywall available for a variety of applications.
1. Standard Drywall or White Board
Standard drywall, or whiteboard, is typically white on one side and brown on the other. It does not include any additional features in the design, like the other options. With that said, regular drywall isn’t inferior to other variations, it simply has special additions.
For instance, standard drywall is naturally fire-resistant, as the water molecules in the gypsum will help to slow the spread of the fire. However, the drywall isn’t enhanced with other materials like fire-resistant drywall is.
This type of drywall is very popular for interior residential construction. It is suitable for both walls, ceilings, and for finishing basements. Standard drywall is also the most common type used, typically found in four-by-eight-foot panels.
2. Moisture Resistant Drywall
Unfortunately, water damage can be a very common occurrence when you’re a homeowner. However, moisture-resistant drywall consists of a specialized coating that helps to minimize the extent of damage when it occurs. This type of drywall is ideal for use in bathrooms, kitchens, or any other spot in the home that is situated near water pipes or is especially humid.
The backing on moisture-resistant drywall is paperless, in addition to the extra coating that helps prevent moisture and mold. You’ll want to use this type of drywall in basements, bathrooms, kitchens, laundry rooms, and utility rooms. However, in very high-moisture areas like showers and shower enclosures, you should go a step further and use cement backer board.
This drywall typically has a green covering and tends to be somewhat more expensive than its standard counterpart. Though, it’s important to note that moisture-resistant drywall is not waterproof, which is why you’ll want to use cement backer board in areas that come into direct contact with water.
Moisture-resistant drywall may also be referred to as cement board, greenboard, or indoor tile backer board. You may also encounter blueboard when you’re searching for moisture-resistant drywall, though this is a different product that is coated with a veneer plaster.
3. Fire Resistant Drywall
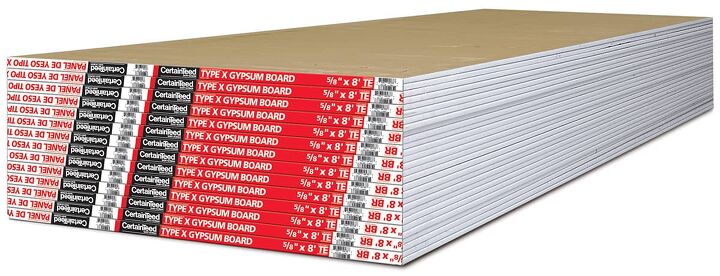
Also referred to as Type X, fireboard, or X board, fire-resistant drywall is typically used in garages, apartment buildings, utility rooms, and any areas that are near a wood stove or furnace. In fact, this type of drywall is often required by many building codes. It is constructed out of special non-combustible fibers in an extra-thick design, providing fire-resistant beyond all other kinds of drywall.
Fire-resistant drywall generates less smoke than standard drywall, helps to prevent both the speed and spread of flames, and also offers enhanced room-to-room soundproofing. It is also often harder to cut and work with that regular drywall. To achieve a higher fire rating, you can combine several thicknesses of this type of drywall in layers.
In order to be designated a “Type X” drywall, the gypsum board must possess at least a one-hour fire-resistance rating for a 5/8-inch panel or a ¾-hour rating for a ½-inch panel in a single layer, nailed to load-bearing wood framing.
4. Mold Resistant Drywall
Like moisture-resistant drywall, mold-resistant drywall consists of a paperless backing and a special coating. Both of these additional features help to limit the build-up of mold in moist or high-humidity areas. It essentially offers the same benefits as standard drywall, with the added bonus of both moisture and mold-resistant properties.
Often referred to as purple drywall, this gypsum board can be sued with all ceiling and wall applications. Though, it is most suited for areas where enhanced moisture and mold resistance are necessary. Mold-resistant drywall is a great choice for bathrooms and kitchens, especially in areas that will be in direct contact with water.
5. Paperless Drywall
Paperless drywall is, very quickly, starting to replace conventional paper-backed drywall. Instead of being covered in paper, this type of drywall is coated in fiberglass which protects the panels from rot and provides an enhanced resistance to mold and mildew. As a result, paperless drywall can also be considered moisture- and mold-resistant drywall.
When compared to standard drywall, paperless drywall is slightly tougher in terms of quality. Though, many professionals find this variety easier to cut. This drywall has some minor texturing to the surface that will require a joint compound to help achieve a smooth, clean, and level drywall finish. It is recommended to be used in kitchens, bathrooms, and any other areas that are susceptible to moisture and humidity.
6. Soundproof Drywall
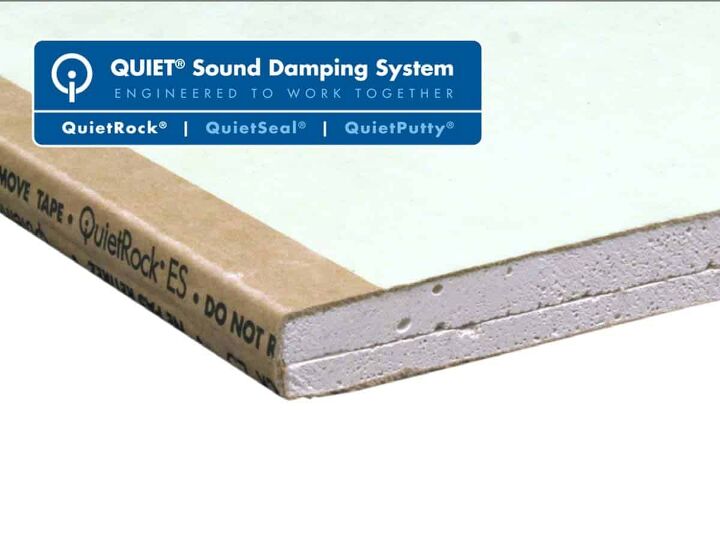
Soundproof drywall is, as the name suggests, a soundproof type of gypsum board. It is specially designed to reduce the noise that travels through walls. This type of drywall is thicker than most regular varieties and typically has two gypsum layers adhered together with a special noise-dampening glue. It also consists of a laminated drywall mix of gypsum, wood fibers, and polymers that increase the sound transmission class, or STC.
Since soundproof drywall is denser than standard versions, it can often be more difficult to cut. However, you can find options that are as thin as ½-inch or as thick as 5/8-inch, depending on the application. Because of its soundproofing abilities, it is typically used in areas where noise is an issue or silence is required in a particular room. You may find soundproofing drywalls used in family room walls, or if you are a musician, it can be an ideal choice for your music room.
You can achieve a similar soundproofing effect by adhering two sheets of drywall together yourself. However, two sheets of drywall are going to be considerably thicker and take up more space than a single sheet of soundproof drywall. For optimal soundproofing, use a combination of soundproof drywall and fiberglass insulation.
A popular brand of soundproofing drywall is called QuietRock, pictured above. The manufacturer boasts that the product offers “outstanding acoustic performance without sacrificing valuable floor space.”
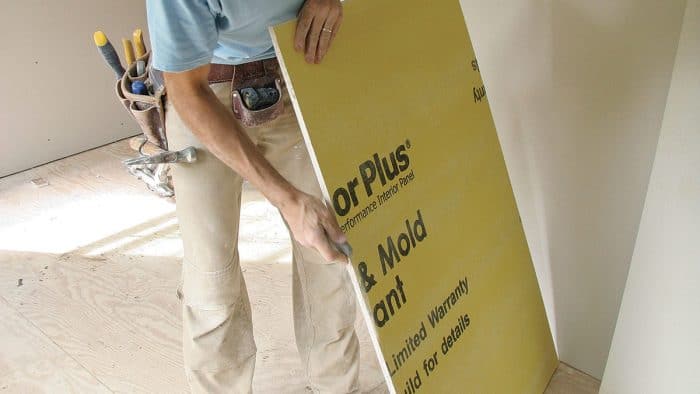
7. Eco-Friendly Drywall
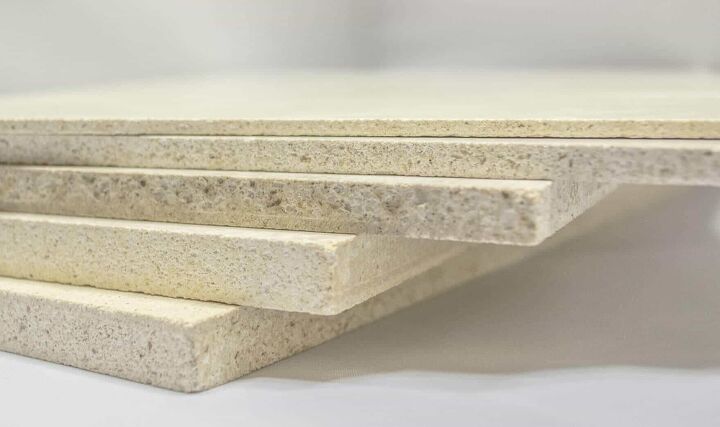
There are many eco-friendly drywall options available as well. These products are made using recycled materials to create a drywall board that looks similar to concrete. They are also manufactured in an environmentally-friendly way.
One such product is called MgO board, developed by ExtremeGreen. This type of wallboard is manufactured using 50% less energy than traditional drywall. It is also made of non-toxic ingredients, plant nutrients, and is a recyclable product. Even if it were to end up in a landfill one day, it won’t leech harmful chemicals into the soil or water supply.
Of course, this isn’t the only eco-friendly drywall out there. EnviroBoard is another option that is made out of waste fibers from the newspaper and agricultural industry. These fibers are compressed to form dense, concrete-like panels that can be used in the construction of walls and ceilings in both residential and commercial applications.
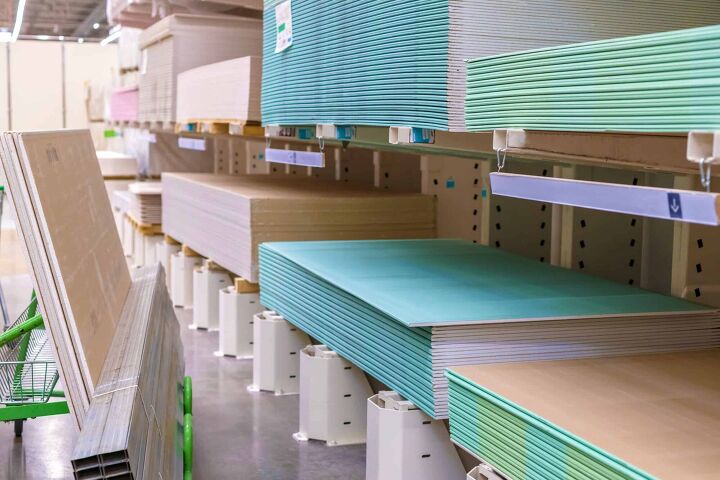
Drywall Sizes
Generally speaking, drywall comes in panels or sheets that are 4 feet wide, with lengths ranging from 8 to 16 feet. Building codes do not have any specific requirements in regard to the length and width of drywall sheets. Instead, the dimensions are determined based on the needs of the builder, architect, homeowner, or client. With that said, these are the most common drywall sizes that you’re likely to come across in your search:
1. 4-foot x 8-foot
This is the most common and versatile drywall size – 4 feet wide and 8 feet long. Since ½-thick sheets in this size will come in at roughly 57 pounds, it’s the largest sheet that most DIYers can easily carry and lift into position. It allows for both vertical and horizontal installation. In most cases, 4 x 8-foot drywall panels come in pairs – two sheets facing each other, bound with paper strips. Sandwiched together like this, many find these pairs difficult to carry on their own. To make transport easier, you can remove the binding paper and carry the panels individually.
2. 4-foot x 10-foot
Another common drywall size, 4-feet wide by 10-feet long, these panels are only slightly longer than the aforementioned option. With a thickness of ½-inch, they are often still light enough to carry and install for the average DIYer. The reason why you’d choose this size over 4 x 8-foot drywall is because it provides a smoother finishing surface on tall walls and expansive ceilings.
3. 4 x 12-foot and 4 x 16-foot
Drywall in lengths of 12 or 16 feet is ideal for tall or long walls. One of the main advantages to these longer sheets is that it’s easier to create a smooth vertical surface to meet high ceilings. The surface will be completely uninterrupted from floor to ceiling. Drywall that is 16-feet long will produce fewer butt joints than 8-feet sheets. However, working with panels this long will require several hands on deck during installation.
These are the longest lengths available, allowing you to cover more surface area with fewer panels. As a result, drywall panels that are 12-feet or 16-feet long are most suitable for great rooms or areas with high ceilings.
4. 2-foot x 2-foot
Although this isn’t technically a stock sheet size, you can find pieces of drywall that are cut-down at various big-box home improvement centers and local hardware stores. Drywall sheets in smaller lengths can be useful for patching projects or wall-boarding small alcoves and nooks in your home.
Note: When you find wall boards in widths and lengths other than multiples of 4 feet, they aren’t typically drywall panels at all. Instead, these are either cement board or another drywall alternative. Although not commonly found on the market, you can specially order drywall sheets that are 4.5-feet wide. These will not be stocked in home improvement stores and are seldom used, except by drywall professionals in special circumstances.
Drywall Thickness
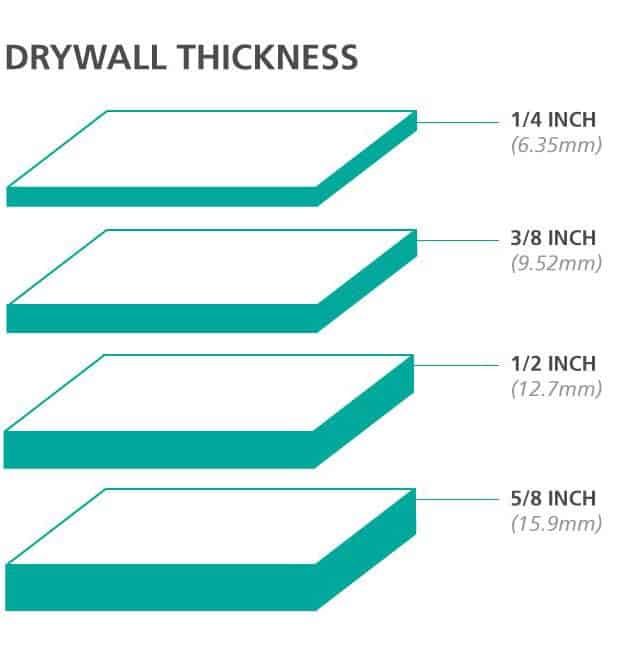
When purchasing drywall sheets, choosing the correct thickness is one of the most important considerations. Some panels are flexible and light, but prone to breaking. Whereas, thicker sheets are often required for ceilings and walls. Drywall can be found in a range of standard thicknesses, each offering a specific function and purpose. Most suppliers offer the following four options in terms of thickness:
1. 1/4-Inch Drywall
This is the thinnest and most economical of the four options. Drywall panels in this thickness are commonly used as a skimming material. They are also ideal for curved walls or for creating a new surface over pre-existing plaster. In fact, you can mount this type of drywall over any existing wall to hide blemishes and refresh the look of the surface.
¼-inch drywall panels are incredibly lightweight (only 38 pounds), and thin. This makes them very easy to handle and manipulate. However, you must use these sheets with care to prevent bending or breaking of the material.
2. 3/8-Inch Drywall
Slightly thicker than ¼-inch drywall, 3/8-inch panels are another great choice for curved walls. This thickness is also commonly used for remodeling partitions or repairing any sections of drywall that need fixing or patching.
3. 1/2-Inch Drywall
This drywall thickness is what you’re most likely going to see when you’re out shopping. In fact, a large majority of drywall panels are ½-inch thick. This thickness comes in a range of panel lengths. It is commonly used for many interior residential applications since they are easy to haul, carry, and mount. These drywall sheets can be used for both wood and steel frames.
If weight is a worry of yours, consider opting for ultra-light half-inch drywall. These sheets are 13 pounds lighter than other options, offering the same thickness and dimensions.
4. 5/8-Inch Drywall
This is the thickest drywall option available, making it ideal for most commercial construction applications. These panels are often referred to as firewall drywall, as they are fire-resistant. Their thickness makes them an excellent choice for rooms that you want to soundproof.
5/8-inch thick drywall can be used on walls, but it’s also ideal for ceiling applications as it will help prevent the risk of sagging over time. This type of drywall thickness is not common in residential applications, as it is more expensive and heavier than other alternatives.
However, you may find this drywall thickness in common walls between residential living spaces and attached garages. These areas, in addition to furnace rooms, require a fire-resistant construction. This fire resistance can be accomplished by installing 5/8-inch thick drywall panels or by using multiple layers of thinner sheets.
Drywall Materials
Fortunately, installing drywall is a cheap and simple task – even for the average DIYer. It is generally very inexpensive to tear out the existing plaster/lath or drywall in a space and re-wall it with drywall. This even considers the cost of the various drywall tools that the project requires. Aside from the specific drywall panels that your application necessitates, you will need the following materials for the installation process:
1. Joint Compound
Until a more ingenious, cleaner, and quicker way is invented to join drywall panels and also cover up holes, joint compound is a necessity. More often referred to as simply “mud,” this material is available either dry in a paper bag or ready-mixed in plastic tubs. If you are a DIYer, correctly mixing joint compound can be challenging, so you may want to go with the pre-mixed option.
Also, if you’re only drywalling a couple of rooms, there are many advantages associated with pre-mixed mud. Although the dry compound is cheaper, the cost savings is not enough compared to the efficiency.
- Low-Dust Mud: If you want to significantly reduce those annoying dust clouds that form during installation, you can opt for a low-dust joint compound. Though it costs twice as much as traditional mud, many find it well worth the price.
2. Paper Tape
You’ll need paper tape to join together sheets of drywall. When followed up with joint compound, this forms a solid connection upon drying. Since it is, as the name suggests, just paper, it’s a relatively inexpensive material to acquire. It’s also incredibly durable.
Alternatively, for a little more money, you can opt for flat fiberglass tape. This option offers a super-strong joint and self-adheres. Whereas, with paper tape, you have to place a thin layer of joint compound first for the tape to adhere properly.
Whether you choose paper or fiberglass, drywall tape serves as a joiner for most drywall connections, including:
- Joining two drywall sheets on their tapered ends.
- Joining inside corners.
- Butt-joining two drywall sheets (two flat ends, with no taper).
Paper tape is not meant to join outside corners – corner beads are used for this purpose instead.
3. Corner Beads
When it comes to walls, there are either inside or outside corners. You can use paper tape to form inside corners. When embedded, paper tape is susceptible to chipping when it’s struck by something sharp. Outside corners, more so than inside corners, are prone to strikes. This can happen by moving furniture around your home, or simply hitting the corner with a coffee mug.
Corner beads are used on the outside corners to ensure a crisp 90-degree angle, that is safe from chipping. Then, tape and joint compound are placed over top. Without corner beads, the corners in your home will look sloppy and uneven.
Depending on the type of corner bead you choose, the outermost edge of your walls may be either plastic or metal. Though, when joint compound and paint is applied, the surface is seamless.
4. Drywall Screws
If you’re renovating a home that was built before the 1980s, you may come across nails holding the drywall to the studs. Even if you’re not completely tearing down the walls, you’ve likely seen those characteristic “nail pops.” These are small circles that pop out through the paint, which can be particularly annoying.
Nail pops are the reasoning behind using drywall screws to fasten drywall to studs. While nails map pop out over time, screws will not. Although screws are more expensive than nails, they have a more secure hold as wood changes with age. For optimal grip, you’ll want to choose screws that have a coarse-thread, rather than a fine thread. Also, opt for drywall screws that are phosphate-coated to be resistant to corrosion.
The ideal length for drywall screws is 1 5/8 inches for both ½-inch and 5/8-inch thick drywall sheets. To begin, purchase about a pound of screws. That way, if they don’t work well, you won’t have just wasted a bunch of money on a giant 25 lb. box of screws. Once you decide that you like the fasteners and they work well for your project, then you can consider buying them in bulk.
Drywall Installation Tools
In addition to the aforementioned materials, there are a number of tools that you’ll need to successfully install drywall. When you arm yourself with the proper tools, the project will be much more enjoyable and easier to accomplish. We’ve outlined some of the most helpful tools for installing drywall, many of which you may already have in your collection:
- Pencil: Obviously, you’re going to want to have a pencil on hand when installing drywall. This project requires a lot of measuring and marking.
- Drywall T-Square: Unlike other squares or straight-edges you can purchase, a drywall T-square is 48-inches in length. This allows you to cut the entire width of a drywall sheet Additionally, the cross-end of the T-square fits perfectly over the drywall edge. Although this tool may be a major investment, there is no suitable substitute.
- Drywall Knife: Drywall knives are a specialized tool, meaning a traditional putty knife simply won’t work for the job. Fortunately, drywall knives are very inexpensive. The 4-inch and 6-inch drywall knife is used for slopping the joint compound in position and for taping. Whereas, the 12-inch knife is for feathering and final coats. You’ll want to get a 12-inch drywall knife and either a 4-inch or 6-inch version as well.
- Utility Knife: If you already have a utility knife in your collection, it’ll work well for your drywall installation. However, the only type that won’t work is the utility knives that have snap-off blades. For greater stability, you want a utility knife that has interchangeable blades set in a screw-down handle.
- Cordless Drill: While you can certainly rent a screw gun for efficiency, especially with major installation projects, a cordless drill works for all other types of drywall work. The ordinary 12V drill is perfectly suitable. Though, if you want more power, opt for an 18V cordless drill.
- Sanding Pole and Sheets: Sanding sheets can be found in two variations: fiberglass mesh and sheets that appear like ordinary sandpaper. You’ll want to acquire both types, one for coarse sanding and the other for finer sanding. These sheets will fit on the end of the sander using wing nuts. Then, the sander is screwed into the sanding pole. However, you can use a regular broom handle as a sanding pole since they both have the same threads.
- Drywall Sanding Sponge: The coarse side of the sanding sponge will be used for touchups, while the “sponge” side is used for dry-walling purposes and wet sanding.
- Jab Saw: A jab saw is a type of hand saw, with a sharpened tip, six-inch blade, and coarse teeth. It is virtually indispensable for cutting drywall, but basically useless for any other tasks.
How to Install Drywall
Drywall installation is a common DIY project for homeowners, as the process is easy to learn and it doesn’t require any pricey specialty tools or materials. To begin installing drywall, you first want to determine what type, size, and thickness of drywall you need, based on the information outlined above. Most home improvement stores will deliver your drywall to your home, which can be incredibly useful if the sheets are too long to fit in your vehicle.
Once you’ve acquired your drywall and the required materials, you being with the installation process – which can be broken down into three easy steps:
1. Cutting the Drywall
Start by laying out your drywall panels on a flat, dry surface. Measure the exact length that you’ll need for the install and, using a pencil, make a mark that indicates where you’ll need to make your cuts. Then, use a T-square as a guide and cut the sheets along the marks. For cutting, use a jab saw, or drywall saw.
You can make all of your cuts before you start the install, or cut the sheets as you are working. However, the latter method may take more time, but it will yield fewer mistakes and less waste. A jab saw can be especially helpful for cutting spots for light switches and electrical outlets to fit into. Whereas, a circle cutter can be beneficial if you’re working with any curved spaces.
2. Hanging the Drywall
At this point, you can begin attaching the appropriately cut drywall panels to the metal or wood studs that frame your space. When working with wood studs, you should hang the panels horizontally, while vertical installations are best suited for metal studs. This has to do with the fact that wood studs are more prone to warping and bending over time. By hanging the panels horizontally, each sheet will be in contact with more studs, minimizing deflection.
Generally speaking, it can be pretty challenging to screw into metal studs. For best results, you’ll want to use fine thread screws for these applications. If you have wood studs, you’ll want to apply joint compound onto the studs prior to hanging the drywall. This helps to further reduce the risk of deflection over time.
Then, to attach the drywall sheets to the studs, use drywall screws and either a screw gun or cordless drill. For large installations, consider renting a screw gun as it will automatically load up the next screw for whenever you’re ready to use it. Move carefully, making sure to hit the studs as you’re drilling. The screws should be placed approximately every four inches.
Do You Need to Hire Drywall Installers?
Get free, zero-commitment quotes from pro contractors near you.
3. Finishing the Drywall
Once the panels are screwed in place, it’s time to finish the drywall. This involves taping, sanding, and smearing more joint compound. Any drywall joints – seams where sheets meet, including corners – must be taped with paper tape or fiberglass drywall tape. If using paper tape, you’ll need to apply mud first so the tape has something to adhere to. Fiberglass tape, on the other hand, is self-adhesive and will have no issue sticking directly to the face of the drywall. The “tape coat” should be roughly four inches wide, and completely centered on the joints.
After you’ve taped up all of the seams, cover the tape with about two layers of joint compound. The first layer, the block coat, will hold the tape in place and should be applied with a 6-inch finish knife. Apply just enough to seal the drywall tape to the wall. The final coat, or skim coat, should be applied using a 10- or 12-inch drywall knife. Take your time with this layer to ensure that it is spread thin, creating a smooth, flat surface.
At this point, you’ll need to wait approximately 24 hours for the joint compound to dry before you can begin sanding. Once dry, use a pole sander and 120-grit sandpaper to gently sand the mud. You’re done sanding when there is no visible tape or joint compound bulges on the surface of the wall. Also, applying a level will reveal that the wall is even and smooth.

Jessica considers herself a home improvement and design enthusiast. She grew up surrounded by constant home improvement projects and owes most of what she knows to helping her dad renovate her childhood home. Being a Los Angeles resident, Jessica spends a lot of her time looking for her next DIY project and sharing her love for home design.
More by Jessica Stone