Sprinkler Anti Siphon Valve Leaking? (Possible Causes & Fixes)

Plumbing improvements have come a long way throughout the years. For the most part, the average person doesn’t really know about them or even think about them, but they exist to help improve the way that our home plumbing works.
One innovation is the anti-siphon valve on sprinklers and water spigots. Most plumbing codes now require outdoor faucets and irrigation systems to have them. From time to time, the valve can leak. The most common reason is dirt in the valve, preventing the poppet from sealing. You could also be facing a worn gasket or poppet.
Do You Need to Hire a Sprinkler System Contractor?
Get free, zero-commitment quotes from pro contractors near you.

What is the Purpose of the Anti-Siphon Valve?
As stated above, most municipal plumbing codes require the installation of an anti-siphon valve. This is a requirement for both outdoor faucets and irrigation systems. The goal is to normalize the pressure inside of the pipes when the water is turned off.
The anti-siphon valve prevents water from flowing backward into the pipe. For outdoor faucets, it allows any residual water trapped in the faucet to drain. This helps to keep the pipe and faucet from getting damaged by frozen water when winter comes. The good news is that leaks are pretty easy to not only identify, but to repair as well.
How Does the Anti-Siphon Valve Work?
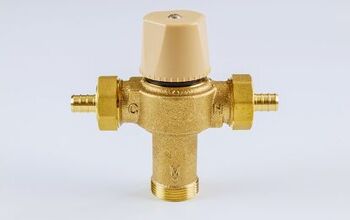
The good news is that it doesn’t matter whether you have it installed on a sprinkler valve or hose bibb. The anti-siphon valve will work the same no matter where it is hooked up. The valve consists of an open port and a disk (the poppet) that covers up the port completely.
There is a spring within that keeps the poppet separate from that port when the water is turned off. When you turn the sprinkler or faucet on, however, the water pressure pushes the poppet up against the port, sealing the valve.
When you turn the water off, the spring pulls the poppet away from the opening. This allows air to come into the valve, equalizing the pressure within the pipe.
Why Does the Anti-Siphon Valve Leak?
The good news is that there are only a few reasons why the anti-siphon valve will leak. Even better, those fixes are easily implemented. So, if you have a leaking anti-siphon valve, check out the reasons below and what to do about them.
Dirty Valve
The simplest and most likely explanation is that there is some dirt in the valve. When dirt gets into the anti-siphon valve, the poppet can’t properly seal when the water gets turned on. If the poppet can’t seal, water will leak out as a result.
Try using a q-tip to clean around the valve. If you can manage it, try using a cleaning wipe. When you are done, try the valve again. If that doesn’t work, then you may want to check out the next cause.
Worn Rubber Gasket or Poppet
The gasket or poppet, when they wear down, allows pressurized water to spray out of the valve when either the sprinkler or faucet is on. There is an important difference that is worth nothing: the valve still works.
That’s right, the anti-siphon valve can still do the job it was designed for. It allows air into the pipe and breaks that vacuum, but the issue is that it wastes water along the way. If you notice leaking, repair or replace the valve.
Some Anti-Siphon Valves Have a Built-in Repair Mechanism
Depending on the sprinkler or faucet that you have (like a frost-free faucet), you should see a plastic cap on the top, somewhere near the handle. You can pry the cap off to show a valve mechanism. Just unscrew it using a pair of adjustable pliers, removing it entirely.
When you remove the valve bonnet, the poppet should fall out. All you need to do is clean it, or if it is worn, replace it. With the valve disassembled, you should try to flush out dirt that may be inside the valve. Best of all, you don’t need to turn off the main water supply to implement this fix. That makes things even easier.
Screw-On Valves
You may have your anti-valve not on the sprinkler but on the outdoor faucet instead. In this case, you will notice the anti-siphon valve connected to the spout. These valves are very cost-effective, so if you notice a leak, just replace it.
To remove it, there is a set screw that needs to be loosened. Should the screw rust, you will have to avoid stripping it, otherwise you will have a very big issue removing that set screw. Before you attempt to take it off, you should spray it with some lubricating oil first. Give it some time and try to unscrew the valves once again.
How to Replace the Anti-Siphon Valve on Your Sprinkler
When you see a leak in your anti-siphon valve, you will likely have to replace it. That’s not a big deal; anti-siphon valves are pretty cheap. Even better, with a little bit of guidance, you can swap out the old faulty valve for a new one.
Step 1: Turn Off the Water
Make life easier on yourself by turning off the water to your sprinkler system. You can just shut off the isolation valve or cut things off at the main valve. The former is a bit easier, especially if you don’t know where your main shut-off valve is.
Step 2: Saw Off the Valve
In this step, you will have to saw off the pipe that is connected to the valve. You just need a hacksaw to get the job done. Cut off the piece that runs into the bottom of your anti-siphon valve. For the most part, these valves are attached to the first head in your sprinkler system. So, make sure that you cut off the piece that runs into that sprinkler head, too.
Step 3: Get Your Replacement
The best way to find your replacement is to take the old valve to your local home improvement store. This way, you can compare the old valve to the new one and make sure that you have the right one. If at all possible, purchase a new valve that is the exact size as the one you are replacing.
Should you be unable to find the right size, you might be able to use a PVC reducer coupler to help match the new valve up to a differently sized PVC pipe. If you aren’t sure about the different sizes, ask for in-store help for clarification.
Step 4: Begin the Installation
With your replacement in hand, you can begin the installation. The first thing that you will have to do is make up for any height that was lost in the pipe when you removed the old valve. This is because the anti-siphon valve has to be higher than the sprinkler head.
Start by attaching the coupler to the top of your sawed off piece of PVC pipe. Use primer and glue at the edges of the pipe as well as inside of the coupler. Then, you will want to cut off a short section of PVC pipe – 2 or 3 inches at most – and insert it into that coupler. Do the same thing for your sprinkler head pipe.
Step 5: Install the New Valve
When you have your couplers and new PVC pipes in place, it is time to install the anti-siphon valve. In order to do this, you will need the primer and glue mentioned in the previous step. If you run out, you will have to get more so don’t skip this step.
Press your valve fixture onto those two PVC pipe pieces that were sawed earlier. Be certain that the first pip goes into the anti-siphon valve of the fixture, with the second piece going into that first sprinkler head.
Step 6: Turn the Water Back On
When you are confident that your new valve has been properly installed, you can go ahead and turn the water back on. Test the installation to ensure that you don’t have any leaks. If you do notice a leak, then you may have to go back and repeat the installation instructions.
Is an Anti-Siphon Valve a Backflow Preventer?
You may hear the term “backflow preventer” when referring to an anti-siphon valve. This is a term that encompasses any device that prevents water from reentering the public water system. An anti-siphon valve is a more specific kind of backflow preventer.
Do You Need to Hire a Sprinkler System Contractor?
Get free, zero-commitment quotes from pro contractors near you.
What are the Other Types of Backflow Preventers?
Now that we are more familiar with anti-siphon valves, you may be curious about the other types of backflow preventers out there. Here are some of the most common out there.
Pressure Vacuum Breaker
This one is basically the same as an anti-siphon valve. The only difference is that you need just one. With anti-siphon valves, you might need up to six to cover your entire irrigation system.
Atmospheric Vacuum Breakers
These are also known as AVBs. They are a stripped down anti-siphon valve. They’re cheap to install but don’t quite hold up as well as anti-siphon valves.
Reduced Pressure Assembly
These are more for areas where contaminants are high. They are made to handle high-waste, high-hazard situations more along the lines of a commercial farm.
Related Article

Ryan Womeldorf has more than a decade of experience writing. He loves to blog about construction, plumbing, and other home topics. Ryan also loves hockey and a lifelong Buffalo sports fan.
More by Ryan Womeldorf


![12 Washing Machine Brands to Avoid [with Recall Data]](https://cdn-fastly.upgradedhome.com/media/2023/07/31/9075781/12-washing-machine-brands-to-avoid-with-recall-data.jpg?size=350x220)