Is The Roof Leaking Around A Vent Pipe? (We Have a Fix!)
Roof leaks are extremely common, particularly around vent pipes. Many components protect your vent pipes, and any of them can get damaged. Home repairs usually cause headaches, but leaks near your vent pipe are typically easy to remedy.
If your roof leaks around the vent pipe, this is probably due to a broken or damaged rubber seal, storm collar, or vent flashing. With new materials and a few tools, you can perform most of these minor repairs to solve the leaking around the vent pipe. If a leak persists after your work, it is time to call in a professional.
When it comes to leaks in the home, you must address the issue as soon as it is discovered. Leaking around the vent pipe can indicate a major problem and cause illness to the home’s inhabitants if mold develops. Continue this article to find what may be causing the leak and how you can solve the problem.
Do You Need Roofing Repair Services?
Get free, zero-commitment quotes from pro contractors near you.

What are Vent Pipes?
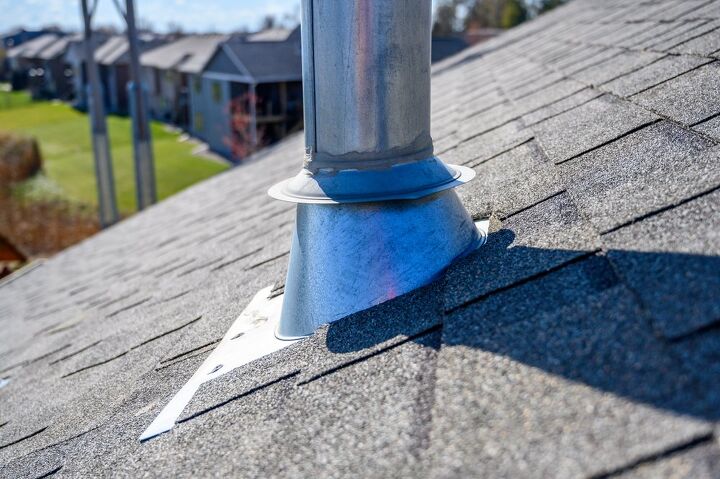
Vent pipes can be seen from the outside of your home on the roof. They’re typically a metal column that extends inches above your roof tiling. Vent pipes allow air and gas to escape from the interior in places you turn on the fan. These places include the bathroom and exhaust over your kitchen stove.
Vent pipes are made of plastic, metal, or a mix of the two materials. There are a few reasons that the components could allow water to pass through. As time goes on, weather, namely rain, deteriorates these materials making a leak likely.
Causes of Leaks Around the Vent Pipe
Because your vent pipe extends beyond the protection of your interior, many things could go wrong. Harsh weather and general wear and tear can cause your vent pipe to become ineffective and leak. Water seeping through results in the once external feature causing significant problems inside the home. A few common culprits for a leaking vent pipe, including a damaged rubber seal, collar, and vent flashing.
Rubber Seal Broken
Water can get into the home if the rubber seal becomes damaged at all. The seal’s only purpose is to create a barrier between the opening and the pipe. If it becomes cracks or breaks, water will seep in and follow the pipe into the house.
Defunct Collars
The collar, also known as a storm collar, is another defense mechanism for keeping water out. Imagine it as a shallow upside-down bowl, or mini umbrella, fitted around the pipe. Its purpose is to slow the water flow that collects during storms. It is a line of defense before water meets the rubber seal. If it is rusted or broken in any way, water may pool and damage the seal.
Vent Flashing
The vent flashing can be a metal or plastic material. It looks like a sheet of material that surrounds the pipe and lays flush with the roof. It can also break or rust, causing it to be ineffective as time goes on. You won’t notice the flashing at first glance as it is usually hidden under your roof shingles.
Problems a Leaking Roof Can Cause
If a leak is not detected until too late, the problem can grow, causing mold and severe water damage inside. Undetected in an attic, water will pool until it is so excessive it damages the main floor’s ceilings as well.
Leaks may be harder to spot if you have an attic, so it’s important to stay vigilant around your home. Once discovered, be sure to address the problem immediately. Depending on the severity, it may be a quick replacement you can do on your own.
However, if there is mold or severe water damage, it is best to contact a professional. At this point, the issue has moved beyond a leak and is best left to someone equipped to combat it effectively.
Fixes for a Leak Around Your Vent Pipe
After assessing the issue, you may need to purchase new products for replacement (vent, flashing, seal, nails, etc.). Every aspect supporting your vent pipe should be in excellent condition for the most effectiveness.
Below is a couple of step-by-step guides on how to address the most common issues. Be sure to purchase high-quality products to avoid another issue sooner than expected. If there are multiple issues discovered, refer to each how-to guide for specific assistance.
Fixing a Damaged Vent Pipe Seal
Use this process if the seal merging the external and internal aspects of the vent pipe is damaged.
Step 1: Gather Supplies- Caulking gun with lap-seal caulk
- Knife
- Use a knife to scrape away old caulk surrounding the vent pipe base. Remove all of the old and damaged caulk. Leaving any old bits may cause your new seal not to be as effective.
- Using the caulk-gun, apply the new lap-seal caulk between the vent pipe and the old rubber seal.
- Apply another layer of caulk overtop the first layer and the old rubber seal.
- Slide the new rubber seal over the vent pipe and lower it to the opening of the roof
- Push down until it is flush with the opening of the roof to create a secondary seal.
Fixing Damaged Vent Pipe Flashing
Use this process if, upon inspection, the flashing is visibly damaged, such as rusting or cracked.
Note you may need to remove shingles before determining that flashing is the root issue
Step 1: Gather Tools
- Putty knife
- Flat bar or pry bar
- Caulk gun
- New flashing
Step 2: Secure a Ladder and Climb to the Roof
Step 3: Pry up Shingles Surrounding Vent Pipe
- The flashing typically expands under multiple shingles. Remove all shingles that cover the flashing. Careful, don’t break any, or you will have an extra step to work on! If an accident happens, check out how to replace a roof shingle.
- You’ll want to loosen them first, then get under them with a flat bar to remove the nails. Start at the top angle of the home and work down the slope for removing shingles.
- Use a putty knife to break the adhesive seal gently. Lift the tile slightly.
- Use a bar to lift the nail head, freeing the shingle
Step 4: Remove Flashing
- Use the flat bar to go under the flashing and lift the nails, freeing the flashing
- Pull the flashing up and over the vent pipe to remove it
Step 5: Place New Flashing
- Slide new flashing over the pipe
- Fit it so that the pipe is directly in the center of the hole if necessary
- After fitting, lift the flashing and put caulking on the top and sides, but not bottom
- Hammer in multiple (3) one and a quarter inch nails on each side to secure new flashing.
Step 6: Replace Shingles
Replacing Ineffective Storm Collar
Replacing the collar is one of the most straightforward fixes for your leaky roof. If you notice it is missing, damaged, or ineffective, it is best to replace it. Since it is on the exterior of the vent pipe, it should be easy to diagnose and replace.
Step 1: Gather Supplies
- New collar
- Knife
Step 2: Secure a Ladder and Climb onto the Roof
Step 3: Remove Old Collar
- Tug the old collar up, sliding it off of the pipe
- If sticking, carefully run a knife in the space between the collar and the pipe to free any debris.
Step 4: Place the New Collar
- Slide the new collar over the pipe
Related Questions
How Much Does a Leaking Vent Pipe Cost to Repair?
Luckily, the roof vent pipe is not a very costly repair. It can cost anywhere between $50-400. The materials needed are relatively inexpensive. The final cost depends on if you do it yourself or hire a professional.
What if I See Debris Around My Vent Pipe – Should I be Concerned?
Debris collecting around your vent pipe is not a significant concern. However, it can lead to complications down the line. Whether from a storm or just general wear and tear, it is best to remove debris as soon as possible. Otherwise, the collected debris may cause a clog if it has not already.
Is a Leak Around the Vent Pipe a “Normal” Problem?
Yes, leaking vent pipes are extremely common. With its constant exposure to the elements, there is a chance of complications. If you notice a leak, don’t panic! It is usually a low-threat problem that the homeowner can treat.
Do You Need Roofing Repair Services?
Get free, zero-commitment quotes from pro contractors near you.
Conclusion
Vent pipes play an important role in your home’s functionality. With all of its components, it’s easy for a leak to develop as time goes on and materials wear out. Using this guide, you can diagnose and combat the issue before it develops into something more severe. If you discover mold or water damage at any point, it is best to call a professional to address the problem safely.
Related Guide

We are a team of passionate homeowners, home improvement pros, and DIY enthusiasts who enjoy sharing home improvement, housekeeping, decorating, and more with other homeowners! Whether you're looking for a step-by-step guide on fixing an appliance or the cost of installing a fence, we've here to help.
More by Upgraded Home Team