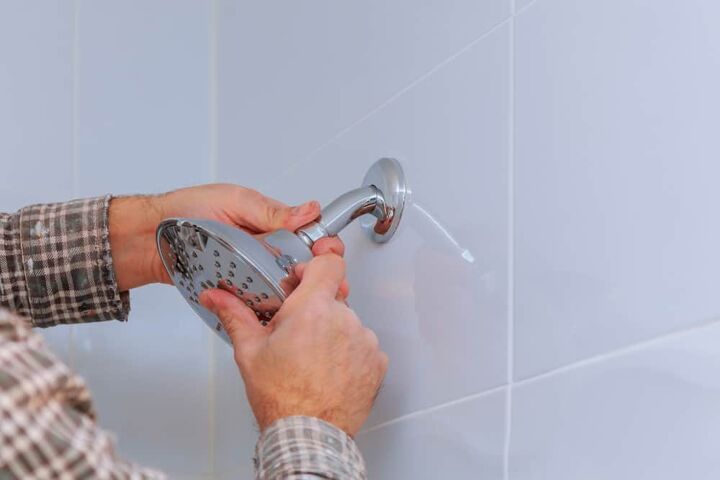
How To Remove A Stuck Showerhead (9 Easy Steps!)

You come home at the end of a long, tough day, looking forward to taking a hot shower. You climb in and find out that your shower has either stopped distributing water completely or with the painstakingly low-pressured flow.
If that’s the case, you should consider replacing the head of your shower; however, it won’t come off easily. That’s because, over the years, the head of your shower has obtained hard-water mineral deposits or rusts that causes it to get stuck.
To remove a stuck showerhead, begin by turning off the water supply. Next, apply a spray lubricant onto the showerhead to dissolve the mineral build-up which is making the shower head stuck. Remove with pliers. If the showerhead is still stuck, soak the head’s connector with a bag of vinegar overnight. Once removed, wipe down with vinegar.
The removal and installation process is simple, but if done incorrectly, it becomes time-consuming and requires a lot of energy as well. That’s not all; it can also damage the head of your shower and causes water leakage. Therefore, it needs to be done properly.
If you want an in-depth guide to removing the stuck showerhead, cleaning it, and putting on a new one, read ahead.
Do You Need a Faucet, Fixture, or Pipe Repair or Replacement?
Get free, zero-commitment quotes from pro contractors near you.

Equipment You’ll Need
To get going, you’ll need a couple of essential tools that most stuck shower heads require:
- Showerhead (brand new)
- Teflon tape (or some other plumper’s tape)
- Pliers or a Wrench
You might need a few additional things, but we will cover it in the showerhead removal section of this article.
You’ve got the necessary equipment; now let’s get to removing that showerhead:
How To Remove Stuck Shower Head
Step 1: Get the Right Tools
There are a few things that you should have with you to get a stubborn shower head loose. What you need depends on the severity of the issue, so one thing may work better than others for you. Just have a few different options available in case one doesn’t work.
It is a good idea to have spray lubricant, some distilled white vinegar, a strap wrench, some rubber bands, a pipe wrench, and a Ziploc bag. Also, have a couple of towels ready to go as there can sometimes be a mess.
Step 2: Prepare the Area
With your tools in hand, it is important to prepare the area for work. The first and perhaps most important step is to turn the water off. You are asking for a huge mess if you don’t turn the water off beforehand.
It is also a good idea to lay some towels down. Not only will it keep any residual moisture from getting on your floors, but it can help make for an easier cleanup. A little preparation will go a long way towards making the entire process all the easier.
Step 3: Prepare Your Tools (Optional)
Having the right tools generally means the job will go more smoothly. But not all of us have the right tools on hand at all times. Thankfully, there are alternatives that can work out just as well as the original with a little preparation.
- Wrap your pliers. If you are using standard pliers, that is okay. You just want to make sure that you wrap up the teeth using some plumber’s tape. You can even wrap the bolts or nuts up in some cloth before allowing the teeth to clamp down. The purpose here is to keep the pliers from scratching or damaging the metal of the showerhead. If you are tossing the old head, make sure to wrap the pliers so that you don’t create any metal shavings.
- Remove old plumber’s tape. Plumber’s tape can be an extremely helpful tool to have and creates a barrier that keeps water from leaking through your fixture. When it comes time to remove the old fixture, however, it can create a real pain in the butt. Make sure that you remove the old plumber’s tape before you start to work on removing the old fixture. Sometimes it can be as simple as removing the old tape that helps get the fixture unstuck.
Step 4: Visual Inspection
If your shower head is stuck and won’t move, don’t just start torquing on it. A quick visual inspection can be the key to getting the job done and can save you a ton of hassle in the meantime. Take a look for any potential signs of calcium or rust buildup near or around the connection that can make things more difficult.
Should you notice a copper or orange-colored ring at or near the connector, rust is the likely issue. Mineral buildup, meanwhile, will have a white ring. Depending on the water hardness in your area, mineral buildup can be a frequent issue that requires regular care to prevent.
Step 5: Use a Spray Lubricant
Rust and mineral buildup are the most likely reasons that the showerhead will not turn as it is meant to. That means getting rid of the buildup. There are two ways that you can help the issue, one of which we will get to further on.
The first is to use a spray lubricant of some kind. A buildup of rust in particular, especially around the threads, can lead to the showerhead sticking and failing to move. Spray the lubricant on and give it about 10 minutes to work. Try turning the showerhead again. If it doesn’t work, you can try lubricant again or you can move on to one of the other methods on the list.
Step 6: Use a Strap Wrench
When it comes to a stuck shower head, sometimes all you need is a little extra force. The strap wrench is meant to give you a greater grip so that you can turn it far more easily. Wrap the strap around the base of the showerhead and make sure that it is nice and tight.
With the strap wrench secured, try turning the showerhead counterclockwise. If it starts to move, you can continue to try removing it. If it is stuck, though, you might want to try something else. Simply torquing on the showerhead can result in the fixture breaking or even potentially lead to injury.
Step 7: Use a Pipe Wrench
Sometimes it simply is a matter of getting a good enough grip on the showerhead to get it off. Depending on the age of the showerhead, the buildup of rust or minerals, and the condition of the threads, any number of methods could be needed.
Pipe wrenches. The purpose of using a pipe wrench is to give yourself a greater grip on the fixture. As mentioned above, it is ideal if you wrap the teeth of the pipe wrench in some plumber’s tape. This will prevent damage to the showerhead. Even if you are throwing out the showerhead, it will save you the hassle of having to clean up metal strips or chunks created by the force of the pipe wrench.
Step 8: Use Vinegar
If you don’t have distilled white vinegar in your home at this point, you absolutely should get some. White vinegar is such a versatile household cleaner that you will no doubt wind up using it at some point in time.
As mentioned previously, there can sometimes be a buildup of rust or hard water minerals around the threads of your shower head. Removing those factors is typically the fastest way to remove the showerhead.
Dissolve the rust or minerals. The best way to get rid of the rust or mineral buildup is to use distilled white vinegar. If the lubricant isn’t working, you will need to break down that buildup before you can move the showerhead.
Using a Ziploc bag, pour in some vinegar and then wrap it around the showerhead using some rubber bands. Make sure that the showerhead is covered up well past the threads to ensure that all of the rust or mineral buildup is accounted for.
Soak overnight. Let the vinegar do its thing; overnight is generally the best idea. After letting the fixture soak, take the bag off and see if you can turn the showerhead. More often than not, the vinegar should be enough to do the trick.
Step 9: Use WD-40
Though technically this could be classified as a spray lubricant, WD-40 is generally so much more than that. Having a can of WD-40 handy will likely help you out in one of several different scenarios, including getting your showerhead unstuck.
The WD-40 can work to lubricate difficult connectors, making it easier for you to turn with your strap wrench. WD-40 can also work as a tough stain remover depending on the situation, so make sure that you have a can ready to go at all times.
How Do I Remove a Glued Showerhead?
If you have moved into a home and want to swap out the fixtures, you may have the misfortune of finding out that the old owner glued the showerhead directly to the pipe. In this situation, getting the showerhead off can be much more difficult. Thankfully, you can follow these steps to get the job done.
- Use a solution. Dissolving the glue is the first thing that needs to be done. Remember that white vinegar? Combine it with a little bit of lemon juice (highly acidic) to form a potent mixture that should dissolve the glue.
- Secure it in a plastic bag. Take that solution and add it together into a plastic bag. Using rubber bands (as mentioned in the distilled white vinegar step), tie the bag holding the solution around the showerhead and the pipe. Make sure that the glue is completely submerged.
- Extra secure. It may also be a good idea to use duct tape or plumber’s tape to keep the bag from leaking. Use best judgment as you secure the bag to the showerhead.
- Let it soak. You won’t need to let this one sit overnight; sometimes as little as 30 minutes can get the job done. Let it soak for a bit and check to see if you can remove the showerhead. Repeat as necessary until you are able to get the head off.
Wipe Your Shower Head Before Re-Attaching
In case you want to re-attach the same shower head that got stuck, make sure to deep clean it first. Here’s how you can do it:
Step 1: Rinse Your Shower Head With Vinegar
After you remove it, clean it thoroughly to remove all remaining mineral buildup or rust.
The cleaning process is very easy to do. Just grab the showerhead and put it into the basin. Then, spill a few drops of the distilled vinegar in it and leave it there for a night. This way, it’ll get soaked perfectly.
The next morning, grab your shower head from the basin and rinse it with tap water.
Step 2: Use The Wire Brush To Clean Remaining Rust
Mostly, after a good vinegar bath, the head of the shower shows no buildup or rust signs. However, if you still find some, just apply the removal chemical again – like you’ve done earlier – on your shower’s head.
Fifteen minutes later, grab your wire brush and remove the chemical product from it.
Note: Never forget to read the manual before getting your hands on the chemicals.
Do You Need a Faucet, Fixture, or Pipe Repair or Replacement?
Get free, zero-commitment quotes from pro contractors near you.
Related Questions
What Features Should I Go For When Purchasing A Shower Head?
Here’re a few features you should consider when purchasing your ideal shower head:Size: Almost all showerheads lie in the 8 to 10-inch range. However, many people consider a big showerhead far better than small ones because they’re relaxing. But this is a half-truth; the head size also considerably relies upon the general area of the shower and bathtub’s width.Quality: Different shower heads have different qualities based on models and brands. However, purchasing a high-priced model doesn’t necessarily mean it’ll be good for you.Therefore, please go through some of the reviews beforehand.Arm fit: You can install a shower head either on your ceiling or the wall. Before you go out and search for one, look for where you want to mount it.
Which Material Is Best For My Shower Head?
Brass is one of the best materials for your showerhead, mainly because it’s durable and used almost in all premium showerheads. With brass, you can resist corrosion, buildup, and rust; it’s your trouble-free material that needs replacing once in a while only.
Can I Unclog The Head Of My Shower Without Using Distilled Vinegar?
Yes, you can. You can use coca-cola instead of the distilled vinegar. Take a plastic bag and fill it with coke. Soak the head into it and wait for almost 15 minutes. After that, take it out and scrub it.
Ian Haynes is a digital marketing specialist and has successfully written hundreds of home improvement guides. Outside of his work, Ian likes fixing old bikes and exploring Brooklyn with his Labrador.
More by Ian Haynes